
 TRAE-AI编程


OpenAI 检索
Retrieval API(检索API)可对自己的数据执行语义搜索:即使共享关键词很少甚至没有,也能找出含义相近的内容。检索可独立使用,与模型结合生成有依据的回答时尤其有用。
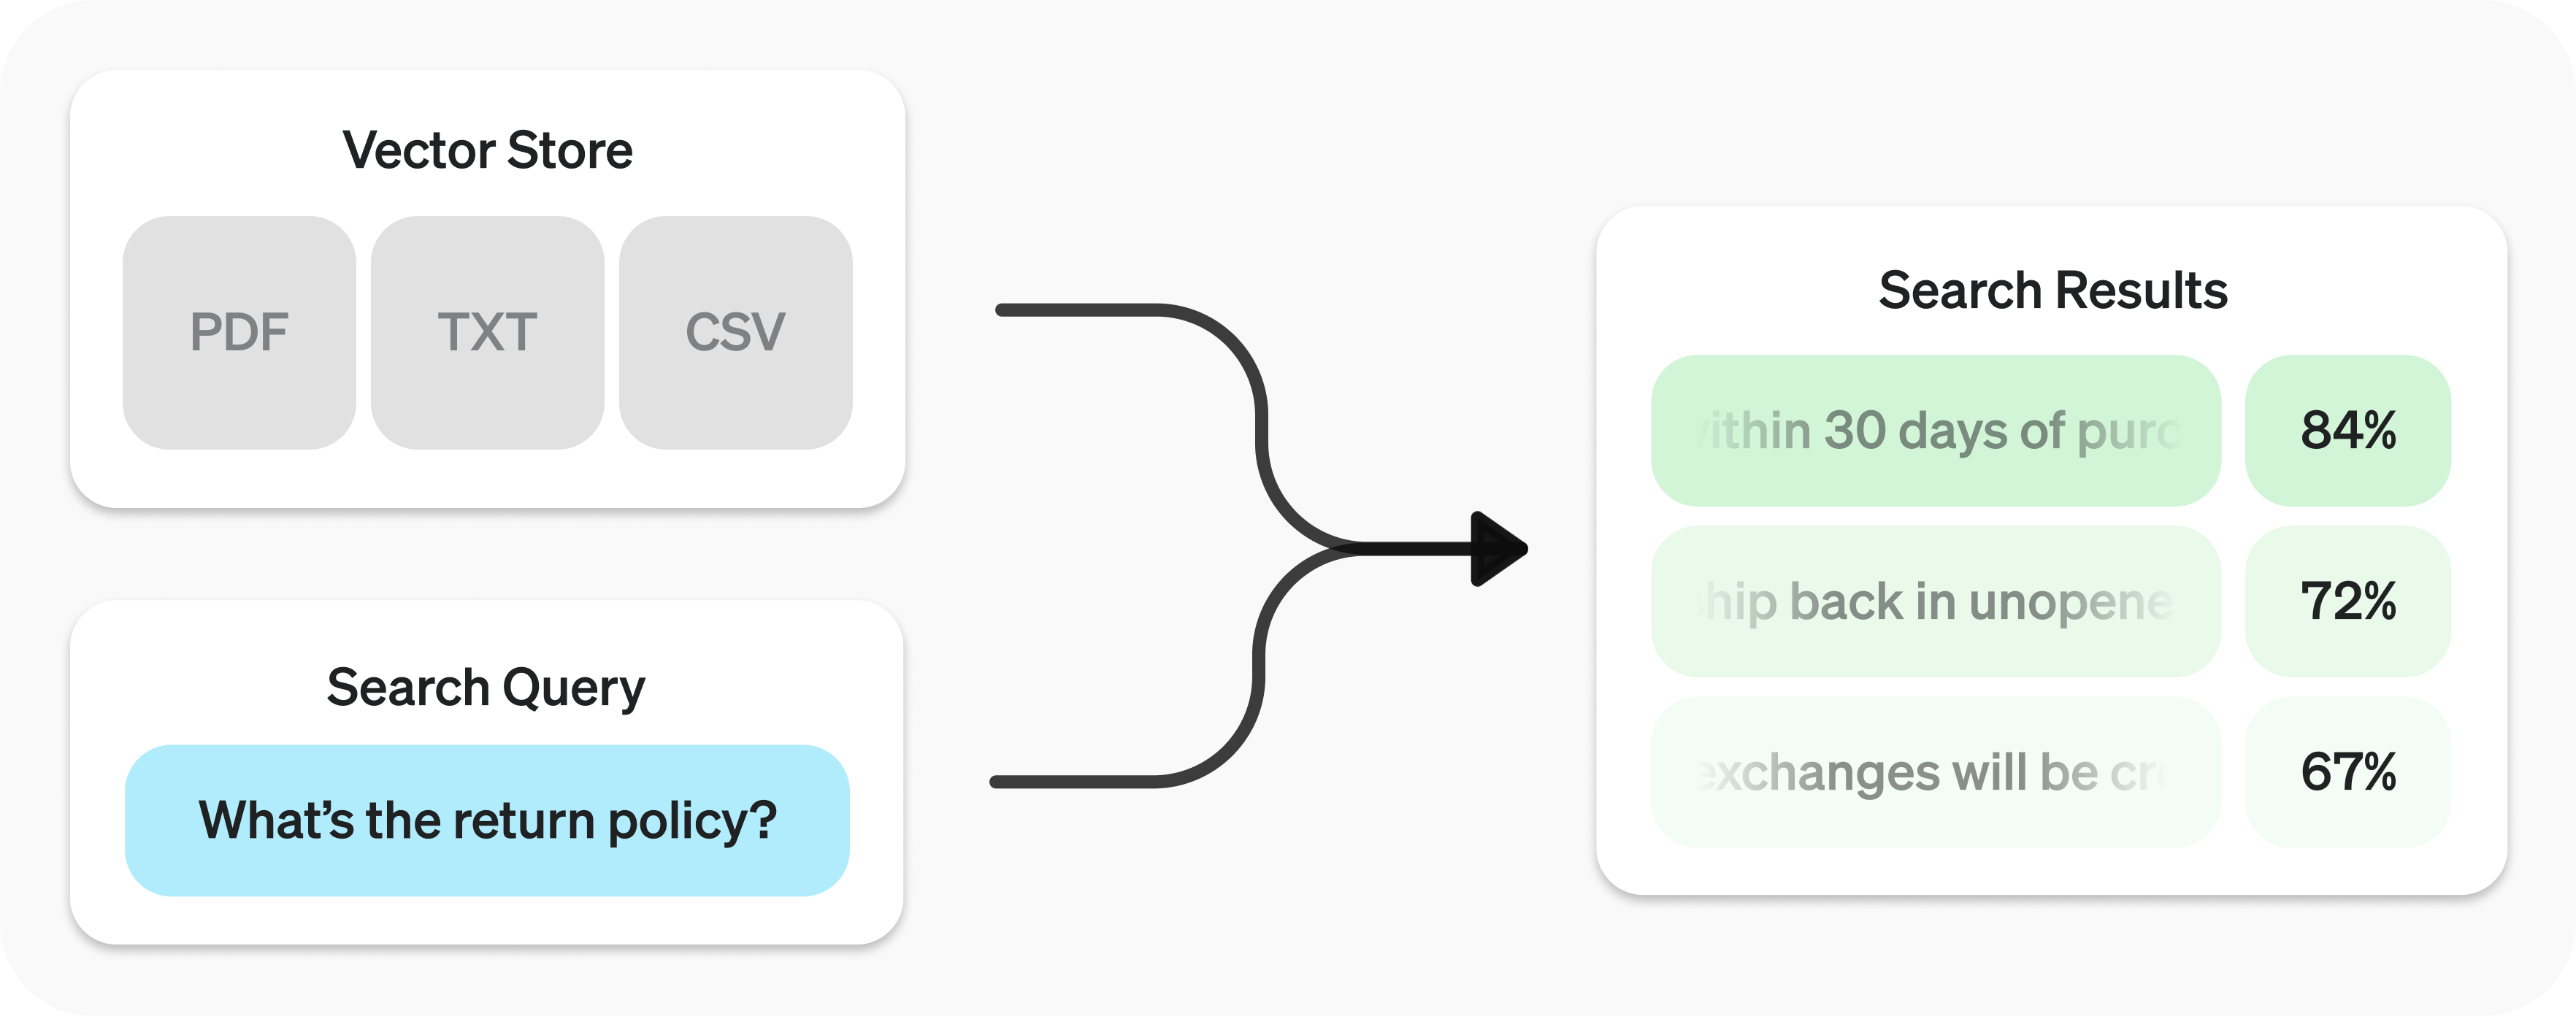
API以向量库作为数据索引。以下介绍搜索操作及向量库细节。
快速开始
第一步:创建向量库并上传文件。
来源示例 1(javascript):
// [中文] 创建向量库并上传customer_policies.txt,轮询到处理完成。
import OpenAI from "openai";
const client = new OpenAI();

const vector_store = await client.vectorStores.create({
  // Create vector store
  name: "Support FAQ",
});

await client.vectorStores.files.uploadAndPoll(
  vector_store.id,
  // Upload file
  fs.createReadStream("customer_policies.txt")
);
来源示例 2(python):
## [中文] 创建向量库并上传customer_policies.txt,轮询到处理完成。
from openai import OpenAI

client = OpenAI()

vector_store = client.vector_stores.create(        # Create vector store
    name="Support FAQ",
)

client.vector_stores.files.upload_and_poll(        # Upload file
    vector_store_id=vector_store.id,
    file=open("customer_policies.txt", "rb")
)
来源示例 3(go):
// [中文] 创建向量库并上传customer_policies.txt,轮询到处理完成。
package main

import (
    "context"
    "fmt"
    "os"

    "github.com/openai/openai-go/v3"
)

func main() {
    client := openai.NewClient()
    vectorStore, err := client.VectorStores.New(context.Background(), openai.VectorStoreNewParams{Name: openai.String("Support FAQ")})
    if err != nil {
        panic(err)
    }
    file, err := os.Open("customer_policies.txt")
    if err != nil {
        panic(err)
    }
    defer file.Close()
    _, err = client.VectorStores.Files.UploadAndPoll(context.Background(), vectorStore.ID, openai.FileNewParams{
        File:    openai.File(file, "customer_policies.txt", "text/plain"),
        Purpose: openai.FilePurposeAssistants,
    }, 1000)
    if err != nil {
        panic(err)
    }
    fmt.Println(vectorStore.ID)
}
来源示例 4(java):
// [中文] 创建向量库并上传customer_policies.txt,轮询到处理完成。
import com.openai.client.OpenAIClient;
import com.openai.client.okhttp.OpenAIOkHttpClient;
import com.openai.models.files.FileCreateParams;
import com.openai.models.files.FilePurpose;
import com.openai.models.vectorstores.VectorStoreCreateParams;
import com.openai.models.vectorstores.files.FileRetrieveParams;
import com.openai.models.vectorstores.files.VectorStoreFile;
import java.nio.file.Path;

var store =
    client.vectorStores().create(VectorStoreCreateParams.builder().name("Support FAQ").build());
var uploaded =
    client
        .files()
        .create(
            FileCreateParams.builder()
                .file(Path.of(System.getenv("OPENAI_EXAMPLE_FILE_PATH")))
                .purpose(FilePurpose.ASSISTANTS)
                .build());
var file =
    client
        .vectorStores()
        .files()
        .create(
            store.id(),
            com.openai.models.vectorstores.files.FileCreateParams.builder()
                .fileId(uploaded.id())
                .build());
while (file.status().equals(VectorStoreFile.Status.IN_PROGRESS)) {
  Thread.sleep(1000);
  file =
      client
          .vectorStores()
          .files()
          .retrieve(file.id(), FileRetrieveParams.builder().vectorStoreId(store.id()).build());
}
System.out.println(store.id());
来源示例 5(ruby):
## [中文] 创建向量库并上传customer_policies.txt,轮询到处理完成。
require "openai"
require "pathname"

client = OpenAI::Client.new
store = client.vector_stores.create(name: "Support FAQ")
file = client.vector_stores.files.upload_and_poll(
  store.id,
  file: Pathname("customer_policies.txt"),
  timeout: 600
)
raise "File ingestion ended with status: #{file.status}" unless file.status == OpenAI::VectorStores::VectorStoreFile::Status::COMPLETED

puts(store.id)
第二步:发送查询,取得相关结果。
来源示例 6(javascript):
// [中文] 搜索退货政策;示例须已有client及vector_store。
const userQuery = "What is the return policy?";

const results = await client.vectorStores.search(vector_store.id, {
  query: userQuery,
});
来源示例 7(python):
## [中文] 搜索退货政策;示例须已有client及vector_store。
user_query = "What is the return policy?"

results = client.vector_stores.search(
    vector_store_id=vector_store.id,
    query=user_query,
)
来源示例 8(go):
// [中文] 搜索退货政策;示例须已有client及vector_store。
package main

import (
    "context"
    "fmt"

    "github.com/openai/openai-go/v3"
)

func main() {
    client := openai.NewClient()
    results, err := client.VectorStores.Search(context.Background(), "vs_123", openai.VectorStoreSearchParams{
        Query: openai.VectorStoreSearchParamsQueryUnion{OfString: openai.String("What is the return policy?")},
    })
    if err != nil {
        panic(err)
    }
    fmt.Println(results.Data)
}
来源示例 9(java):
// [中文] 搜索退货政策;示例须已有client及vector_store。
import com.openai.client.OpenAIClient;
import com.openai.client.okhttp.OpenAIOkHttpClient;
import com.openai.models.vectorstores.VectorStoreSearchParams;

String vectorStoreId = "vs_123";

var results =
    client
        .vectorStores()
        .search(
            vectorStoreId,
            VectorStoreSearchParams.builder().query("What is the return policy?").build());

System.out.println(results.data());
来源示例 10(ruby):
## [中文] 搜索退货政策;示例须已有client及vector_store。
require "openai"

client = OpenAI::Client.new
results = client.vector_stores.search("vs_123", query: "What is the return policy?")
puts(results.data&.first&.content)
如何结合模型使用结果,参见生成回答。
语义搜索
语义搜索使用向量嵌入找出含义相关的内容,包括传统关键词搜索可能遗漏的结果。例如查询When did we go to the moon?(我们何时登上月球?):
| 原文内容及含义 | 关键词相似度 | 语义相似度 |
|---|---|---|
| The first lunar landing occurred in July of 1969.(首次登月发生于1969年7月) | 0% | 65% |
| The first man on the moon was Neil Armstrong.(首位登月者是尼尔·阿姆斯特朗) | 27% | 43% |
| When I ate the moon cake, it was delicious.(我吃的月饼很好吃) | 40% | 28% |
以上分数针对英文原句:关键词相似度使用Jaccard交并比,语义相似度使用text-embedding-3-small和余弦相似度。最相关的结果并不包含查询原词,这使语义搜索适合各种规模的知识库。
执行语义搜索
对向量库调用search,以自然语言指定query。返回列表包含相关片段、相似度分数和来源文件。
来源示例 11(javascript):
// [中文] 搜索每位乘客可携带多少土拨鼠;演示自然语言query。
const results = await client.vectorStores.search(vector_store.id, {
  query: "How many woodchucks are allowed per passenger?",
});
来源示例 12(python):
## [中文] 搜索每位乘客可携带多少土拨鼠;演示自然语言query。
results = client.vector_stores.search(
    vector_store_id=vector_store.id,
    query="How many woodchucks are allowed per passenger?",
)
来源示例 13(go):
// [中文] 搜索每位乘客可携带多少土拨鼠;演示自然语言query。
package main

import (
    "context"
    "fmt"

    "github.com/openai/openai-go/v3"
)

func main() {
    client := openai.NewClient()
    results, err := client.VectorStores.Search(context.Background(), "vs_123", openai.VectorStoreSearchParams{
        Query: openai.VectorStoreSearchParamsQueryUnion{OfString: openai.String("How many woodchucks are allowed per passenger?")},
    })
    if err != nil {
        panic(err)
    }
    fmt.Println(results.Data)
}
来源示例 14(java):
// [中文] 搜索每位乘客可携带多少土拨鼠;演示自然语言query。
import com.openai.client.OpenAIClient;
import com.openai.client.okhttp.OpenAIOkHttpClient;
import com.openai.models.vectorstores.VectorStoreSearchParams;

String vectorStoreId = "vs_123";

var results =
    client
        .vectorStores()
        .search(
            vectorStoreId,
            VectorStoreSearchParams.builder()
                .query("How many woodchucks are allowed per passenger?")
                .build());

System.out.println(results.data());
来源示例 15(ruby):
## [中文] 搜索每位乘客可携带多少土拨鼠;演示自然语言query。
require "openai"

client = OpenAI::Client.new
results = client.vector_stores.search(
  "vs_123",
  query: "How many woodchucks are allowed per passenger?"
)
puts(results.data&.first&.content)
来源示例 16(json):
{
  "object": "vector_store.search_results.page",
  "search_query": "How many woodchucks are allowed per passenger?",
  "data": [
    {
      "file_id": "file-12345",
      "filename": "woodchuck_policy.txt",
      "score": 0.85,
      "attributes": {
        "region": "North America",
        "author": "Wildlife Department"
      },
      "content": [
        {
          "type": "text",
          "text": "According to the latest regulations, each passenger is allowed to carry up to two woodchucks."
        },
        {
          "type": "text",
          "text": "Ensure that the woodchucks are properly contained during transport."
        }
      ]
    },
    {
      "file_id": "file-67890",
      "filename": "transport_guidelines.txt",
      "score": 0.75,
      "attributes": {
        "region": "North America",
        "author": "Transport Authority"
      },
      "content": [
        {
          "type": "text",
          "text": "Passengers must adhere to the guidelines set forth by the Transport Authority regarding the transport of woodchucks."
        }
      ]
    }
  ],
  "has_more": false,
  "next_page": null
}
默认最多返回10条结果,可用max_num_results提高至50条。
查询改写
某些查询形式效果更好。执行search时设置rewrite_query=true可自动改写,改写结果见search_query。
| 原查询含义 | 改写后的英文查询 |
|---|---|
| 我想知道总部办公楼的高度 | primary office building height |
| 危险品运输有哪些安全规定? | safety regulations for hazardous materials |
| 怎样对服务问题提出投诉? | service complaint filing process |
属性过滤
通过filters指定并组合条件,在搜索前按文件属性缩小范围,例如限定日期。比较过滤器将文件attributes中特定key与value比较;复合过滤器用and或or组合多个条件。
比较过滤器:
来源示例 17(json):
格式说明:本块保留来源的模式或片段写法,不是可直接解析的完整严格JSON;代码内容保持原样。
{
  "type": "eq" | "ne" | "gt" | "gte" | "lt" | "lte" | "in" | "nin",  // comparison operators
  "key": "attributes_key",                           // attributes key
  "value": "target_value"                             // value to compare against
}
复合过滤器:
来源示例 18(json):
格式说明:本块保留来源的模式或片段写法,不是可直接解析的完整严格JSON;代码内容保持原样。
{
  "type": "and" | "or",                                // logical operators
  "filters": [...]
}
文件名示例匹配的是自定义filename属性,必须显式设置在每个向量库文件上,如{"filename": "example.txt"};它不会自动匹配上传文件名称。
按地区过滤:
来源示例 19(json):
{
  "type": "eq",
  "key": "region",
  "value": "us"
}
按日期范围过滤:
来源示例 20(json):
格式说明:本块保留来源的模式或片段写法,不是可直接解析的完整严格JSON;代码内容保持原样。
{
  "type": "and",
  "filters": [
    {
      "type": "gte",
      "key": "date",
      "value": 1704067200  // unix timestamp for 2024-01-01
    },
    {
      "type": "lte",
      "key": "date",
      "value": 1710892800  // unix timestamp for 2024-03-20
    }
  ]
}
匹配一组文件名:
来源示例 21(json):
{
  "type": "in",
  "key": "filename",
  "value": ["example.txt", "example2.txt"]
}
按文件名排除草稿:
来源示例 22(json):
{
  "type": "nin",
  "key": "filename",
  "value": ["draft.txt", "internal_notes.md"]
}
组合条件筛选具有指定英文名称的绝密项目:
来源示例 23(json):
{
  "type": "or",
  "filters": [
    {
      "type": "and",
      "filters": [
        {
          "type": "or",
          "filters": [
            {
              "type": "eq",
              "key": "project_code",
              "value": "X123"
            },
            {
              "type": "eq",
              "key": "project_code",
              "value": "X999"
            }
          ]
        },
        {
          "type": "eq",
          "key": "confidentiality",
          "value": "top_secret"
        }
      ]
    },
    {
      "type": "eq",
      "key": "language",
      "value": "en"
    }
  ]
}
排序
结果相关性不足时,调整ranking_options。可选择auto或default-2024-08-21等ranker,并将score_threshold设为0.0至1.0。阈值越高,片段通常越相关,也可能漏掉有用结果。
提供ranking_options.hybrid_search时,还可调整hybrid_search.embedding_weight(rrf_embedding_weight)和hybrid_search.text_weight(rrf_text_weight),控制倒数排名融合如何平衡嵌入语义匹配与稀疏关键词匹配。前者越大越强调语义,后者越大越强调文本重叠;至少一个权重必须大于0。
向量库
向量库为Retrieval API和文件搜索工具提供搜索容器。文件加入时会自动分块、生成嵌入并建立索引。
| 对象 | 说明 |
|---|---|
file |
通过Files API上传的内容,可用于向量库、微调等用途 |
vector_store |
可搜索文件的容器 |
vector_store.file |
已分块、嵌入并关联到向量库的文件包装对象;含用于过滤的attributes |
价格
按全部向量库中解析片段及其嵌入占用的总存储计费:前1GB免费,超过部分每天每GB为0.10美元。可使用过期策略减少费用。
向量库操作
创建:
来源示例 24(javascript):
// [中文] 创建名为Support FAQ(支持常见问题)的向量库并关联文件。
await client.vectorStores.create({
  name: "Support FAQ",
  file_ids: ["file_123"],
});
来源示例 25(python):
## [中文] 创建名为Support FAQ(支持常见问题)的向量库并关联文件。
client.vector_stores.create(
    name="Support FAQ",
    file_ids=["file_123"]
)
来源示例 26(go):
// [中文] 创建名为Support FAQ(支持常见问题)的向量库并关联文件。
package main

import (
    "context"
    "fmt"

    "github.com/openai/openai-go/v3"
)

func main() {
    client := openai.NewClient()
    vectorStore, err := client.VectorStores.New(context.Background(), openai.VectorStoreNewParams{
        Name:    openai.String("Support FAQ"),
        FileIDs: []string{"file_123"},
    })
    if err != nil {
        panic(err)
    }
    fmt.Println(vectorStore.ID)
}
来源示例 27(java):
// [中文] 创建名为Support FAQ(支持常见问题)的向量库并关联文件。
import com.openai.client.OpenAIClient;
import com.openai.client.okhttp.OpenAIOkHttpClient;
import com.openai.models.vectorstores.VectorStoreCreateParams;

String fileId = "file_123";

var store =
    client
        .vectorStores()
        .create(
            VectorStoreCreateParams.builder().name("Support FAQ").addFileId(fileId).build());

System.out.println(store.id());
来源示例 28(ruby):
## [中文] 创建名为Support FAQ(支持常见问题)的向量库并关联文件。
require "openai"

client = OpenAI::Client.new
store = client.vector_stores.create(
  name: "Support FAQ",
  file_ids: ["file_123"]
)
puts(store.id)
读取:
来源示例 29(javascript):
// [中文] 读取指定向量库信息。
await client.vectorStores.retrieve("vs_123");
来源示例 30(python):
## [中文] 读取指定向量库信息。
client.vector_stores.retrieve(
    vector_store_id="vs_123"
)
来源示例 31(go):
// [中文] 读取指定向量库信息。
package main

import (
    "context"
    "fmt"

    "github.com/openai/openai-go/v3"
)

func main() {
    client := openai.NewClient()
    vectorStore, err := client.VectorStores.Get(context.Background(), "vs_123")
    if err != nil {
        panic(err)
    }
    fmt.Println(vectorStore.ID)
}
来源示例 32(java):
// [中文] 读取指定向量库信息。
import com.openai.client.OpenAIClient;
import com.openai.client.okhttp.OpenAIOkHttpClient;

String vectorStoreId = "vs_123";

System.out.println(client.vectorStores().retrieve(vectorStoreId).id());
来源示例 33(ruby):
## [中文] 读取指定向量库信息。
require "openai"

client = OpenAI::Client.new
store = client.vector_stores.retrieve("vs_123")
puts(store.id)
更新:
来源示例 34(javascript):
// [中文] 更新向量库名称为Support FAQ Updated。
await client.vectorStores.update("vs_123", {
  name: "Support FAQ Updated",
});
来源示例 35(python):
## [中文] 更新向量库名称为Support FAQ Updated。
client.vector_stores.update(
    vector_store_id="vs_123",
    name="Support FAQ Updated"
)
来源示例 36(go):
// [中文] 更新向量库名称为Support FAQ Updated。
package main

import (
    "context"
    "fmt"

    "github.com/openai/openai-go/v3"
)

func main() {
    client := openai.NewClient()
    vectorStore, err := client.VectorStores.Update(context.Background(), "vs_123", openai.VectorStoreUpdateParams{
        Name: openai.String("Support FAQ Updated"),
    })
    if err != nil {
        panic(err)
    }
    fmt.Println(vectorStore.Name)
}
来源示例 37(java):
// [中文] 更新向量库名称为Support FAQ Updated。
import com.openai.client.OpenAIClient;
import com.openai.client.okhttp.OpenAIOkHttpClient;
import com.openai.models.vectorstores.VectorStoreUpdateParams;

String vectorStoreId = "vs_123";

var store =
    client
        .vectorStores()
        .update(
            vectorStoreId,
            VectorStoreUpdateParams.builder().name("Updated knowledge base").build());

System.out.println(store.name());
来源示例 38(ruby):
## [中文] 更新向量库名称为Support FAQ Updated。
require "openai"

client = OpenAI::Client.new
store = client.vector_stores.update("vs_123", name: "Updated knowledge base")
puts(store.name)
删除:
来源示例 39(javascript):
// [中文] 删除指定向量库;这是有副作用的来源示例,本轮未执行。
await client.vectorStores.delete("vs_123");
来源示例 40(python):
## [中文] 删除指定向量库;这是有副作用的来源示例,本轮未执行。
client.vector_stores.delete(
    vector_store_id="vs_123"
)
来源示例 41(go):
// [中文] 删除指定向量库;这是有副作用的来源示例,本轮未执行。
package main

import (
    "context"
    "fmt"

    "github.com/openai/openai-go/v3"
)

func main() {
    client := openai.NewClient()
    deleted, err := client.VectorStores.Delete(context.Background(), "vs_123")
    if err != nil {
        panic(err)
    }
    fmt.Println(deleted.Deleted)
}
来源示例 42(java):
// [中文] 删除指定向量库;这是有副作用的来源示例,本轮未执行。
import com.openai.client.OpenAIClient;
import com.openai.client.okhttp.OpenAIOkHttpClient;

String vectorStoreId = "vs_123";

System.out.println(client.vectorStores().delete(vectorStoreId).deleted());
来源示例 43(ruby):
## [中文] 删除指定向量库;这是有副作用的来源示例,本轮未执行。
require "openai"

client = OpenAI::Client.new
deleted = client.vector_stores.delete("vs_123")
puts(deleted.deleted)
列举:
来源示例 44(javascript):
// [中文] 列举向量库。
await client.vectorStores.list();
来源示例 45(python):
## [中文] 列举向量库。
client.vector_stores.list()
来源示例 46(go):
// [中文] 列举向量库。
package main

import (
    "context"
    "fmt"

    "github.com/openai/openai-go/v3"
)

func main() {
    client := openai.NewClient()
    vectorStores, err := client.VectorStores.List(context.Background(), openai.VectorStoreListParams{})
    if err != nil {
        panic(err)
    }
    fmt.Println(vectorStores.Data)
}
来源示例 47(java):
// [中文] 列举向量库。
import com.openai.client.OpenAIClient;
import com.openai.client.okhttp.OpenAIOkHttpClient;

System.out.println(client.vectorStores().list().data());
来源示例 48(ruby):
## [中文] 列举向量库。
require "openai"

client = OpenAI::Client.new
stores = client.vector_stores.list(limit: 10)
puts((stores.data || []).length)
向量库文件操作
vector_store.file的create等操作异步完成。可用create_and_poll等辅助方法等待,或查询状态。删除采用最终一致性,短时间内搜索结果仍可能包含已删除文件的内容。
添加文件按向量库ID限流:/vector_stores/{vector_store_id}/files与/vector_stores/{vector_store_id}/file_batches共用每库每分钟300次请求的限制。
创建文件关联:
来源示例 49(javascript):
// [中文] 关联已上传文件并轮询;不等于重新上传原文件。
await client.vectorStores.files.createAndPoll("vs_123", {
  file_id: "file_123",
});
来源示例 50(python):
## [中文] 关联已上传文件并轮询;不等于重新上传原文件。
client.vector_stores.files.create_and_poll(
    vector_store_id="vs_123",
    file_id="file_123"
)
来源示例 51(go):
// [中文] 关联已上传文件并轮询;不等于重新上传原文件。
package main

import (
    "context"
    "fmt"

    "github.com/openai/openai-go/v3"
)

func main() {
    client := openai.NewClient()
    file, err := client.VectorStores.Files.NewAndPoll(context.Background(), "vs_123", openai.VectorStoreFileNewParams{
        FileID: "file_123",
    }, 1000)
    if err != nil {
        panic(err)
    }
    fmt.Println(file.ID)
}
来源示例 52(java):
// [中文] 关联已上传文件并轮询;不等于重新上传原文件。
import com.openai.client.OpenAIClient;
import com.openai.client.okhttp.OpenAIOkHttpClient;
import com.openai.models.vectorstores.files.FileCreateParams;

String vectorStoreId = "vs_123";

String fileId = "file_123";

var file =
    client
        .vectorStores()
        .files()
        .create(vectorStoreId, FileCreateParams.builder().fileId(fileId).build());

System.out.println(file.id());
来源示例 53(ruby):
## [中文] 关联已上传文件并轮询;不等于重新上传原文件。
## [中文] 使用create_and_poll等待索引结束,只有COMPLETED才继续,否则报告last_error或状态。
require "openai"

client = OpenAI::Client.new
file = client.vector_stores.files.create_and_poll("vs_123", file_id: "file_123")
unless file.status == OpenAI::VectorStores::VectorStoreFile::Status::COMPLETED
  raise "File indexing did not complete: #{file.last_error&.message || file.status}"
end

puts(file.id)
上传:
来源示例 54(javascript):
// [中文] 上传本地政策文件并等待索引处理完成。
await client.vectorStores.files.uploadAndPoll(
  "vs_123",
  fs.createReadStream("customer_policies.txt")
);
来源示例 55(python):
## [中文] 上传本地政策文件并等待索引处理完成。
client.vector_stores.files.upload_and_poll(
    vector_store_id="vs_123",
    file=open("customer_policies.txt", "rb")
)
来源示例 56(go):
// [中文] 上传本地政策文件并等待索引处理完成。
package main

import (
    "context"
    "fmt"
    "os"

    "github.com/openai/openai-go/v3"
)

func main() {
    client := openai.NewClient()
    file, err := os.Open("customer_policies.txt")
    if err != nil {
        panic(err)
    }
    defer file.Close()
    result, err := client.VectorStores.Files.UploadAndPoll(context.Background(), "vs_123", openai.FileNewParams{
        File:    openai.File(file, "customer_policies.txt", "text/plain"),
        Purpose: openai.FilePurposeAssistants,
    }, 1000)
    if err != nil {
        panic(err)
    }
    fmt.Println(result.ID)
}
来源示例 57(java):
// [中文] 上传本地政策文件并等待索引处理完成。
import com.openai.client.OpenAIClient;
import com.openai.client.okhttp.OpenAIOkHttpClient;
import com.openai.models.files.FileCreateParams;
import com.openai.models.files.FilePurpose;
import com.openai.models.vectorstores.files.FileRetrieveParams;
import com.openai.models.vectorstores.files.VectorStoreFile;
import java.nio.file.Path;

String vectorStoreId = "vs_123";
var uploaded =
    client
        .files()
        .create(
            FileCreateParams.builder()
                .file(Path.of(System.getenv("OPENAI_EXAMPLE_FILE_PATH")))
                .purpose(FilePurpose.ASSISTANTS)
                .build());
var file =
    client
        .vectorStores()
        .files()
        .create(
            vectorStoreId,
            com.openai.models.vectorstores.files.FileCreateParams.builder()
                .fileId(uploaded.id())
                .build());
while (file.status().equals(VectorStoreFile.Status.IN_PROGRESS)) {
  Thread.sleep(1000);
  file =
      client
          .vectorStores()
          .files()
          .retrieve(
              file.id(), FileRetrieveParams.builder().vectorStoreId(vectorStoreId).build());
}
System.out.println(file.id());
来源示例 58(ruby):
## [中文] 上传本地政策文件并等待索引处理完成。
require "openai"
require "pathname"

client = OpenAI::Client.new
vector_store_file = client.vector_stores.files.upload_and_poll(
  "vs_123",
  file: Pathname("customer_policies.txt"),
  timeout: 600
)
raise "File ingestion ended with status: #{vector_store_file.status}" unless vector_store_file.status == OpenAI::VectorStores::VectorStoreFile::Status::COMPLETED

puts(vector_store_file.id)
读取:
来源示例 59(javascript):
// [中文] 读取向量库中的文件关联。
await client.vectorStores.files.retrieve("file_123", {
  vector_store_id: "vs_123",
});
来源示例 60(python):
## [中文] 读取向量库中的文件关联。
client.vector_stores.files.retrieve(
    vector_store_id="vs_123",
    file_id="file_123"
)
来源示例 61(go):
// [中文] 读取向量库中的文件关联。
package main

import (
    "context"
    "fmt"

    "github.com/openai/openai-go/v3"
)

func main() {
    client := openai.NewClient()
    file, err := client.VectorStores.Files.Get(context.Background(), "vs_123", "file_123")
    if err != nil {
        panic(err)
    }
    fmt.Println(file.ID)
}
来源示例 62(java):
// [中文] 读取向量库中的文件关联。
import com.openai.client.OpenAIClient;
import com.openai.client.okhttp.OpenAIOkHttpClient;

String fileId = "file_123";

String vectorStoreId = "vs_123";

System.out.println(
    client
        .vectorStores()
        .files()
        .retrieve(
            fileId,
            com.openai.models.vectorstores.files.FileRetrieveParams.builder()
                .vectorStoreId(vectorStoreId)
                .build())
        .id());
来源示例 63(ruby):
## [中文] 读取向量库中的文件关联。
require "openai"

client = OpenAI::Client.new
file = client.vector_stores.files.retrieve("file_123", vector_store_id: "vs_123")
puts(file.id)
更新:
来源示例 64(javascript):
// [中文] 更新文件关联的自定义attributes。
await client.vectorStores.files.update("file_123", {
  vector_store_id: "vs_123",
  attributes: { key: "value" },
});
来源示例 65(python):
## [中文] 更新文件关联的自定义attributes。
client.vector_stores.files.update(
    vector_store_id="vs_123",
    file_id="file_123",
    attributes={"key": "value"}
)
来源示例 66(go):
// [中文] 更新文件关联的自定义attributes。
package main

import (
    "context"
    "fmt"

    "github.com/openai/openai-go/v3"
)

func main() {
    client := openai.NewClient()
    file, err := client.VectorStores.Files.Update(context.Background(), "vs_123", "file_123", openai.VectorStoreFileUpdateParams{
        Attributes: map[string]openai.VectorStoreFileUpdateParamsAttributeUnion{
            "key": {OfString: openai.String("value")},
        },
    })
    if err != nil {
        panic(err)
    }
    fmt.Println(file.ID)
}
来源示例 67(java):
// [中文] 更新文件关联的自定义attributes。
import com.openai.client.OpenAIClient;
import com.openai.client.okhttp.OpenAIOkHttpClient;
import com.openai.core.JsonValue;
import com.openai.models.vectorstores.files.FileUpdateParams;

String fileId = "file_123";

String vectorStoreId = "vs_123";

var file =
    client
        .vectorStores()
        .files()
        .update(
            fileId,
            FileUpdateParams.builder()
                .vectorStoreId(vectorStoreId)
                .attributes(
                    FileUpdateParams.Attributes.builder()
                        .putAdditionalProperty("category", JsonValue.from("policy"))
                        .build())
                .build());

System.out.println(file.id());
来源示例 68(ruby):
## [中文] 更新文件关联的自定义attributes。
require "openai"

client = OpenAI::Client.new
file = client.vector_stores.files.update("file_123", vector_store_id: "vs_123", attributes: { category: "policy" })
puts(file.id)
删除关联:
来源示例 69(javascript):
// [中文] 删除向量库中的文件关联;搜索采用最终一致性,可能短暂仍见旧片段。
await client.vectorStores.files.delete("file_123", {
  vector_store_id: "vs_123",
});
来源示例 70(python):
## [中文] 删除向量库中的文件关联;搜索采用最终一致性,可能短暂仍见旧片段。
client.vector_stores.files.delete(
    vector_store_id="vs_123",
    file_id="file_123"
)
来源示例 71(go):
// [中文] 删除向量库中的文件关联;搜索采用最终一致性,可能短暂仍见旧片段。
package main

import (
    "context"
    "fmt"

    "github.com/openai/openai-go/v3"
)

func main() {
    client := openai.NewClient()
    deleted, err := client.VectorStores.Files.Delete(context.Background(), "vs_123", "file_123")
    if err != nil {
        panic(err)
    }
    fmt.Println(deleted.Deleted)
}
来源示例 72(java):
// [中文] 删除向量库中的文件关联;搜索采用最终一致性,可能短暂仍见旧片段。
import com.openai.client.OpenAIClient;
import com.openai.client.okhttp.OpenAIOkHttpClient;

String fileId = "file_123";

String vectorStoreId = "vs_123";

System.out.println(
    client
        .vectorStores()
        .files()
        .delete(
            fileId,
            com.openai.models.vectorstores.files.FileDeleteParams.builder()
                .vectorStoreId(vectorStoreId)
                .build())
        .deleted());
来源示例 73(ruby):
## [中文] 删除向量库中的文件关联;搜索采用最终一致性,可能短暂仍见旧片段。
require "openai"

client = OpenAI::Client.new
deleted = client.vector_stores.files.delete("file_123", vector_store_id: "vs_123")
puts(deleted.deleted)
列举文件:
来源示例 74(javascript):
// [中文] 列举向量库中的文件。
await client.vectorStores.files.list("vs_123");
来源示例 75(python):
## [中文] 列举向量库中的文件。
client.vector_stores.files.list(
    vector_store_id="vs_123"
)
来源示例 76(go):
// [中文] 列举向量库中的文件。
package main

import (
    "context"
    "fmt"

    "github.com/openai/openai-go/v3"
)

func main() {
    client := openai.NewClient()
    files, err := client.VectorStores.Files.List(context.Background(), "vs_123", openai.VectorStoreFileListParams{})
    if err != nil {
        panic(err)
    }
    fmt.Println(files.Data)
}
来源示例 77(java):
// [中文] 列举向量库中的文件。
import com.openai.client.OpenAIClient;
import com.openai.client.okhttp.OpenAIOkHttpClient;

String vectorStoreId = "vs_123";

System.out.println(client.vectorStores().files().list(vectorStoreId).data());
来源示例 78(ruby):
## [中文] 列举向量库中的文件。
require "openai"

client = OpenAI::Client.new
files = client.vector_stores.files.list("vs_123")
puts((files.data || []).length)
批量操作
创建批次:
来源示例 79(javascript):
// [中文] 批量关联两个文件,为各文件设置独立属性或静态分块参数。
await client.vectorStores.fileBatches.createAndPoll("vs_123", {
  files: [
    {
      file_id: "file_123",
      attributes: { department: "finance" },
    },
    {
      file_id: "file_456",
      chunking_strategy: {
        type: "static",
        static: {
          max_chunk_size_tokens: 1200,
          chunk_overlap_tokens: 200,
        },
      },
    },
  ],
});
来源示例 80(python):
## [中文] 批量关联两个文件,为各文件设置独立属性或静态分块参数。
client.vector_stores.file_batches.create_and_poll(
    vector_store_id="vs_123",
    files=[
        {
            "file_id": "file_123",
            "attributes": {"department": "finance"}
        },
        {
            "file_id": "file_456",
            "chunking_strategy": {
                "type": "static",
                "static": {
                    "max_chunk_size_tokens": 1200,
                    "chunk_overlap_tokens": 200
                }
            }
        }
    ]
)
来源示例 81(go):
// [中文] 批量关联两个文件,为各文件设置独立属性或静态分块参数。
package main

import (
    "context"
    "fmt"

    "github.com/openai/openai-go/v3"
)

func main() {
    client := openai.NewClient()
    batch, err := client.VectorStores.FileBatches.NewAndPoll(context.Background(), "vs_123", openai.VectorStoreFileBatchNewParams{
        Files: []openai.VectorStoreFileBatchNewParamsFile{
            {
                FileID: "file_123",
                Attributes: map[string]openai.VectorStoreFileBatchNewParamsFileAttributeUnion{
                    "department": {OfString: openai.String("finance")},
                },
            },
            {
                FileID: "file_456",
                ChunkingStrategy: openai.FileChunkingStrategyParamUnion{OfStatic: &openai.StaticFileChunkingStrategyObjectParam{
                    Static: openai.StaticFileChunkingStrategyParam{MaxChunkSizeTokens: 1200, ChunkOverlapTokens: 200},
                }},
            },
        },
    }, 1000)
    if err != nil {
        panic(err)
    }
    fmt.Println(batch.ID)
}
来源示例 82(java):
// [中文] 批量关联两个文件,为各文件设置独立属性或静态分块参数。
import com.openai.client.OpenAIClient;
import com.openai.client.okhttp.OpenAIOkHttpClient;
import com.openai.core.JsonValue;
import com.openai.models.vectorstores.StaticFileChunkingStrategy;
import com.openai.models.vectorstores.filebatches.FileBatchCreateParams;
import com.openai.models.vectorstores.filebatches.FileBatchRetrieveParams;
import com.openai.models.vectorstores.filebatches.VectorStoreFileBatch;

String vectorStoreId = "vs_123";
String fileId = "file_123";
String fileId2 = "file_456";
var first =
    FileBatchCreateParams.File.builder()
        .fileId(fileId)
        .attributes(
            FileBatchCreateParams.File.Attributes.builder()
                .putAdditionalProperty("department", JsonValue.from("finance"))
                .build())
        .build();
var second =
    FileBatchCreateParams.File.builder()
        .fileId(fileId2)
        .staticChunkingStrategy(
            StaticFileChunkingStrategy.builder()
                .maxChunkSizeTokens(1200)
                .chunkOverlapTokens(200)
                .build())
        .build();

var batch =
    client
        .vectorStores()
        .fileBatches()
        .create(
            vectorStoreId,
            FileBatchCreateParams.builder().addFile(first).addFile(second).build());
while (batch.status().equals(VectorStoreFileBatch.Status.IN_PROGRESS)) {
  Thread.sleep(1000);
  batch =
      client
          .vectorStores()
          .fileBatches()
          .retrieve(
              batch.id(),
              FileBatchRetrieveParams.builder().vectorStoreId(vectorStoreId).build());
}
System.out.println(batch.status());
来源示例 83(ruby):
## [中文] 批量关联两个文件,为各文件设置独立属性或静态分块参数。
require "openai"

client = OpenAI::Client.new
batch = client.vector_stores.file_batches.create_and_poll(
  "vs_123",
  files: [
    {
      file_id: "file_123",
      attributes: { department: "finance" }
    },
    {
      file_id: "file_456",
      chunking_strategy: {
        type: :static,
        static: {
          max_chunk_size_tokens: 1_200,
          chunk_overlap_tokens: 200
        }
      }
    }
  ],
  timeout: 600
)
raise "File ingestion ended with status: #{batch.status}" unless batch.status == OpenAI::VectorStores::VectorStoreFileBatch::Status::COMPLETED

raise "File ingestion failed for #{batch.file_counts.failed} file(s)" if batch.file_counts.failed.positive?

## Live validation of per-file batches returned default chunking despite overrides.
file = client.vector_stores.files.retrieve("file_456", vector_store_id: "vs_123")
strategy = file.chunking_strategy
unless strategy.is_a?(OpenAI::StaticFileChunkingStrategyObject) &&
       strategy.static.max_chunk_size_tokens == 1_200 &&
       strategy.static.chunk_overlap_tokens == 200
  raise "Requested chunking was not applied to #{file.id}: #{strategy.to_json}"
end

puts(batch.status)
读取批次:
来源示例 84(javascript):
// [中文] 读取文件批次状态。
await client.vectorStores.fileBatches.retrieve("vsfb_123", {
  vector_store_id: "vs_123",
});
来源示例 85(python):
## [中文] 读取文件批次状态。
client.vector_stores.file_batches.retrieve(
    vector_store_id="vs_123",
    batch_id="vsfb_123"
)
来源示例 86(go):
// [中文] 读取文件批次状态。
package main

import (
    "context"
    "fmt"

    "github.com/openai/openai-go/v3"
)

func main() {
    client := openai.NewClient()
    batch, err := client.VectorStores.FileBatches.Get(context.Background(), "vs_123", "vsfb_123")
    if err != nil {
        panic(err)
    }
    fmt.Println(batch.ID)
}
来源示例 87(java):
// [中文] 读取文件批次状态。
import com.openai.client.OpenAIClient;
import com.openai.client.okhttp.OpenAIOkHttpClient;

String fileBatchId = "vsfb_123";

String vectorStoreId = "vs_123";

System.out.println(
    client
        .vectorStores()
        .fileBatches()
        .retrieve(
            fileBatchId,
            com.openai.models.vectorstores.filebatches.FileBatchRetrieveParams.builder()
                .vectorStoreId(vectorStoreId)
                .build())
        .status());
来源示例 88(ruby):
## [中文] 读取文件批次状态。
require "openai"

client = OpenAI::Client.new
batch = client.vector_stores.file_batches.retrieve(
  "vsfb_123",
  vector_store_id: "vs_123"
)
puts(batch.status)
取消批次:
来源示例 89(javascript):
// [中文] 取消文件批次;本轮未执行。
await client.vectorStores.fileBatches.cancel("vsfb_123", {
  vector_store_id: "vs_123",
});
来源示例 90(python):
## [中文] 取消文件批次;本轮未执行。
client.vector_stores.file_batches.cancel(
    vector_store_id="vs_123",
    batch_id="vsfb_123"
)
来源示例 91(go):
// [中文] 取消文件批次;本轮未执行。
package main

import (
    "context"
    "fmt"

    "github.com/openai/openai-go/v3"
)

func main() {
    client := openai.NewClient()
    batch, err := client.VectorStores.FileBatches.Cancel(context.Background(), "vs_123", "vsfb_123")
    if err != nil {
        panic(err)
    }
    fmt.Println(batch.Status)
}
来源示例 92(java):
// [中文] 取消文件批次;本轮未执行。
import com.openai.client.OpenAIClient;
import com.openai.client.okhttp.OpenAIOkHttpClient;

String fileBatchId = "vsfb_123";

String vectorStoreId = "vs_123";

System.out.println(
    client
        .vectorStores()
        .fileBatches()
        .cancel(
            fileBatchId,
            com.openai.models.vectorstores.filebatches.FileBatchCancelParams.builder()
                .vectorStoreId(vectorStoreId)
                .build())
        .status());
来源示例 93(ruby):
## [中文] 取消文件批次;本轮未执行。
require "openai"

client = OpenAI::Client.new
batch = client.vector_stores.file_batches.cancel(
  "vsfb_123",
  vector_store_id: "vs_123"
)
puts(batch.status)
列举批次文件:
来源示例 94(javascript):
// [中文] 列举指定批次的文件。
await client.vectorStores.fileBatches.listFiles("vsfb_123", {
  vector_store_id: "vs_123",
});
来源示例 95(python):
## [中文] 列举指定批次的文件。
client.vector_stores.file_batches.list_files(
    "vsfb_123",
    vector_store_id="vs_123"
)
来源示例 96(go):
// [中文] 列举指定批次的文件。
package main

import (
    "context"
    "fmt"

    "github.com/openai/openai-go/v3"
)

func main() {
    client := openai.NewClient()
    files, err := client.VectorStores.FileBatches.ListFiles(context.Background(), "vs_123", "vsfb_123", openai.VectorStoreFileBatchListFilesParams{})
    if err != nil {
        panic(err)
    }
    fmt.Println(files.Data)
}
来源示例 97(java):
// [中文] 列举指定批次的文件。
import com.openai.client.OpenAIClient;
import com.openai.client.okhttp.OpenAIOkHttpClient;

String fileBatchId = "vsfb_123";

String vectorStoreId = "vs_123";

System.out.println(
    client
        .vectorStores()
        .fileBatches()
        .listFiles(
            fileBatchId,
            com.openai.models.vectorstores.filebatches.FileBatchListFilesParams.builder()
                .vectorStoreId(vectorStoreId)
                .build())
        .data());
来源示例 98(ruby):
## [中文] 列举指定批次的文件。
require "openai"

client = OpenAI::Client.new
files = client.vector_stores.file_batches.list_files(
  "vsfb_123",
  vector_store_id: "vs_123"
)
puts((files.data || []).length)
创建时可使用file_ids配合共享attributes和/或chunking_strategy,也可使用files数组,为每个file_id配置独立属性和分块策略。两种方式互斥。
向单个向量库高吞吐导入时,建议尽量批量创建;每请求最多500个文件,通常比逐文件请求减少竞争、改善端到端延迟。
属性
每个vector_store.file可关联attributes字典,供语义搜索的属性过滤使用。原指南写“最多16个键、每个限制256字符”,与创建向量库文件接口参考的定义存在差异。按该接口,文件attributes最多16对键值:键是最长64字符的字符串;值可为最长512字符的字符串、数字或布尔值。这里说明的是文件属性,不能与向量库对象的metadata混为一谈。
来源示例 99(javascript):
// [中文] 设置地区US、分类Marketing与日期时间戳等自定义属性,供过滤使用。
await client.vectorStores.files.create("<vector_store_id>", {
  file_id: "file_123",
  attributes: {
    region: "US",
    category: "Marketing",
    date: 1672531200, // Jan 1, 2023
  },
});
来源示例 100(python):
## [中文] 设置地区US、分类Marketing与日期时间戳等自定义属性,供过滤使用。
client.vector_stores.files.create(
    vector_store_id="<vector_store_id>",
    file_id="file_123",
    attributes={
        "region": "US",
        "category": "Marketing",
        "date": 1672531200      # Jan 1, 2023
    }
)
来源示例 101(go):
// [中文] 设置地区US、分类Marketing与日期时间戳等自定义属性,供过滤使用。
package main

import (
    "context"
    "fmt"

    "github.com/openai/openai-go/v3"
)

func main() {
    client := openai.NewClient()
    file, err := client.VectorStores.Files.New(context.Background(), "<vector_store_id>", openai.VectorStoreFileNewParams{
        FileID: "file_123",
        Attributes: map[string]openai.VectorStoreFileNewParamsAttributeUnion{
            "region":   {OfString: openai.String("US")},
            "category": {OfString: openai.String("Marketing")},
            "date":     {OfFloat: openai.Float(1672531200)},
        },
    })
    if err != nil {
        panic(err)
    }
    fmt.Println(file.ID)
}
来源示例 102(java):
// [中文] 设置地区US、分类Marketing与日期时间戳等自定义属性,供过滤使用。
import com.openai.client.OpenAIClient;
import com.openai.client.okhttp.OpenAIOkHttpClient;
import com.openai.core.JsonValue;
import com.openai.models.vectorstores.files.FileCreateParams;

String vectorStoreId = "<vector_store_id>";

String fileId = "file_123";

var file =
    client
        .vectorStores()
        .files()
        .create(
            vectorStoreId,
            FileCreateParams.builder()
                .fileId(fileId)
                .attributes(
                    FileCreateParams.Attributes.builder()
                        .putAdditionalProperty("category", JsonValue.from("policy"))
                        .build())
                .build());

System.out.println(file.id());
来源示例 103(ruby):
## [中文] 设置地区US、分类Marketing与日期时间戳等自定义属性,供过滤使用。
require "openai"

client = OpenAI::Client.new
file = client.vector_stores.files.create("<vector_store_id>", file_id: "file_123", attributes: { category: "policy" })
puts(file.id)
过期策略
通过expires_after设置向量库过期时间。过期后所有相关vector_store.file对象被删除,不再对其计费。
来源示例 104(javascript):
// [中文] 以last_active_at为锚点,设置7天后过期。
await client.vectorStores.update("vs_123", {
  expires_after: {
    anchor: "last_active_at",
    days: 7,
  },
});
来源示例 105(python):
## [中文] 以last_active_at为锚点,设置7天后过期。
client.vector_stores.update(
    vector_store_id="vs_123",
    expires_after={
        "anchor": "last_active_at",
        "days": 7
    }
)
来源示例 106(go):
// [中文] 以last_active_at为锚点,设置7天后过期。
package main

import (
    "context"
    "fmt"

    "github.com/openai/openai-go/v3"
)

func main() {
    client := openai.NewClient()
    vectorStore, err := client.VectorStores.Update(context.Background(), "vs_123", openai.VectorStoreUpdateParams{
        ExpiresAfter: openai.VectorStoreUpdateParamsExpiresAfter{Days: 7},
    })
    if err != nil {
        panic(err)
    }
    fmt.Println(vectorStore.ExpiresAfter)
}
来源示例 107(java):
// [中文] 以last_active_at为锚点,设置7天后过期。
import com.openai.client.OpenAIClient;
import com.openai.client.okhttp.OpenAIOkHttpClient;
import com.openai.core.JsonValue;
import com.openai.models.vectorstores.VectorStoreUpdateParams;

String vectorStoreId = "vs_123";

var store =
    client
        .vectorStores()
        .update(
            vectorStoreId,
            VectorStoreUpdateParams.builder()
                .expiresAfter(
                    VectorStoreUpdateParams.ExpiresAfter.builder()
                        .anchor(JsonValue.from("last_active_at"))
                        .days(7)
                        .build())
                .build());

System.out.println(store.expiresAfter().orElseThrow());
来源示例 108(ruby):
## [中文] 以last_active_at为锚点,设置7天后过期。
require "openai"

client = OpenAI::Client.new
store = client.vector_stores.update(
  "vs_123",
  expires_after: {
    anchor: :last_active_at,
    days: 7
  }
)
puts(store.expires_after)
限制
单文件最多512MB,且不超过5,000,000词元;附加文件时自动计算词元数。
分块
默认max_chunk_size_tokens=800、chunk_overlap_tokens=400,即每块800词元,相邻块重叠400词元。添加文件时可设置chunking_strategy:
max_chunk_size_tokens为100至4096(含端点)。chunk_overlap_tokens非负,且不应超过max_chunk_size_tokens / 2。
支持的文件类型
text/ MIME类型必须使用utf-8、utf-16或ascii编码。
| 文件格式 | MIME type |
|---|---|
.c |
text/x-c |
.cpp |
text/x-c++ |
.cs |
text/x-csharp |
.css |
text/css |
.doc |
application/msword |
.docx |
application/vnd.openxmlformats-officedocument.wordprocessingml.document |
.go |
text/x-golang |
.html |
text/html |
.java |
text/x-java |
.js |
text/javascript |
.json |
application/json |
.md |
text/markdown |
.pdf |
application/pdf |
.php |
text/x-php |
.pptx |
application/vnd.openxmlformats-officedocument.presentationml.presentation |
.py |
text/x-python |
.py |
text/x-script.python |
.rb |
text/x-ruby |
.sh |
application/x-sh |
.tex |
text/x-tex |
.ts |
application/typescript |
.txt |
text/plain |
根据结果生成回答
将搜索结果和原查询交给模型,可生成以检索资料为依据的回答。
先搜索:
来源示例 109(javascript):
// [中文] 先检索退货政策,为后续生成提供results和user_query。
import OpenAI from "openai";

const client = new OpenAI();

const userQuery = "What is the return policy?";

const results = await client.vectorStores.search(vector_store.id, {
  query: userQuery,
});
来源示例 110(python):
## [中文] 先检索退货政策,为后续生成提供results和user_query。
from openai import OpenAI

client = OpenAI()

user_query = "What is the return policy?"

results = client.vector_stores.search(
    vector_store_id=vector_store.id,
    query=user_query,
)
来源示例 111(go):
// [中文] 先检索退货政策,为后续生成提供results和user_query。
package main

import (
    "context"
    "fmt"

    "github.com/openai/openai-go/v3"
)

func main() {
    client := openai.NewClient()
    results, err := client.VectorStores.Search(context.Background(), "vs_123", openai.VectorStoreSearchParams{
        Query: openai.VectorStoreSearchParamsQueryUnion{OfString: openai.String("What is the return policy?")},
    })
    if err != nil {
        panic(err)
    }
    fmt.Println(results.Data)
}
来源示例 112(java):
// [中文] 先检索退货政策,为后续生成提供results和user_query。
import com.openai.client.OpenAIClient;
import com.openai.client.okhttp.OpenAIOkHttpClient;
import com.openai.models.vectorstores.VectorStoreSearchParams;

String vectorStoreId = "vs_123";

var results =
    client
        .vectorStores()
        .search(
            vectorStoreId,
            VectorStoreSearchParams.builder().query("What is the return policy?").build());

System.out.println(results.data());
来源示例 113(ruby):
## [中文] 先检索退货政策,为后续生成提供results和user_query。
require "openai"

client = OpenAI::Client.new
results = client.vector_stores.search(
  "vs_123",
  query: "What is the return policy?"
)
puts(results.data)
再根据结果生成回答:
来源示例 114(javascript):
// [中文] 根据检索来源生成简洁回答;需前一步结果及format_results,来源调用与辅助函数的入参形状仍待运行核对。
const formattedResults = formatResults(results.data);
// Join the text content of all results
const textSources = results.data
  .map((result) => result.content.map((c) => c.text).join("\n"))
  .join("\n");

const completion = await client.chat.completions.create({
  model: "gpt-6-astra",
  messages: [
    {
      role: "developer",
      content:
        "Produce a concise answer to the query based on the provided sources.",
    },
    {
      role: "user",
      content: `Sources: ${formattedResults}\n\nQuery: '${userQuery}'`,
    },
  ],
});

console.log(completion.choices[0].message.content);
来源示例 115(python):
## [中文] 根据检索来源生成简洁回答;需前一步结果及format_results,来源调用与辅助函数的入参形状仍待运行核对。
## Use results and user_query from the preceding search step.
formatted_results = format_results(results.data)

"\n".join("\n".join(c.text for c in result.content) for result in results.data)

completion = client.chat.completions.create(
    model="gpt-6-astra",
    messages=[
        {
            "role": "developer",
            "content": "Produce a concise answer to the query based on the provided sources.",
        },
        {
            "role": "user",
            "content": f"Sources: {formatted_results}\n\nQuery: '{user_query}'",
        },
    ],
)

print(completion.choices[0].message.content)
来源示例 116(go):
// [中文] 根据检索来源生成简洁回答;需前一步结果及format_results,来源调用与辅助函数的入参形状仍待运行核对。
package main

import (
    "context"
    "fmt"
    "strings"

    "github.com/openai/openai-go/v3"
)

func main() {
    client := openai.NewClient()
    userQuery := "What is the return policy?"
    results, err := client.VectorStores.Search(context.Background(), "vs_123", openai.VectorStoreSearchParams{
        Query: openai.VectorStoreSearchParamsQueryUnion{OfString: openai.String(userQuery)},
    })
    if err != nil {
        panic(err)
    }

    completion, err := client.Chat.Completions.New(context.Background(), openai.ChatCompletionNewParams{
        Model: "gpt-6-astra",
        Messages: []openai.ChatCompletionMessageParamUnion{
            openai.DeveloperMessage("Produce a concise answer to the query based on the provided sources."),
            openai.UserMessage(fmt.Sprintf("Sources: %s\n\nQuery: %q", formatResults(results.Data), userQuery)),
        },
    })
    if err != nil {
        panic(err)
    }
    fmt.Println(completion.Choices[0].Message.Content)
}

func formatResults(results []openai.VectorStoreSearchResponse) string {
    var sources strings.Builder
    sources.WriteString("<sources>")
    for _, result := range results {
        fmt.Fprintf(&sources, "<result file_id=%q file_name=%q>", result.FileID, result.Filename)
        for _, content := range result.Content {
            fmt.Fprintf(&sources, "<content>%s</content>", content.Text)
        }
        sources.WriteString("</result>")
    }
    sources.WriteString("</sources>")
    return sources.String()
}
来源示例 117(java):
// [中文] 根据检索来源生成简洁回答;需前一步结果及format_results,来源调用与辅助函数的入参形状仍待运行核对。
import com.openai.client.OpenAIClient;
import com.openai.client.okhttp.OpenAIOkHttpClient;
import com.openai.models.chat.completions.ChatCompletionCreateParams;
import com.openai.models.vectorstores.VectorStoreSearchParams;
import java.util.stream.Collectors;

String vectorStoreId = "vs_123";

String query = "What is the return policy?";
var results =
    client
        .vectorStores()
        .search(vectorStoreId, VectorStoreSearchParams.builder().query(query).build());
String sources =
    results.data().stream()
        .map(
            result ->
                "<result file_id='"
                    + result.fileId()
                    + "' file_name='"
                    + result.filename()
                    + "'>"
                    + result.content().stream()
                        .map(content -> "<content>" + content.text() + "</content>")
                        .collect(Collectors.joining())
                    + "</result>")
        .collect(Collectors.joining());

var completion =
    client
        .chat()
        .completions()
        .create(
            ChatCompletionCreateParams.builder()
                .model("gpt-6-astra")
                .addDeveloperMessage(
                    "Answer the query concisely using only the provided sources.")
                .addUserMessage(
                    "Sources: <sources>" + sources + "</sources>\n\nQuery: " + query)
                .build());

completion.choices().stream()
    .flatMap(choice -> choice.message().content().stream())
    .forEach(System.out::println);
来源示例 118(ruby):
## [中文] 根据检索来源生成简洁回答;需前一步结果及format_results,来源调用与辅助函数的入参形状仍待运行核对。
require "openai"

client = OpenAI::Client.new
query = "What is the return policy?"
results = client.vector_stores.search("vs_123", query: query)
sources = (results.data || []).map do |result|
  content = result.content.map { |part| "<content>#{part.text}</content>" }.join
  "<result file_id='#{result.file_id}' file_name='#{result.filename}'>#{content}</result>"
end.join

completion = client.chat.completions.create(
  model: "gpt-6-astra",
  messages: [
    {
      role: :developer,
      content: "Answer the query concisely using only the provided sources."
    },
    {
      role: :user,
      content: "Sources: <sources>#{sources}</sources>\n\nQuery: #{query}"
    }
  ]
)
puts(completion.choices.fetch(0).message.content)
来源示例 119(json):
"Our return policy allows returns within 30 days of purchase."
示例中的format_results可按下面方式实现:
来源示例 120(javascript):
// [中文] 把结果片段包装为sources/result/content文本;注意此函数访问results.data,而前例有传入results.data的写法,不能视为已验证可直接拼接。
function formatResults(results) {
  let formattedResults = "";
  for (const result of results.data) {
    let formattedResult = `<result file_id='${result.file_id}' file_name='${result.filename}'>`;
    for (const part of result.content) {
      formattedResult += `<content>${part.text}</content>`;
    }
    formattedResults += formattedResult + "</result>";
  }
  return `<sources>${formattedResults}</sources>`;
}
来源示例 121(python):
## [中文] 把结果片段包装为sources/result/content文本;注意此函数访问results.data,而前例有传入results.data的写法,不能视为已验证可直接拼接。
def format_results(results):
    formatted_results = ""
    for result in results.data:
        formatted_result = (
            f"<result file_id='{result.file_id}' file_name='{result.file_name}'>"
        )
        for part in result.content:
            formatted_result += f"<content>{part.text}</content>"
        formatted_results += formatted_result + "</result>"
    return f"<sources>{formatted_results}</sources>"
来源示例 122(go):
// [中文] 把结果片段包装为sources/result/content文本;注意此函数访问results.data,而前例有传入results.data的写法,不能视为已验证可直接拼接。
package main

import (
    "fmt"
    "strings"

    "github.com/openai/openai-go/v3"
)

func main() {
    results := []openai.VectorStoreSearchResponse{{
        FileID:   "file-12345",
        Filename: "woodchuck_policy.txt",
        Content:  []openai.VectorStoreSearchResponseContent{{Text: "Each passenger may carry up to two woodchucks."}},
    }}
    fmt.Println(formatResults(results))
}

func formatResults(results []openai.VectorStoreSearchResponse) string {
    var sources strings.Builder
    sources.WriteString("<sources>")
    for _, result := range results {
        fmt.Fprintf(&sources, "<result file_id=%q file_name=%q>", result.FileID, result.Filename)
        for _, content := range result.Content {
            fmt.Fprintf(&sources, "<content>%s</content>", content.Text)
        }
        sources.WriteString("</result>")
    }
    sources.WriteString("</sources>")
    return sources.String()
}
来源示例 123(java):
// [中文] 把结果片段包装为sources/result/content文本;注意此函数访问results.data,而前例有传入results.data的写法,不能视为已验证可直接拼接。
import com.openai.models.vectorstores.VectorStoreSearchResponse;
import java.util.List;

System.out.println(formatResults(results.data()));

static String formatResults(List<VectorStoreSearchResponse> results) {
  var formatted = new StringBuilder("<sources>");
  for (var result : results) {
    formatted
        .append("<result file_id='")
        .append(result.fileId())
        .append("' file_name='")
        .append(result.filename())
        .append("'>");
    for (var part : result.content()) {
      formatted.append("<content>").append(part.text()).append("</content>");
    }
    formatted.append("</result>");
  }
  return formatted.append("</sources>").toString();
}
来源示例 124(ruby):
## [中文] 把结果片段包装为sources/result/content文本;注意此函数访问results.data,而前例有传入results.data的写法,不能视为已验证可直接拼接。
results = [
  {
    file_id: "file-12345",
    filename: "woodchuck_policy.txt",
    content: [{ text: "Each passenger may carry up to two woodchucks." }]
  }
]

sources = results.map do |result|
  content = result.fetch(:content).map { |part| "<content>#{part.fetch(:text)}</content>" }.join
  "<result file_id=\"#{result.fetch(:file_id)}\" file_name=\"#{result.fetch(:filename)}\">#{content}</result>"
end

puts("<sources>#{sources.join}</sources>")















更多建议: