


触屏事件
触屏事件指当手指/手写笔在组件上按下、滑动、抬起时触发的回调事件。包括点击事件、拖拽事件和触摸事件。
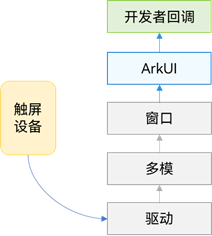
图1 触摸事件原理
点击事件
点击事件是指通过手指或手写笔做出一次完整的按下和抬起动作。当发生点击事件时,会触发以下回调函数:
- onClick(event: (event?: ClickEvent) => void)
event参数提供点击事件相对于窗口或组件的坐标位置,以及发生点击的事件源。
- @Entry
- @Component
- struct IfElseTransition {
- @State flag: boolean = true;
- @State btnMsg: string = 'show';
- build() {
- Column() {
- Button(this.btnMsg).width(80).height(30).margin(30)
- .onClick(() => {
- if (this.flag) {
- this.btnMsg = 'hide';
- } else {
- this.btnMsg = 'show';
- }
- // 点击Button控制Image的显示和消失
- this.flag = !this.flag;
- })
- if (this.flag) {
- Image($r('app.media.icon')).width(200).height(200)
- }
- }.height('100%').width('100%')
- }
- }
拖拽事件
拖拽事件指手指/手写笔长按组件(>=500ms),并拖拽到接收区域释放的事件。拖拽事件触发流程:
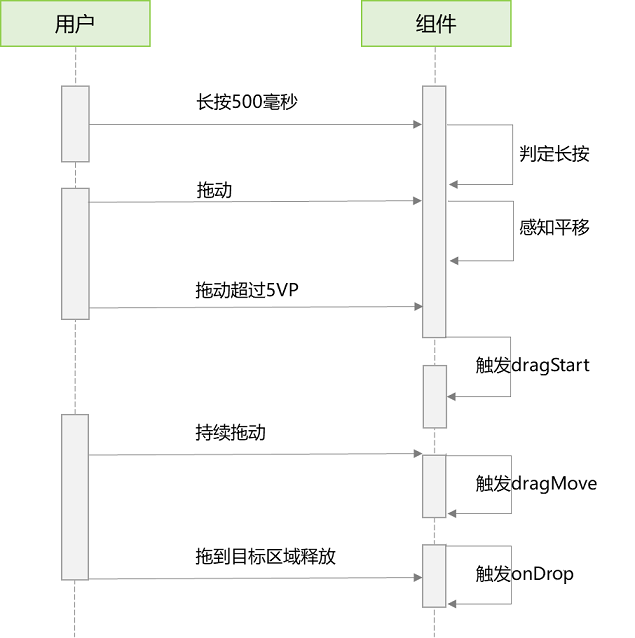
拖拽事件的触发通过长按、拖动平移判定,手指平移的距离达到5vp即可触发拖拽事件。ArkUI支持应用内、跨应用的拖拽事件。
拖拽事件提供以下接口:
接口名称 | 描述 |
|---|---|
onDragStart(event: (event?: DragEvent, extraParams?: string) => CustomBuilder | DragItemInfo) | 拖拽启动接口。当前仅支持自定义pixelmap和自定义组件。 |
onDragEnter(event: (event?: DragEvent, extraParams?: string) => void) | 拖拽进入组件接口。DragEvent定义拖拽发生位置,extraParmas表示用户自定义信息 |
onDragLeave(event: (event?: DragEvent, extraParams?: string) => void) | 拖拽离开组件接口。DragEvent定义拖拽发生位置,extraParmas表示拖拽事件额外信息。 |
onDragMove(event: (event?: DragEvent, extraParams?: string) => void) | 拖拽移动接口。DragEvent定义拖拽发生位置,extraParmas表示拖拽事件额外信息。 |
onDrop(event: (event?: DragEvent, extraParams?: string) => void) | 拖拽释放组件接口。DragEvent定义拖拽发生位置,extraParmas表示拖拽事件额外信息。 |
如下是跨窗口拖拽,拖出窗口示例:
- import image from '@ohos.multimedia.image';
- @Entry
- @Component
- struct Index {
- @State visible: Visibility = Visibility.Visible
- private pixelMapReader = undefined
- aboutToAppear() {
- console.info('begin to create pixmap has info message: ')
- this.createPixelMap()
- }
- createPixelMap() {
- let color = new ArrayBuffer(4 * 96 * 96);
- var buffer = new Uint8Array(color);
- for (var i = 0; i < buffer.length; i++) {
- buffer[i] = (i + 1) % 255;
- }
- let opts = {
- alphaType: 0,
- editable: true,
- pixelFormat: 4,
- scaleMode: 1,
- size: { height: 96, width: 96 }
- }
- const promise = image.createPixelMap(color, opts);
- promise.then((data) => {
- console.info('create pixmap has info message: ' + JSON.stringify(data))
- this.pixelMapReader = data;
- })
- }
- @Builder pixelMapBuilder() {
- Text('drag item')
- .width('100%')
- .height(100)
- .fontSize(16)
- .textAlign(TextAlign.Center)
- .borderRadius(10)
- .backgroundColor(0xFFFFFF)
- }
- build() {
- Flex({ direction: FlexDirection.Column, alignItems: ItemAlign.Center, justifyContent: FlexAlign.Center }) {
- Text('App1')
- .width('40%')
- .height(80)
- .fontSize(20)
- .margin(30)
- .textAlign(TextAlign.Center)
- .backgroundColor(Color.Pink)
- .visibility(Visibility.Visible)
- Text('Across Window Drag This')
- .width('80%')
- .height(80)
- .fontSize(16)
- .margin(30)
- .textAlign(TextAlign.Center)
- .backgroundColor(Color.Pink)
- .visibility(this.visible)
- .onDragStart(() => { //启动跨窗口拖拽
- console.info('Text onDrag start')
- return { pixelMap: this.pixelMapReader, extraInfo: 'custom extra info.' }
- })
- .onDrop((event: DragEvent, extraParams: string) => {
- console.info('Text onDragDrop, ')
- this.visible = Visibility.None //拖动结束后,使源不可见
- })
- }
- .width('100%')
- .height('100%')
- }
- }
跨窗口拖拽,拖入示例:
- @Entry
- @Component
- struct Index {
- @State number: string[] = ['drag here']
- @State text: string = ''
- @State bool1: boolean = false
- @State bool2: boolean = false
- @State visible: Visibility = Visibility.Visible
- @State visible2: Visibility = Visibility.None
- scroller: Scroller = new Scroller()
- build() {
- Flex({ direction: FlexDirection.Column, alignItems: ItemAlign.Center, justifyContent: FlexAlign.Center }) {
- Text('App2')
- .width('40%')
- .height(80)
- .fontSize(20)
- .margin(30)
- .textAlign(TextAlign.Center)
- .backgroundColor(Color.Pink)
- .visibility(Visibility.Visible)
- List({ space: 20, initialIndex: 0 }) {
- ForEach(this.number, (item) => {
- ListItem() {
- Text('' + item)
- .width('100%')
- .height(80)
- .fontSize(16)
- .borderRadius(10)
- .textAlign(TextAlign.Center)
- .backgroundColor(0xFFFFFF)
- }
- }, item => item)
- ListItem() {
- Text('Across Window Drag This')
- .width('80%')
- .height(80)
- .fontSize(16)
- .margin(30)
- .textAlign(TextAlign.Center)
- .backgroundColor(Color.Pink)
- .visibility(this.visible2)
- }
- }
- .height('50%')
- .width('90%')
- .border({ width: 1 })
- .divider({ strokeWidth: 2, color: 0xFFFFFF, startMargin: 20, endMargin: 20 })
- .onDragEnter((event: DragEvent, extraParams: string) => { //拖拽进去组件
- console.info('List onDragEnter, ' + extraParams)
- })
- .onDragMove((event: DragEvent, extraParams: string) => { //拖拽时移动
- console.info('List onDragMove, ' + extraParams)
- })
- .onDragLeave((event: DragEvent, extraParams: string) => { //拖拽离开组件
- console.info('List onDragLeave, ' + extraParams)
- })
- .onDrop((event: DragEvent, extraParams: string) => { //释放组件
- console.info('List onDragDrop, ' + extraParams)
- this.visible2 = Visibility.Visible //拖拽完成使拖入目标可见
- })
- }
- .width('100%')
- .height('100%')
- }
- }
触摸事件
当手指或手写笔在组件上触碰时,会触发不同动作所对应的事件响应,包括按下(Down)、滑动(Move)、抬起(Up)事件:
- onTouch(event: (event?: TouchEvent) => void)
- event.type为TouchType.Down:表示手指按下。
- event.type为TouchType.Up:表示手指抬起。
- event.type为TouchType.Move:表示手指按住移动。
触摸事件可以同时多指触发,通过event参数可获取触发的手指位置、手指唯一标志、当前发生变化的手指和输入的设备源等信息。
- // xxx.ets
- @Entry
- @Component
- struct TouchExample {
- @State text: string = '';
- @State eventType: string = '';
- build() {
- Column() {
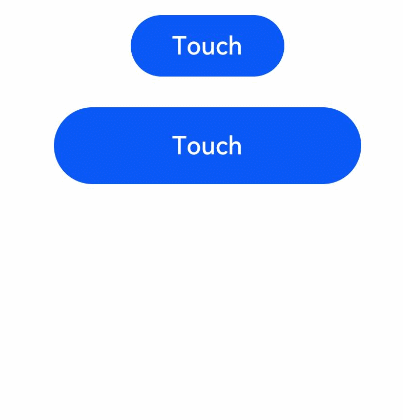
- Button('Touch').height(40).width(100)
- .onTouch((event: TouchEvent) => {
- if (event.type === TouchType.Down) {
- this.eventType = 'Down';
- }
- if (event.type === TouchType.Up) {
- this.eventType = 'Up';
- }
- if (event.type === TouchType.Move) {
- this.eventType = 'Move';
- }
- this.text = 'TouchType:' + this.eventType + '\nDistance between touch point and touch element:\nx: '
- + event.touches[0].x + '\n' + 'y: ' + event.touches[0].y + '\nComponent globalPos:('
- + event.target.area.globalPosition.x + ',' + event.target.area.globalPosition.y + ')\nwidth:'
- + event.target.area.width + '\nheight:' + event.target.area.height
- })
- Button('Touch').height(50).width(200).margin(20)
- .onTouch((event: TouchEvent) => {
- if (event.type === TouchType.Down) {
- this.eventType = 'Down';
- }
- if (event.type === TouchType.Up) {
- this.eventType = 'Up';
- }
- if (event.type === TouchType.Move) {
- this.eventType = 'Move';
- }
- this.text = 'TouchType:' + this.eventType + '\nDistance between touch point and touch element:\nx: '
- + event.touches[0].x + '\n' + 'y: ' + event.touches[0].y + '\nComponent globalPos:('
- + event.target.area.globalPosition.x + ',' + event.target.area.globalPosition.y + ')\nwidth:'
- + event.target.area.width + '\nheight:' + event.target.area.height
- })
- Text(this.text)
- }.width('100%').padding(30)
- }
- }

更多建议: