


布局更新动画
显式动画(animateTo)和属性动画(animation)是ArkUI提供的最基础和常用的动画功能。在布局属性(如尺寸属性、位置属性)发生变化时,可以通过属性动画或显式动画,按照动画参数过渡到新的布局参数状态。
动画类型 | 特点 |
|---|---|
显式动画 | 闭包内的变化均会触发动画,包括由数据变化引起的组件的增删、组件属性的变化等,可以做较为复杂的动画。 |
属性动画 | 动画设置简单,属性变化时自动触发动画。 |
使用显式动画产生布局更新动画
显式动画的接口为:
- animateTo(value: AnimateParam, event: () => void): void
第一个参数指定动画参数,第二个参数为动画的闭包函数。
以下是使用显式动画产生布局更新动画的示例。示例中,当Column组件的alignItems属性改变后,其子组件的布局位置结果发生变化。只要该属性是在animateTo的闭包函数中修改的,那么由其引起的所有变化都会按照animateTo的动画参数执行动画过渡到终点值。
- @Entry
- @Component
- struct LayoutChange {
- // 用于控制Column的alignItems属性
- @State itemAlign: HorizontalAlign = HorizontalAlign.Start;
- allAlign: HorizontalAlign[] = [HorizontalAlign.Start, HorizontalAlign.Center, HorizontalAlign.End];
- alignIndex: number = 0;
- build() {
- Column() {
- Column({ space: 10 }) {
- Button("1").width(100).height(50)
- Button("2").width(100).height(50)
- Button("3").width(100).height(50)
- }
- .margin(20)
- .alignItems(this.itemAlign)
- .borderWidth(2)
- .width("90%")
- .height(200)
- Button("click").onClick(() => {
- // 动画时长为1000ms,曲线为EaseInOut
- animateTo({ duration: 1000, curve: Curve.EaseInOut }, () => {
- this.alignIndex = (this.alignIndex + 1) % this.allAlign.length;
- // 在闭包函数中修改this.itemAlign参数,使Column容器内部孩子的布局方式变化,使用动画过渡到新位置
- this.itemAlign = this.allAlign[this.alignIndex];
- });
- })
- }
- .width("100%")
- .height("100%")
- }
- }

除直接改变布局方式外,也可直接修改组件的宽、高、位置。
- @Entry
- @Component
- struct LayoutChange2 {
- @State myWidth: number = 100;
- @State myHeight: number = 50;
- // 标志位,true和false分别对应一组myWidth、myHeight值
- @State flag: boolean = false;
- build() {
- Column({ space: 10 }) {
- Button("text")
- .type(ButtonType.Normal)
- .width(this.myWidth)
- .height(this.myHeight)
- .margin(20)
- Button("area: click me")
- .fontSize(12)
- .margin(20)
- .onClick(() => {
- animateTo({ duration: 1000, curve: Curve.Ease }, () => {
- // 动画闭包中根据标志位改变控制第一个Button宽高的状态变量,使第一个Button做宽高动画
- if (this.flag) {
- this.myWidth = 100;
- this.myHeight = 50;
- } else {
- this.myWidth = 200;
- this.myHeight = 100;
- }
- this.flag = !this.flag;
- });
- })
- }
- .width("100%")
- .height("100%")
- }
- }
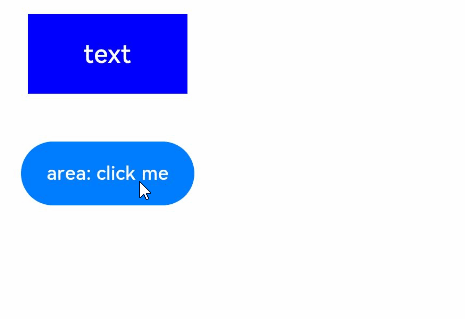
在第二个Button的点击事件中,使用animateTo函数,在闭包中修改this.myWidth和this.myHeight状态变量,而这两个状态变量分别为第一个Button的宽、高属性值,所以第一个Button做了宽高动画。效果如下图。

与此同时,第二个Button也产生了一个位置动画。这是由于第一个Button的宽高变化后,引起了Column内部其他组件的布局结果也发生了变化,第二个Button的布局发生变化也是由于闭包内改变第一个Button的宽高造成的。
如果不希望第二个Button有动画效果,有两种方式可以实现。一种是给做第一个Button外面再加一个容器,使其动画前后的大小都在容器的范围内,这样第二个Button的位置不会被第一个Button的位置所影响。修改后的核心代码如下。
- Column({ space: 10 }) {
- Column() {
- // Button放在足够大的容器内,使其不影响更外层的组件位置
- Button("text")
- .type(ButtonType.Normal)
- .width(this.myWidth)
- .height(this.myHeight)
- }
- .margin(20)
- .width(200)
- .height(100)
- Button("area: click me")
- .fontSize(12)
- .onClick(() => {
- animateTo({ duration: 1000, curve: Curve.Ease }, () => {
- // 动画闭包中根据标志位改变控制第一个Button宽高的状态变量,使第一个Button做宽高动画
- if (this.flag) {
- this.myWidth = 100;
- this.myHeight = 50;
- } else {
- this.myWidth = 200;
- this.myHeight = 100;
- }
- this.flag = !this.flag;
- });
- })
- }
- .width("100%")
- .height("100%")

另一种方式是给第二个Button添加布局约束,如position的位置约束,使其位置不被第一个Button的宽高影响。核心代码如下:
- Column({ space: 10 }) {
- Button("text")
- .type(ButtonType.Normal)
- .width(this.myWidth)
- .height(this.myHeight)
- .margin(20)
- Button("area: click me")
- .fontSize(12)
- // 配置position属性固定,使自己的布局位置不被第一个Button的宽高影响
- .position({ x: "30%", y: 200 })
- .onClick(() => {
- animateTo({ duration: 1000, curve: Curve.Ease }, () => {
- // 动画闭包中根据标志位改变控制第一个Button宽高的状态变量,使第一个Button做宽高动画
- if (this.flag) {
- this.myWidth = 100;
- this.myHeight = 50;
- } else {
- this.myWidth = 200;
- this.myHeight = 100;
- }
- this.flag = !this.flag;
- });
- })
- }
- .width("100%")
- .height("100%")
使用属性动画产生布局更新动画
显式动画把要执行动画的属性的修改放在闭包函数中触发动画,而属性动画则无需使用闭包,把animation属性加在要做属性动画的组件的属性后即可。
属性动画的接口为:
- animation(value: AnimateParam)
其入参为动画参数。想要组件随某个属性值的变化而产生动画,此属性需要加在animation属性之前。有的属性变化不希望通过animation产生属性动画,可以放在animation之后。上面显式动画的示例很容易改为用属性动画实现。例如:
- @Entry
- @Component
- struct LayoutChange2 {
- @State myWidth: number = 100;
- @State myHeight: number = 50;
- @State flag: boolean = false;
- @State myColor: Color = Color.Blue;
- build() {
- Column({ space: 10 }) {
- Button("text")
- .type(ButtonType.Normal)
- .width(this.myWidth)
- .height(this.myHeight)
- // animation只对其上面的type、width、height属性生效,时长为1000ms,曲线为Ease
- .animation({ duration: 1000, curve: Curve.Ease })
- // animation对下面的backgroundColor、margin属性不生效
- .backgroundColor(this.myColor)
- .margin(20)
- Button("area: click me")
- .fontSize(12)
- .onClick(() => {
- // 改变属性值,配置了属性动画的属性会进行动画过渡
- if (this.flag) {
- this.myWidth = 100;
- this.myHeight = 50;
- this.myColor = Color.Blue;
- } else {
- this.myWidth = 200;
- this.myHeight = 100;
- this.myColor = Color.Pink;
- }
- this.flag = !this.flag;
- })
- }
- }
- }
上述示例中,第一个button上的animation属性,只对写在animation之前的type、width、height属性生效,而对写在animation之后的backgroundColor、margin属性无效。运行结果是width、height属性会按照animation的动画参数执行动画,而backgroundColor会直接跳变,不会产生动画。效果如下图:
1. 使用属性动画时,会按照指定的属性动画参数执行动画。每个组件可为自己的属性配置不同参数的属性动画。
2. 显式动画会对动画闭包前后造成的所有界面差异执行动画,且使用同一动画参数,适用于统一执行的场景。此外,显式动画也可以用于一些非属性变量造成的动画,如if/else的条件,ForEach使用的数组元素的删减。
3. 如果一个属性配置了属性动画,且在显式动画闭包中改变该属性值,属性动画优先生效,会使用属性动画的动画参数。

更多建议: