
 免费 AI IDE

使用OpenCV创建视频
目标
每当您使用视频Feed时,您最终都可能想要以新的视频文件的形式保存您的图像处理结果。对于简单的视频输出,您可以使用为此设计的OpenCV内置cv :: VideoWriter类。
- 如何使用OpenCV创建视频文件
- 您可以使用OpenCV创建什么类型的视频文件
- 如何从视频中提取给定的颜色通道
作为一个简单的演示,我只需将一个输入视频文件的BGR颜色通道之一提取到一个新的视频中。您可以从其控制台行参数控制应用程序的流量:
- 第一个参数指向要处理的视频文件
- 第二个参数可以是以下字符之一:RG B.这将指定要提取哪些通道。
- 最后一个参数是字符Y(是)或N(否)。如果不是,输入视频文件的编解码器将与输出相同。否则,将弹出一个窗口,并允许您选择要使用的编解码器。
例如,有效的命令行将如下所示:
video-write.exe video/Megamind.avi R Y
源代码
您也可以在samples/cpp/tutorial_code/videoio/video-write/OpenCV源库的文件夹中找到源代码和这些视频文件,或从这里下载。
#include <iostream> // for standard I/O
#include <string>   // for strings
#include <opencv2/core.hpp>     // Basic OpenCV structures (cv::Mat)
#include <opencv2/videoio.hpp>  // Video write
using namespace std;
using namespace cv;
static void help()
{
    cout
        << "------------------------------------------------------------------------------" << endl
        << "This program shows how to write video files."                                   << endl
        << "You can extract the R or G or B color channel of the input video."              << endl
        << "Usage:"                                                                         << endl
        << "./video-write <input_video_name> [ R | G | B] [Y | N]"                          << endl
        << "------------------------------------------------------------------------------" << endl
        << endl;
}
int main(int argc, char *argv[])
{
    help();
    if (argc != 4)
    {
        cout << "Not enough parameters" << endl;
        return -1;
    }
    const string source      = argv[1];           // the source file name
    const bool askOutputType = argv[3][0] =='Y';  // If false it will use the inputs codec type
    VideoCapture inputVideo(source);              // Open input
    if (!inputVideo.isOpened())
    {
        cout  << "Could not open the input video: " << source << endl;
        return -1;
    }
    string::size_type pAt = source.find_last_of('.');                  // Find extension point
    const string NAME = source.substr(0, pAt) + argv[2][0] + ".avi";   // Form the new name with container
    int ex = static_cast<int>(inputVideo.get(CAP_PROP_FOURCC));     // Get Codec Type- Int form
    // Transform from int to char via Bitwise operators
    char EXT[] = {(char)(ex & 0XFF) , (char)((ex & 0XFF00) >> 8),(char)((ex & 0XFF0000) >> 16),(char)((ex & 0XFF000000) >> 24), 0};
    Size S = Size((int) inputVideo.get(CAP_PROP_FRAME_WIDTH),    // Acquire input size
                  (int) inputVideo.get(CAP_PROP_FRAME_HEIGHT));
    VideoWriter outputVideo;                                        // Open the output
    if (askOutputType)
        outputVideo.open(NAME, ex=-1, inputVideo.get(CAP_PROP_FPS), S, true);
    else
        outputVideo.open(NAME, ex, inputVideo.get(CAP_PROP_FPS), S, true);
    if (!outputVideo.isOpened())
    {
        cout  << "Could not open the output video for write: " << source << endl;
        return -1;
    }
    cout << "Input frame resolution: Width=" << S.width << "  Height=" << S.height
         << " of nr#: " << inputVideo.get(CAP_PROP_FRAME_COUNT) << endl;
    cout << "Input codec type: " << EXT << endl;
    int channel = 2; // Select the channel to save
    switch(argv[2][0])
    {
    case 'R' : channel = 2; break;
    case 'G' : channel = 1; break;
    case 'B' : channel = 0; break;
    }
    Mat src, res;
    vector<Mat> spl;
    for(;;) //Show the image captured in the window and repeat
    {
        inputVideo >> src;              // read
        if (src.empty()) break;         // check if at end
        split(src, spl);                // process - extract only the correct channel
        for (int i =0; i < 3; ++i)
            if (i != channel)
                spl[i] = Mat::zeros(S, spl[0].type());
       merge(spl, res);
       //outputVideo.write(res); //save or
       outputVideo << res;
    }
    cout << "Finished writing" << endl;
    return 0;
}
视频的结构
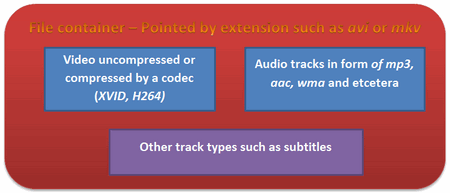
首先,您应该了解视频文件的外观。每个视频文件本身就是容器。容器的类型在文件扩展名(例如avi,mov或mkv)中表示。它包含多个元素,如:视频馈送,音频馈送或其他音轨(例如字幕)。这些馈送是如何存储的由它们中的每一个使用的编解码器决定。在音频通道使用的编解码器是mp3或aac的情况下。对于视频文件,列表以某种方式更长,包括诸如XVID,DIVX,H264或LAGS(Lagarith Lossless Codec)。您可能在系统上使用的编解码器的完整列表取决于您已安装的编解码器。
正如您可以看到的事情可能会让视频变得非常复杂。然而,OpenCV主要是一个计算机视觉库,而不是视频流,编解码器和写入。因此,开发人员试图让这部分尽可能的简单。由于OpenCV视频容器仅支持avi扩展,它的第一个版本。这样做的一个直接的限制是您无法保存大于2 GB的视频文件。此外,您只能创建和扩展容器内的单个视频轨道。没有音频或其他曲目编辑支持。不过,系统上存在的任何视频编解码器都可能正常工作 如果您遇到这些限制,您将需要查看更专门的视频编写库,如FFMpeg或编解码器,如HuffYUV,CorePNG和LCL。作为替代方案,使用OpenCV创建视频轨道,并使用声轨扩展,或通过使用视频操作程序(如VirtualDub或AviSynth)将其转换为其他格式。
VideoWriter类
这里写的内容建立在你已经通过OpenCV读取视频输入和相似度测量教程的假设,你知道如何读取视频文件。要创建视频文件,您只需要创建一个cv :: VideoWriter类的实例。您可以通过构造函数中的参数或稍后通过cv :: VideoWriter :: open函数指定其属性。无论哪种方式,参数是相同的:1.在其扩展名中包含容器类型的输出的名称。目前只支持avi。我们从输入文件构造这个,添加到要使用的通道的名称,并使用容器扩展名完成它。
const string source      = argv[1];            // the source file name
string::size_type pAt = source.find_last_of('.');   // Find extension point
const string NAME = source.substr(0, pAt) + argv[2][0] + ".avi"; // Form the new name with container- 用于视频轨道的编解码器。现在所有的视频编解码器都有一个唯一的短名称,最多四个字符。因此,XVID,DIVX或H264的名称。这被称为四字符代码。您也可以通过使用其获取功能从输入视频中查询。因为get函数是一个通用函数,它总是返回double值。双精度值存储在64位上。四个字符是四个字节,意味着32位。这四个字符被编码在双倍的低32位中。丢弃高32位的一个简单方法是将此值转换为int:
VideoCapture inputVideo(source);                                // Open input
int ex = static_cast<int>(inputVideo.get(CAP_PROP_FOURCC));     // Get Codec Type- Int form
OpenCV内部使用这种整数类型,并期望它作为其第二个参数。现在要从整数形式转换为字符串,我们可以使用两种方法:一个按位运算符和一个联合方法。第一个从int中提取字符看起来像(“和”操作,一些移动,并在结尾添加一个0以关闭字符串):
char EXT [] = {ex&0XFF,(ex&0XFF00)>> 8,(ex&0XFF0000)>> 16,(ex&0XFF000000)>> 24,0};
你可以和工会做同样的事情:
union { int v; char c[5];} uEx ;
uEx.v = ex;                              // From Int to char via union
uEx.c[4]='\0';这样做的优点是转换在分配后自动完成,而对于按位运算符,您需要在更改编解码器类型时执行操作。如果事先知道编解码器有四个字符代码,可以使用CV_FOURCC宏构建整数:
CV_FOURCC('P','I','M,'1') // this is an MPEG1 codec from the characters to integer
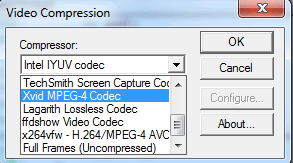
如果您传递此参数减去一个而不是窗口将在运行时弹出,其中包含系统上安装的所有编解码器,并要求您选择要使用的编解码器:
- 输出视频的每秒帧数。再次,这里我通过使用get函数来保持每秒的输入视频帧。
- 输出视频帧的大小。这里也使用get函数保留每秒的输入视频帧大小。
- 最后一个参数是可选的。默认情况下是真的,并且输出将是一个多彩的输出(所以写你会发送三通道图像)。要创建一个灰度级视频,在这里传递一个虚假参数。
VideoWriter outputVideo;
Size S = Size((int) inputVideo.get(CAP_PROP_FRAME_WIDTH),    //Acquire input size
              (int) inputVideo.get(CAP_PROP_FRAME_HEIGHT));
outputVideo.open(NAME , ex, inputVideo.get(CAP_PROP_FPS),S, true);outputVideo.write(res); //or
outputVideo << res;split(src, spl); // process - extract only the correct channel
for( int i =0; i < 3; ++i)
if (i != channel)
spl[i] = Mat::zeros(S, spl[0].type());
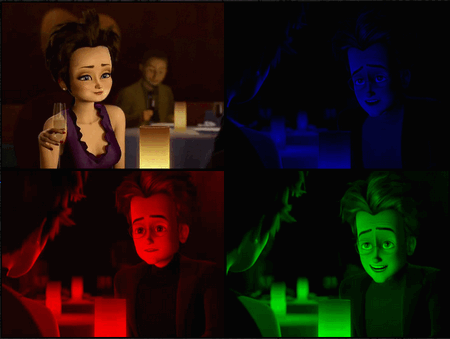
merge(spl, res);把所有这一切放在一起,你会得到更高的源代码,其运行时结果将显示如下图像:


更多建议: