
 免费 AI IDE

2D特征框架特征检测
2018-10-12 10:24 更新
目标
在本教程中,您将学习如何:
- 使用cv :: FeatureDetector接口来查找兴趣点。特别:使用cv :: xfeatures2d :: SURF及其函数cv :: xfeatures2d :: SURF :: detect来执行检测过程使用函数cv :: drawKeypoints绘制检测到的关键点
Code
本教程代码如下所示。
#include <stdio.h>
#include <iostream>
#include "opencv2/core.hpp"
#include "opencv2/features2d.hpp"
#include "opencv2/xfeatures2d.hpp"
#include "opencv2/highgui.hpp"
using namespace cv;
using namespace cv::xfeatures2d;
void readme();
/* @function main */
int main( int argc, char** argv )
{
  if( argc != 3 )
  { readme(); return -1; }
  Mat img_1 = imread( argv[1], IMREAD_GRAYSCALE );
  Mat img_2 = imread( argv[2], IMREAD_GRAYSCALE );
  if( !img_1.data || !img_2.data )
  { std::cout<< " --(!) Error reading images " << std::endl; return -1; }
  //-- Step 1: Detect the keypoints using SURF Detector
  int minHessian = 400;
  Ptr<SURF> detector = SURF::create( minHessian );
  std::vector<KeyPoint> keypoints_1, keypoints_2;
  detector->detect( img_1, keypoints_1 );
  detector->detect( img_2, keypoints_2 );
  //-- Draw keypoints
  Mat img_keypoints_1; Mat img_keypoints_2;
  drawKeypoints( img_1, keypoints_1, img_keypoints_1, Scalar::all(-1), DrawMatchesFlags::DEFAULT );
  drawKeypoints( img_2, keypoints_2, img_keypoints_2, Scalar::all(-1), DrawMatchesFlags::DEFAULT );
  //-- Show detected (drawn) keypoints
  imshow("Keypoints 1", img_keypoints_1 );
  imshow("Keypoints 2", img_keypoints_2 );
  waitKey(0);
  return 0;
  }
  /* @function readme */
  void readme()
  { std::cout << " Usage: ./SURF_detector <img1> <img2>" << std::endl; }
结果
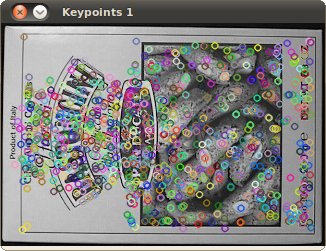
以下是应用于第一张图像的特征检测的结果:
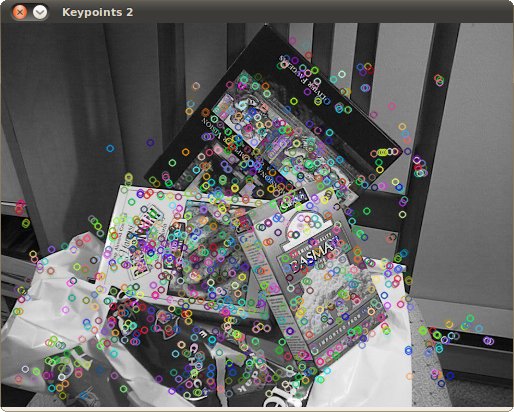
是第二张图片的结果:
以上内容是否对您有帮助:


更多建议: