免费 AI IDE
本篇文章,我将为大家介绍如何通过使用 Oracle 数据库的简化应用程序在 SpringBoot 应用程序中使用多个数据源。下面是详情内容,希望能够对各位读者有所帮助。
项目创建
我们可以使用Spring Initializer创建具有以下依赖项的示例应用程序:
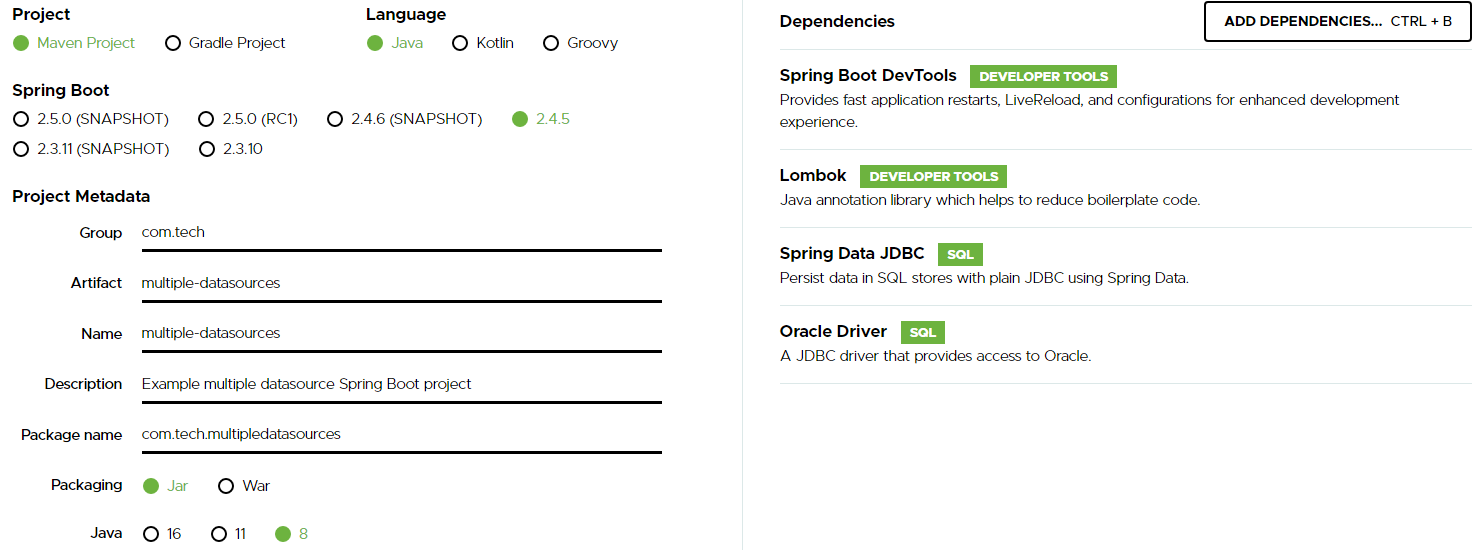
选择后,请按“生成”按钮并将项目另存为 zip 文件。
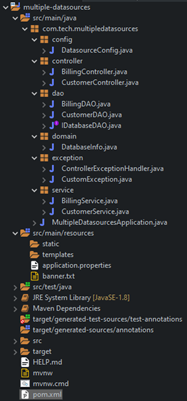
我使用 Eclipse 作为 Java IDE,但你可以使用任何你喜欢的方式来开发示例应用程序。打开 zip 文件,并将该文件夹作为 Eclipse 中的 Maven 项目导入。项目结构应如下所示:
属性文件
首先,让我们在 application.properties 文件中定义两个不同的数据源设置,如下所示:
server.port=9090
spring.output.ansi.enabled=ALWAYS

application-description=@project.description@
application-version=@project.version@

spring.customerdatasource.url=[url1]
spring.customerdatasource.username=[username1]
spring.customerdatasource.password=[password1]
spring.customerdatasource.driverClassName=oracle.jdbc.OracleDriver

spring.billingdatasource.url=[url2]
spring.billingdatasource.username=[username2]
spring.billingdatasource.password=[password1]
spring.billingdatasource.driverClassName=oracle.jdbc.OracleDriver

database.sql.databasename=SELECT dbid, name FROM v$database
正如我之前提到的,我使用过 Oracle 数据库,但你也可以使用其他数据库,只要相应地更改 driverClassName。
数据源配置
为了创建 DataSource bean,我创建了一个 DatasourceConfig 类并将其注释为配置,并将两个数据源添加为两个不同的 bean:
import javax.sql.DataSource;

import org.springframework.context.annotation.Bean;
import org.springframework.context.annotation.Configuration;
import org.springframework.core.env.Environment;
import org.springframework.jdbc.datasource.DriverManagerDataSource;

@Configuration
public class DatasourceConfig {

	Environment env;

	public DatasourceConfig(Environment env) {
		this.env = env;
	}

	@Bean(name = "customerDataSource")
    public DataSource customerDataSource() {
    	DriverManagerDataSource dataSource = new DriverManagerDataSource();
        dataSource.setDriverClassName(env.getProperty("spring.customerdatasource.driverClassName"));
        dataSource.setUrl(env.getProperty("spring.customerdatasource.url"));
        dataSource.setUsername(env.getProperty("spring.customerdatasource.username"));
        dataSource.setPassword(env.getProperty("spring.customerdatasource.password"));

        return dataSource;
    }

    @Bean(name = "billingDataSource")
    public DataSource billingDataSource() {
    	DriverManagerDataSource dataSource = new DriverManagerDataSource();
        dataSource.setDriverClassName(env.getProperty("spring.billingdatasource.driverClassName"));
        dataSource.setUrl(env.getProperty("spring.billingdatasource.url"));
        dataSource.setUsername(env.getProperty("spring.billingdatasource.username"));
        dataSource.setPassword(env.getProperty("spring.billingdatasource.password"));

        return dataSource;
    }

}
数据访问
我使用了 JdbcTemplate作为数据访问。要创建 DAO 接口,请在 com.tech.multipledatasources.dao 包下添加 IDatabaseDAO 接口,如下所示:
import com.tech.multipledatasources.domain.DatabaseInfo;

public interface IDatabaseDAO {

    public DatabaseInfo getDatabaseInfo();
}
我对这个接口做了两种不同的实现,因为即使它是一个简单的应用程序,现实生活中的场景也会有所不同。
import javax.sql.DataSource;

import org.springframework.beans.factory.annotation.Qualifier;
import org.springframework.beans.factory.annotation.Value;
import org.springframework.jdbc.core.BeanPropertyRowMapper;
import org.springframework.jdbc.core.JdbcTemplate;
import org.springframework.stereotype.Repository;

import com.tech.multipledatasources.domain.DatabaseInfo;

@Repository
public class BillingDAO implements IDatabaseDAO{

    private JdbcTemplate jdbcTemplate;

    @Value("${database.sql.databasename}")
    private String sql;

    public BillingDAO(@Qualifier("billingDataSource")DataSource datasource) {
        jdbcTemplate = new JdbcTemplate(datasource);
    }

    @Override
    public DatabaseInfo getDatabaseInfo() {
        return jdbcTemplate.queryForObject(sql, new BeanPropertyRowMapper<DatabaseInfo>(DatabaseInfo.class));
    }
}
import javax.sql.DataSource;
import org.springframework.beans.factory.annotation.Qualifier;
import org.springframework.beans.factory.annotation.Value;
import org.springframework.jdbc.core.BeanPropertyRowMapper;
import org.springframework.jdbc.core.JdbcTemplate;
import org.springframework.stereotype.Repository;
import com.tech.multipledatasources.domain.DatabaseInfo;
@Repository
public class CustomerDAO implements IDatabaseDAO {
private JdbcTemplate jdbcTemplate;
@Value("${database.sql.databasename}")
private String sql;
public CustomerDAO(@Qualifier("customerDataSource") DataSource datasource) {
jdbcTemplate = new JdbcTemplate(datasource);
}
@Override
public DatabaseInfo getDatabaseInfo() {
return jdbcTemplate.queryForObject(sql, new BeanPropertyRowMapper<DatabaseInfo>(DatabaseInfo.class));
}
}对于 database.sql.databasename 变量,请在 application.properties 文件中添加“SELECT dbid, name FROM v$database”值。请注意,此 SQL 也适用于 Oracle 数据库。如果您打算使用不同的数据库,则需要更改此语句。
我使用构造函数级别的依赖注入来注入数据源,并使用 Qualifier 注释来指定 bean 名称。
域
我还使用 DatabaseInfo 模型类将 SQL 结果映射到一个对象中。
import lombok.AllArgsConstructor;
import lombok.Getter;
import lombok.NoArgsConstructor;
import lombok.Setter;
import lombok.ToString;

@Getter
@Setter
@AllArgsConstructor
@NoArgsConstructor
@ToString
public class DatabaseInfo {

    private long dbid;
    private String name;

}为了保持代码干净整洁,我使用了Lombok插件。
服务
我添加了两个服务类作为服务层,如下所示,注释为服务,并注入相关的DAO类:
import com.tech.multipledatasources.dao.BillingDAO;
import com.tech.multipledatasources.domain.DatabaseInfo;
import org.springframework.stereotype.Service;

@Service
public class BillingService {

    private BillingDAO billingDAO;

    public BillingService(BillingDAO billingDAO){
        this.billingDAO = billingDAO;
    }

    public DatabaseInfo getDatabaseInfo(){
        return billingDAO.getDatabaseInfo();
    }
}
import com.tech.multipledatasources.dao.CustomerDAO;
import com.tech.multipledatasources.domain.DatabaseInfo;
import org.springframework.stereotype.Service;
@Service
public class CustomerService {
private CustomerDAO customerDAO;
public CustomerService(CustomerDAO customerDAO){
this.customerDAO = customerDAO;
}
public DatabaseInfo getDatabaseInfo(){
return customerDAO.getDatabaseInfo();
}
}异常处理
我在下面创建了 CustomException 类,并在 ControllerAdvice 中使用了中央异常处理:
import lombok.AllArgsConstructor;
import lombok.Getter;
import lombok.NoArgsConstructor;
import lombok.Setter;
import lombok.ToString;

import java.util.Date;

@Getter
@Setter
@AllArgsConstructor
@NoArgsConstructor
@ToString
public class CustomException extends Exception {

    private static final long serialVersionUID = 1L;
	private int errStatusCode;
    private String errMsg;
    private Date errDate;
    private String reqDesc;
}
import org.springframework.http.HttpStatus;
import org.springframework.http.ResponseEntity;
import org.springframework.web.bind.annotation.ExceptionHandler;
import org.springframework.web.context.request.WebRequest;
import java.util.Date;
public class ControllerExceptionHandler {
@ExceptionHandler(Exception.class)
public ResponseEntity<CustomException> genericExceptionHandler(Exception ex, WebRequest request) {
CustomException customException = new CustomException(
HttpStatus.EXPECTATION_FAILED.value(),
ex.getMessage(),
new Date(),
request.getDescription(false)
);
return new ResponseEntity<CustomException>(customException, HttpStatus.EXPECTATION_FAILED);
}
}控制器
我创建了两个控制器。一种用于计费,一种用于客户请求;将两个服务类注入控制器。
import com.tech.multipledatasources.domain.DatabaseInfo;
import com.tech.multipledatasources.service.BillingService;
import org.springframework.http.ResponseEntity;
import org.springframework.web.bind.annotation.GetMapping;
import org.springframework.web.bind.annotation.RequestMapping;
import org.springframework.web.bind.annotation.RestController;

@RestController
@RequestMapping("/billing")
public class BillingController {

    private BillingService billingService;

    public BillingController(BillingService billingService){
        this.billingService = billingService;
    }

    @GetMapping("/dsinfo")
    public ResponseEntity<DatabaseInfo> getDatasourceInfo(){
        return ResponseEntity.ok(billingService.getDatabaseInfo());
    }
}
import com.tech.multipledatasources.domain.DatabaseInfo;
import com.tech.multipledatasources.service.CustomerService;
import org.springframework.http.ResponseEntity;
import org.springframework.web.bind.annotation.GetMapping;
import org.springframework.web.bind.annotation.RequestMapping;
import org.springframework.web.bind.annotation.RestController;
@RestController
@RequestMapping("/customer")
public class CustomerController {
private CustomerService customerService;
public CustomerController(CustomerService customerService){
this.customerService = customerService;
}
@GetMapping("/dsinfo")
public ResponseEntity<DatabaseInfo> getDatasourceInfo(){
return ResponseEntity.ok(customerService.getDatabaseInfo());
}
}运行应用程序
运行应用程序和请求后,它将返回结果,该结果将指示我们刚刚在连接中创建的数据库。
关于Spring boot应用程序中如何使用多个数据源的内容就介绍到此结束了,感谢各位读者的阅读。