

鸿蒙OS 组件与布局代码创建布局
2020-09-18 11:51 更新
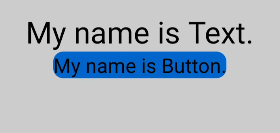
开发如下图所示界面,需要添加一个 Text 组件和 Button 组件。由于两个组件从上到下依次居中排列,可以选择使用竖向的 DirectionalLayout 布局来放置组件。
图1 开发样例图
代码创建布局需要分别创建组件和布局,并将它们进行组织关联。
创建组件
- 声明组件
Button button = new Button(context); // 参数context表示AbilitySlice的Context对象- 设置组件大小
   button.setWidth(ComponentContainer.LayoutConfig.MATCH_CONTENT);
button.setHeight(ComponentContainer.LayoutConfig.MATCH_CONTENT);- 设置组件属性及ID
   button.setText("My name is Button.");
   button.setTextSize(25);
   button.setId(ID_BUTTON);
创建布局并使用
- 声明布局
DirectionalLayout directionalLayout = new DirectionalLayout(context);- 设置布局大小
   directionalLayout.setWidth(ComponentContainer.LayoutConfig.MATCH_PARENT);
directionalLayout.setHeight(ComponentContainer.LayoutConfig.MATCH_PARENT);- 设置布局属性及 ID
directionalLayout.setOrientation(Component.VERTICAL);- 将组件添加到布局中(视布局需要对组件设置布局属性进行约束)
directionalLayout.addComponent(button);- 将布局添加到组件树中
setUIContent(directionalLayout);完整代码示例:
@Override
public void onStart(Intent intent) {
    super.onStart(intent);
    // 步骤1 声明布局
    DirectionalLayout directionalLayout = new DirectionalLayout(context);
    // 步骤2 设置布局大小
    directionalLayout.setWidth(ComponentContainer.LayoutConfig.MATCH_PARENT);
    directionalLayout.setHeight(ComponentContainer.LayoutConfig.MATCH_PARENT);
    // 步骤3 设置布局属性及ID(ID视需要设置即可)
    directionalLayout.setOrientation(Component.VERTICAL);
    directionalLayout.setPadding(32, 32, 32, 32);


    Text text = new Text(context);
    text.setText("My name is Text.");
    text.setTextSize(50);
    text.setId(100);
    // 步骤4.1 为组件添加对应布局的布局属性
    DirectionalLayout.LayoutConfig layoutConfig = new DirectionalLayout.LayoutConfig(LayoutConfig.MATCH_CONTENT,
        LayoutConfig.MATCH_CONTENT);
    layoutConfig.alignment = LayoutAlignment.HORIZONTAL_CENTER;
    text.setLayoutConfig(layoutConfig);


    // 步骤4.2 将Text添加到布局中
    directionalLayout.addComponent(text);


    // 类似的添加一个Button
    Button button = new Button(context);
    layoutConfig.setMargins(0, 50, 0, 0);
    button.setLayoutConfig(layoutConfig);
    button.setText("My name is Button.");
    button.setTextSize(50);
    button.setId(100);
    ShapeElement background = new ShapeElement();
    background.setRgbColor(new RgbColor(0, 125, 255));
    background.setCornerRadius(25);
    button.setBackground(background);
    button.setPadding(10, 10, 10, 10);
    button.setClickedListener(new Component.ClickedListener() {
        @Override
        // 在组件中增加对点击事件的检测
        public void onClick(Component Component) {
            // 此处添加按钮被点击需要执行的操作
        }
    });
    directionalLayout.addComponent(button);


    // 步骤5 将布局作为根布局添加到视图树中
    super.setUIContent(directionalLayout);
}
根据以上步骤创建组件和布局后的界面显示效果如[图1]所示。其中,代码示例中为组件设置了一个按键回调,在按键被按下后,应用会执行自定义的操作。
在代码示例中,可以看到设置组件大小的方法有两种:
- 通过 setWidth/setHeight 直接设置宽高。
- 通过 setLayoutConfig 方法设置布局属性来设定宽高。
这两种方法的区别是后者还可以增加更多的布局属性设置,例如:使用“alignment”设置水平居中的约束。另外,这两种方法设置的宽高以最后设置的作为最终结果。它们的取值一致,可以是以下取值:
- 具体以像素为单位的数值。
- MATCH_PARENT:表示组件大小将扩展为父组件允许的最大值,它将占据父组件方向上的剩余大小。
- MATCH_CONTENT:表示组件大小与它内容占据的大小范围相适应。
以上内容是否对您有帮助:

更多建议: