6 月 30 日是 Beyond黄家驹逝世周年纪念日,对于编程狮W3Cschool小编和广大70、80甚至90年代的人来说“Beyond”可以是一种情结可以是一种回忆也可以是一种精神上的能量,《再见理想》《Amani》《海阔天空》《光辉岁月》一首首脍炙人口的歌曲,鼓舞着一代人在逆境中成长。许多乐迷曾经说过,喜欢 Beyond 就是在纪念自己。纪念黄家驹,也像是在纪念自己的青春,家驹不仅是一代人的记忆,没有什么能够比 Beyond 的名字更能概括 Be-yond ———超越。今天我们来看看会 Python 编程的乐迷是如何致敬黄家驹的吧~
- 作者:薛定谔的壳
- 原文:【有点意思】Python Turtle+PIL ‘画图’之黄家驹
- 来源:CSDN博客
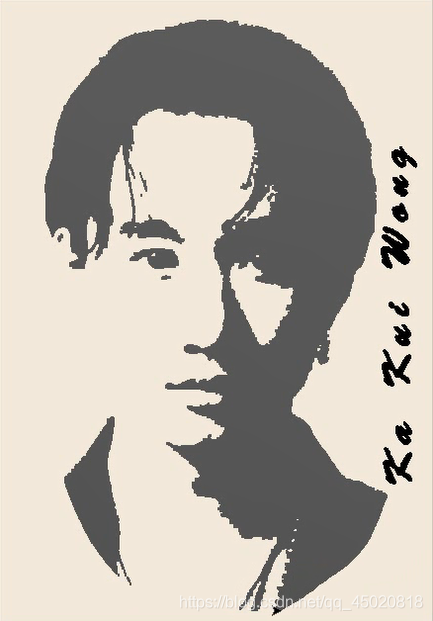
最终效果图:
思路:
运用 PIL 的 Image 模块与 turtle 模块读取并重新画出图像
就是读取一张有人像的图片,然后通过循环对比,记录下人各行人像的像素坐标,然后再通过 turtle 画出大概的人像轮廓。
Image 模块有直接显示轮廓的函数,而且对于从图象中识别出人像,这个对于小白太难了,所以就选取黑白或者是色彩单一、含人像的图像来识别。
步骤:
| 步骤 | 操作 | 用到的库 |
|---|---|---|
| 1 | 读取图像,通过遍历每一行像素记录并对比,得到画图所需的人像‘坐标’ | PIL |
| 2 | 根据所得到的坐标,调用 turtle 库画图 | turtle |
第一步,读取图片,获得画图坐标

读取图片如上,获取坐标是逐行遍历像素的过程,便利时记录每一行像素中非白色(白色为背景色)的像素条的始末坐标(X1,X2)。
对比时,当前像素与同行的下一个像素进行比较,如果两个像素值不同,且有一像素为背景色,那么记录非背景色的横坐标。
记录时,整张图的数据暂时保存在一个列表中,该列表由 n 个列表组成(n 为图像像素行数),这 n 个列表存着对应行的所有非背景色像素条的始末坐标。
源码:
from PIL import Image
import turtle as t


def get_lst(img_path):
    imgf = Image.open(img_path)  # 读取图像
    global size
    print(size:= imgf.size) # 获取图像尺寸/大小
    pix = imgf.load()
    lst = [[] for i in range(size[1])] # 构造空列表
    for y in range(0, size[1]): # 从第一行开始循环
        index = 0
        for x in range(0, size[0]-1): # 循环第y行的每一个像素
            # 如果当前像素与下一个像素值不同且两者有一为背景色,则记录坐标
            if pix[x, y] != pix[x+1, y] and (255, 255, 255, 255) in [pix[x, y], pix[x+1, y]]:
                if index == 0: # index值为0说明是像素条起始坐标
                    lst[y].append([x+1, ])
                    index += 1
                else: # index值为1说明记录的是像素条结束坐标
                    lst[y][-1].append(x)
                    index = 0
    return lst
第二步,画图
得到了每一个像素条的始末坐标后,就可以逐行画图了
源码
def paint(lst):
    fontc = 'whitesmoke' # 右边字的颜色
    manc = 'black' #'dimgrey' 人像的颜色
    t.setup(width=size[0]+40, height=size[1]) # 绘图窗口大小
    t.screensize(bg='oldlace') # 画布背景色
    t.bgpic(r'c:\\users\\pxo\\desktop\\bg.png') # 画布背景图
    t.speed(333) #画画速度 据说范围[1,10]
    for y in range(0, size[1]):
        # 遍历每一行
        t.pencolor(manc)
        for line in lst[y]:
            # 遍历每一个像素条
            if line[0] > 364 and 144 < y < 495: # 这个是判断是否是右边的字
                t.pencolor(fontc)
            # 下面是画像素条
            t.penup()
            t.goto(line[0]-size[0]//2, (size[1]-y)-size[1]//2)
            t.pendown()
            t.goto(line[1]-size[0]//2, (size[1]-y)-size[1]//2)
    t.mainloop()
开始:
if __name__ == '__main__':
    img_path = r'c:\\users\\pxo\\desktop\\jh.png' # 图像地址
    lst = get_lst(img_path)
    paint(lst)
附上一张带背景图的效果

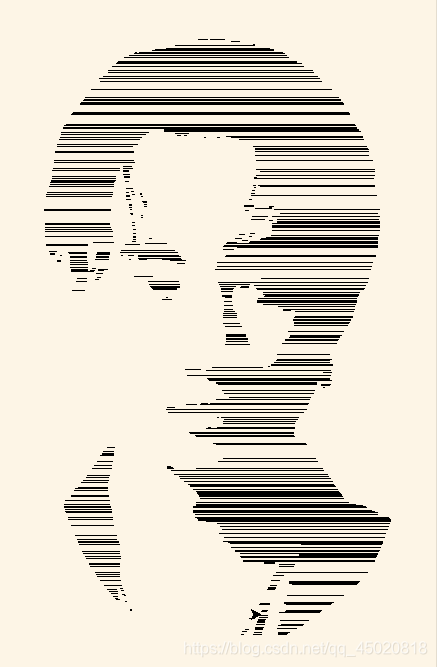
这样就实现了使用 Python Turtle+PIL 绘制黄家驹效果。如果还不过瘾以下提供了另一种思路,具体查看源码注释↓
随机线条实现方式:
源码:
from PIL import Image
import turtle as t
from random import choice


def get_lst(img_path):
    imgf = Image.open(img_path)
    global size
    print(size:= imgf.size)
    pix = imgf.load()
    lst = [[] for i in range(size[1])]
    for y in range(0, size[1]):
        index = 0
        for x in range(0, size[0]-1):
            if pix[x, y] != pix[x+1, y] and (255, 255, 255, 255) in [pix[x, y], pix[x+1, y]]:
                if index == 0:
                    lst[y].append([y, x+1, ]) # 这里在每一个像素条的数据中加入了其纵坐标y
                    index += 1
                else:
                    lst[y][-1].append(x)
                    index = 0
    # 这里也改了,返回的数据列表的子元素是所有单独的像素条,而不是某一行像素条的总和
    lt = []
    for i in lst:
        for j in i:
            if j:
                lt.append(j)
    return lt


def paint(lst):
    fontc = 'darkorange'
    manc = 'black' #'dimgrey'
    t.setup(width=size[0]+40, height=size[1]+40)
    t.screensize(bg='oldlace')
    #t.bgpic(r'c:\\users\\pxo\\desktop\\bg.png')
    t.speed(330)
    cnt = len(lst)
    lt = [i for i in range(cnt)] # 弄一个种子列表,理解为存取位置
    flst = []
    for i in range(cnt):
        del lt[lt.index(index:=choice(lt))] #获取并删除一个随机位置
        line = lst[index]  # 从所有线条中得到一条随机线条(像素条)
        y = line[0]
        x1, x2 = line[1], line[2]
        t.pencolor(manc)
        if x1 > 364 and 144 < y < 495:
            flst.append(line)
            continue
        t.penup()
        t.goto(x1-size[0]//2, (size[1]-y)-size[1]//2)
        t.pendown()
        t.goto(x2-size[0]//2, (size[1]-y)-size[1]//2)
    new_flst = sorted(flst[:-80], reverse=True)
    for line in new_flst:
        y = line[0]
        x1, x2 = line[1], line[2]
        t.pencolor(fontc)
        t.penup()
        t.goto(x1-size[0]//2, (size[1]-y)-size[1]//2)
        t.pendown()
        t.goto(x2-size[0]//2, (size[1]-y)-size[1]//2)
    t.hideturtle()
    t.mainloop()


if __name__ == '__main__':
    img_path = r'c:\\users\\pxo\\desktop\\jh.png'
    lst = get_lst(img_path)
    paint(lst)
附几张画到一半的图

以上就是编程狮(w3cschool.cn)小编为你整理的《程序员如何使用 Python Turtle+PIL 画图绘制黄家驹?【附源码】》全部内容,更多 IT 编程技术文章请关注W3C技术头条。
如果你也想拥有这种能力,你也许需要先掌握以下技能: