
 免费 AI IDE

Angular9 结构型指令
什么是结构型指令?
结构型指令的职责是 HTML 布局。 它们塑造或重塑 DOM 的结构,比如添加、移除或维护这些元素。
像其它指令一样,你可以把结构型指令应用到一个宿主元素上。 然后它就可以对宿主元素及其子元素做点什么。
结构型指令非常容易识别。 在这个例子中,星号(*)被放在指令的属性名之前。
Path:"src/app/app.component.html (ngif)"
<div *ngIf="hero" class="name">{{hero.name}}</div>
没有方括号,没有圆括号,只是把 *ngIf 设置为一个字符串。
在这个例子中,你将学到星号(*)这个简写方法,而这个字符串是一个微语法,而不是通常的模板表达式。 Angular 会解开这个语法糖,变成一个 <ng-template> 标记,包裹着宿主元素及其子元素。 每个结构型指令都可以用这个模板做点不同的事情。
三个常用的内置结构型指令 —— NgIf、NgFor和NgSwitch...。 你在模板语法一章中学过它,并且在 Angular 文档的例子中到处都在用它。下面是模板中的例子:
Path:"src/app/app.component.html (built-in)"
<div *ngIf="hero" class="name">{{hero.name}}</div>


<ul>
  <li *ngFor="let hero of heroes">{{hero.name}}</li>
</ul>


<div [ngSwitch]="hero?.emotion">
  <app-happy-hero    *ngSwitchCase="'happy'"    [hero]="hero"></app-happy-hero>
  <app-sad-hero      *ngSwitchCase="'sad'"      [hero]="hero"></app-sad-hero>
  <app-confused-hero *ngSwitchCase="'confused'" [hero]="hero"></app-confused-hero>
  <app-unknown-hero  *ngSwitchDefault           [hero]="hero"></app-unknown-hero>
</div>
指令的拼写形式
你将看到指令同时具有两种拼写形式大驼峰 UpperCamelCase 和小驼峰 lowerCamelCase,比如你已经看过的 NgIf 和 ngIf。 这里的原因在于,NgIf 引用的是指令的类名,而 ngIf 引用的是指令的属性名*。
指令的类名拼写成大驼峰形式(NgIf),而它的属性名则拼写成小驼峰形式(ngIf)。 本章会在谈论指令的属性和工作原理时引用指令的类名,在描述如何在 HTML 模板中把该指令应用到元素时,引用指令的属性名。
还有另外两种 Angular 指令,在本开发指南的其它地方有讲解:(1) 组件 (2) 属性型指令。
组件可以在原生 HTML 元素中管理一小片区域的 HTML。从技术角度说,它就是一个带模板的指令。
属性型指令会改变某个元素、组件或其它指令的外观或行为。 比如,内置的
NgStyle指令可以同时修改元素的多个样式。
你可以在一个宿主元素上应用多个属性型指令,但只能应用一个结构型指令。
NgIf 案例分析
NgIf 是一个很好的结构型指令案例:它接受一个布尔值,并据此让一整块 DOM 树出现或消失。
Path:"src/app/app.component.html (ngif-true)"
<p *ngIf="true">
  Expression is true and ngIf is true.
  This paragraph is in the DOM.
</p>
<p *ngIf="false">
  Expression is false and ngIf is false.
  This paragraph is not in the DOM.
</p>
ngIf 指令并不是使用 CSS 来隐藏元素的。它会把这些元素从 DOM 中物理删除。 使用浏览器的开发者工具就可以确认这一点。
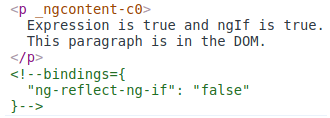
可以看到第一段文字出现在了 DOM 中,而第二段则没有,在第二段的位置上是一个关于“绑定”的注释。
当条件为假时,NgIf 会从 DOM 中移除它的宿主元素,取消它监听过的那些 DOM 事件,从 Angular 变更检测中移除该组件,并销毁它。 这些组件和 DOM 节点可以被当做垃圾收集起来,并且释放它们占用的内存。
为什么是移除而不是隐藏?
指令也可以通过把它的 display 风格设置为 none 而隐藏不需要的段落。
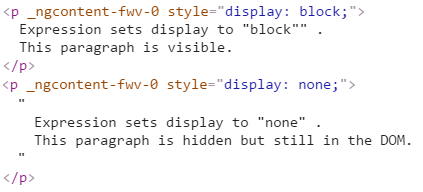
Path:"src/app/app.component.html (display-none)"
<p [style.display]="'block'">
  Expression sets display to "block".
  This paragraph is visible.
</p>
<p [style.display]="'none'">
  Expression sets display to "none".
  This paragraph is hidden but still in the DOM.
</p>
当不可见时,这个元素仍然留在 DOM 中。
对于简单的段落,隐藏和移除之间的差异影响不大,但对于资源占用较多的组件是不一样的。 当隐藏掉一个元素时,组件的行为还在继续 —— 它仍然附加在它所属的 DOM 元素上, 它也仍在监听事件。Angular 会继续检查哪些能影响数据绑定的变更。 组件原本要做的那些事情仍在继续。
虽然不可见,组件及其各级子组件仍然占用着资源,而这些资源如果分配给别人可能会更有用。 在性能和内存方面的负担相当可观,响应度会降低,而用户却可能无法从中受益。
当然,从积极的一面看,重新显示这个元素会非常快。 组件以前的状态被保留着,并随时可以显示。 组件不用重新初始化 —— 该操作可能会比较昂贵。 这时候隐藏和显示就成了正确的选择。
但是,除非有非常强烈的理由来保留它们,否则你会更倾向于移除用户看不见的那些 DOM 元素,并且使用 NgIf 这样的结构型指令来收回用不到的资源。
同样的考量也适用于每一个结构型指令,无论是内置的还是自定义的。 你应该提醒自己慎重考虑添加元素、移除元素以及创建和销毁组件的后果。
星号(*)前缀
你可能注意到了指令名的星号(*)前缀,并且困惑于为什么需要它以及它是做什么的。
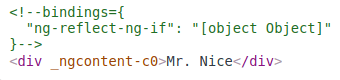
这里的 *ngIf 会在 hero 存在时显示英雄的名字。
Path:"src/app/app.component.html (asterisk)"
<div *ngIf="hero" class="name">{{hero.name}}</div>
星号是一个用来简化更复杂语法的“语法糖”。 从内部实现来说,Angular 把 *ngIf 属性 翻译成一个 <ng-template> 元素 并用它来包裹宿主元素,代码如下:
Path:"src/app/app.component.html (ngif-template)"
<ng-template [ngIf]="hero">
  <div class="name">{{hero.name}}</div>
</ng-template>*ngIf指令被移到了<ng-template>元素上。在那里它变成了一个属性绑定[ngIf]。
<div>上的其余部分,包括它的class属性在内,移到了内部的<ng-template>元素上。
第一种形态永远不会真的渲染出来。 只有最终产出的结果才会出现在 DOM 中。
Angular 会在真正渲染的时候填充 <ng-template> 的内容,并且把 <ng-template> 替换为一个供诊断用的注释。
NgFor和NgSwitch...指令也都遵循同样的模式。
*ngFor 内幕
Angular 会把 *ngFor 用同样的方式把星号(*)语法的 template属性转换成 <ng-template>元素。
这里有一个 NgFor 的全特性应用,同时用了这两种写法:
Path:"src/app/app.component.html (inside-ngfor)"
<div *ngFor="let hero of heroes; let i=index; let odd=odd; trackBy: trackById" [class.odd]="odd">
  ({{i}}) {{hero.name}}
</div>


<ng-template ngFor let-hero [ngForOf]="heroes" let-i="index" let-odd="odd" [ngForTrackBy]="trackById">
  <div [class.odd]="odd">({{i}}) {{hero.name}}</div>
</ng-template>
它明显比 ngIf 复杂得多,确实如此。 NgFor 指令比本章展示过的 NgIf 具有更多的必选特性和可选特性。 至少 NgFor 会需要一个循环变量(let hero)和一个列表(heroes)。
你可以通过把一个字符串赋值给 ngFor 来启用这些特性,这个字符串使用 Angular 的微语法。
ngFor字符串之外的每一样东西都会留在宿主元素(<div&)上,也就是说它移到了<ng-template&内部。 在这个例子中,[class.odd]="odd"留在了<div&上。
微语法
Angular 微语法能让你通过简短的、友好的字符串来配置一个指令。 微语法解析器把这个字符串翻译成 <ng-template> 上的属性:
let关键字声明一个模板输入变量,你会在模板中引用它。本例子中,这个输入变量就是hero、i和odd。 解析器会把let hero、let i和let odd翻译成命名变量let-hero、let-i和let-odd。
- 微语法解析器接收
of和trackby,把它们首字母大写(of->Of,trackBy->TrackBy), 并且给它们加上指令的属性名(ngFor)前缀,最终生成的名字是ngForOf和ngForTrackBy。 这两个最终生成的名字是NgFor的输入属性,指令据此了解到列表是heroes,而track-by函数是trackById。
NgFor指令在列表上循环,每个循环中都会设置和重置它自己的上下文对象上的属性。 这些属性包括但不限于index和odd以及一个特殊的属性名$implicit(隐式变量)。
let-i和let-odd变量是通过let i=index和let odd=odd来定义的。 Angular 把它们设置为上下文对象中的index和odd属性的当前值。
- 这里并没有指定
let-hero的上下文属性。它的来源是隐式的。 Angular 将let-hero设置为此上下文中$implicit属性的值, 它是由NgFor用当前迭代中的英雄初始化的。
- API 参考手册中描述了
NgFor指令的其它属性和上下文属性。
NgForOf指令实现了NgFor。请到 NgForOf API 参考手册中了解NgForOf指令的更多属性及其上下文属性。
编写你自己的结构型指令
当你编写自己的结构型指令时,也可以利用这些微语法机制。 例如,Angular 中的微语法允许你写成 <div *ngFor="let item of items">{{item}}</div> 而不是 <ng-template ngFor let-item [ngForOf]="items"><div>{{item}}</div></ng-template>。 以下各节提供了有关约束、语法和微语法翻译方式的详细信息。
约束
微语法必须满足以下要求:
- 它必须可被预先了解,以便 IDE 可以解析它而无需知道指令的底层语义或已存在哪些指令。
- 它必须转换为 DOM 中的“键-值”属性。
语法
当你编写自己的结构型指令时,请使用以下语法:
*:prefix="( :let | :expression ) (';' | ',')? ( :let | :as | :keyExp )*"下表描述了微语法的每个组成部分。
| 组成部分 | 描述 |
|---|---|
prefix |
HTML 属性键(attribute key) |
key |
HTML 属性键(attribute key) |
local |
模板中使用的局部变量名 |
export |
指令使用指定名称导出的值 |
expression |
标准 Angular 表达式 |
| keyExp = :key ":"? :expression ("as" :local)? ";"? |
| let = "let" :local "=" :export ";"? |
| as = :export "as" :local ";"? |
翻译
将微语法转换为常规的绑定语法,如下所示:
| 微语法 | 翻译结果 |
|---|---|
| prefix 和裸表达式 | [prefix]="expression" |
| keyExp | [prefixKey] "表达式" (let-prefixKey="export"),注意 prefix 已经加成了 key |
| let | let-local="export" |
微语法样例
下表说明了 Angular 会如何解开微语法。
| 微语法 | 解语法糖后 |
|---|---|
| *ngFor="let item of [1,2,3]" | <ng-template ngFor let-item [ngForOf]="[1,2,3]"> |
| *ngFor="let item of [1,2,3] as items; trackBy: myTrack; index as i" | <ng-template ngFor let-item [ngForOf]="[1,2,3]" let-items="ngForOf" [ngForTrackBy]="myTrack" let-i="index"> |
| *ngIf="exp" | <ng-template [ngIf]="exp"> |
| *ngIf="exp as value" | <ng-template [ngIf]="exp" let-value="ngIf"> |
注:
- 这些微语法机制在你写自己的结构型指令时也同样有效。
模板输入变量
模板输入变量是这样一种变量,你可以在单个实例的模板中引用它的值。 这个例子中有好几个模板输入变量:hero、i 和 odd。 它们都是用 let 作为前导关键字。
模板输入变量和模板引用变量是不同的,无论是在语义上还是语法上。
你使用 let 关键字(如 let hero)在模板中声明一个模板输入变量。 这个变量的范围被限制在所重复模板的单一实例上。 事实上,你可以在其它结构型指令中使用同样的变量名。
而声明模板引用变量使用的是给变量名加 # 前缀的方式(#var)。 一个引用变量引用的是它所附着到的元素、组件或指令。它可以在整个模板的任意位置访问。
模板输入变量和引用变量具有各自独立的命名空间。let hero 中的 hero 和 #hero 中的 hero 并不是同一个变量。
每个宿主元素上只能有一个结构型指令
有时你会希望只有当特定的条件为真时才重复渲染一个 HTML 块。 你可能试过把 *ngFor 和 *ngIf 放在同一个宿主元素上,但 Angular 不允许。这是因为你在一个元素上只能放一个结构型指令。
原因很简单。结构型指令可能会对宿主元素及其子元素做很复杂的事。当两个指令放在同一个元素上时,谁先谁后?NgIf 优先还是 NgFor 优先?NgIf 可以取消 NgFor 的效果吗? 如果要这样做,Angular 应该如何把这种能力泛化,以取消其它结构型指令的效果呢?
对这些问题,没有办法简单回答。而禁止多个结构型指令则可以简单地解决这个问题。 这种情况下有一个简单的解决方案:把 *ngIf 放在一个"容器"元素上,再包装进 *ngFor 元素。 这个元素可以使用ng-container,以免引入一个新的 HTML 层级。
NgSwitch 内幕
Angular 的 NgSwitch 实际上是一组相互合作的指令:NgSwitch、NgSwitchCase 和 NgSwitchDefault。
例子如下:
Path:"src/app/app.component.html (ngswitch)"
<div [ngSwitch]="hero?.emotion">
  <app-happy-hero    *ngSwitchCase="'happy'"    [hero]="hero"></app-happy-hero>
  <app-sad-hero      *ngSwitchCase="'sad'"      [hero]="hero"></app-sad-hero>
  <app-confused-hero *ngSwitchCase="'confused'" [hero]="hero"></app-confused-hero>
  <app-unknown-hero  *ngSwitchDefault           [hero]="hero"></app-unknown-hero>
</div>
一个值(hero.emotion)被被赋值给了 NgSwitch,以决定要显示哪一个分支。
NgSwitch 本身不是结构型指令,而是一个属性型指令,它控制其它两个 switch 指令的行为。 这也就是为什么你要写成 [ngSwitch] 而不是 *ngSwitch 的原因。
NgSwitchCase 和 NgSwitchDefault 都是结构型指令。 因此你要使用星号(*)前缀来把它们附着到元素上。 NgSwitchCase 会在它的值匹配上选项值的时候显示它的宿主元素。 NgSwitchDefault 则会当没有兄弟 NgSwitchCase 匹配上时显示它的宿主元素。
指令所在的元素就是它的宿主元素。
<happy-hero&是*ngSwitchCase的宿主元素。<unknown-hero&是*ngSwitchDefault的宿主元素。
像其它的结构型指令一样,NgSwitchCase 和 NgSwitchDefault 也可以解开语法糖,变成 <ng-template> 的形式。
Path:"src/app/app.component.html (ngswitch-template)"
<div [ngSwitch]="hero?.emotion">
  <ng-template [ngSwitchCase]="'happy'">
    <app-happy-hero [hero]="hero"></app-happy-hero>
  </ng-template>
  <ng-template [ngSwitchCase]="'sad'">
    <app-sad-hero [hero]="hero"></app-sad-hero>
  </ng-template>
  <ng-template [ngSwitchCase]="'confused'">
    <app-confused-hero [hero]="hero"></app-confused-hero>
  </ng-template >
  <ng-template ngSwitchDefault>
    <app-unknown-hero [hero]="hero"></app-unknown-hero>
  </ng-template>
</div>
优先使用星号(*)语法
星号(*)语法比不带语法糖的形式更加清晰。 如果找不到单一的元素来应用该指令,可以使用<ng-container>作为该指令的容器。
虽然很少有理由在模板中使用结构型指令的属性形式和元素形式,但这些幕后知识仍然是很重要的,即:Angular 会创建 <ng-template>,还要了解它的工作原理。 当需要写自己的结构型指令时,你就要使用 <ng-template>。
<ng-template>元素
<ng-template>是一个 Angular 元素,用来渲染 HTML。 它永远不会直接显示出来。 事实上,在渲染视图之前,Angular 会把 <ng-template> 及其内容替换为一个注释。
如果没有使用结构型指令,而仅仅把一些别的元素包装进 <ng-template> 中,那些元素就是不可见的。 在下面的这个短语"Hip! Hip! Hooray!"中,中间的这个 "Hip!"(欢呼声) 就是如此。
Path:"src/app/app.component.html (template-tag)"
<p>Hip!</p>
<ng-template>
  <p>Hip!</p>
</ng-template>
<p>Hooray!</p>
Angular 抹掉了中间的那个 "Hip!",让欢呼声显得不再那么热烈了。

结构型指令会让 <ng-template> 正常工作,在你写自己的结构型指令时就会看到这一点。
使用<ng-container>把一些兄弟元素归为一组
通常都需要一个根元素作为结构型指令的宿主。 列表元素(<li>)就是一个典型的供 NgFor 使用的宿主元素。
Path:"src/app/app.component.html (ngfor-li)"
<li *ngFor="let hero of heroes">{{hero.name}}</li>
当没有这样一个单一的宿主元素时,你就可以把这些内容包裹在一个原生的 HTML 容器元素中,比如 <div>,并且把结构型指令附加到这个"包裹"上。
Path:"src/app/app.component.html (ngif)"
<div *ngIf="hero" class="name">{{hero.name}}</div>
但引入另一个容器元素(通常是 <span> 或 <div>)来把一些元素归到一个单一的根元素下,通常也会带来问题。注意,是"通常"而不是"总会"。
这种用于分组的元素可能会破坏模板的外观表现,因为 CSS 的样式既不曾期待也不会接受这种新的元素布局。 比如,假设你有下列分段布局。
Path:"src/app/app.component.html (ngif-span)"
<p>
  I turned the corner
  <span *ngIf="hero">
    and saw {{hero.name}}. I waved
  </span>
  and continued on my way.
</p>
而你的 CSS 样式规则是应用于 <p> 元素下的 <span> 的。
Path:"src/app/app.component.css (p-span)"
p span { color: red; font-size: 70%; }这样渲染出来的段落就会非常奇怪。

本来为其它地方准备的 p span 样式,被意外的应用到了这里。
另一个问题是:有些 HTML 元素需要所有的直属下级都具有特定的类型。 比如,<select> 元素要求直属下级必须为 <option>,那就没办法把这些选项包装进 <div> 或 <span> 中。
如果这样做:
Path:"src/app/app.component.html (select-span)"
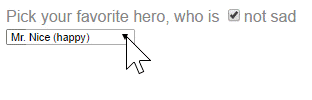
<div>
  Pick your favorite hero
  (<label><input type="checkbox" checked (change)="showSad = !showSad">show sad</label>)
</div>
<select [(ngModel)]="hero">
  <span *ngFor="let h of heroes">
    <span *ngIf="showSad || h.emotion !== 'sad'">
      <option [ngValue]="h">{{h.name}} ({{h.emotion}})</option>
    </span>
  </span>
</select>
下拉列表就是空的。浏览器不会显示 <span> 中的 <option>。
<ng-container> 的救赎
Angular 的 <ng-container> 是一个分组元素,但它不会污染样式或元素布局,因为 Angular 压根不会把它放进 DOM 中。
下面是重新实现的条件化段落,这次使用 <ng-container>。
Path:"src/app/app.component.html (ngif-ngcontainer)"
<p>
  I turned the corner
  <ng-container *ngIf="hero">
    and saw {{hero.name}}. I waved
  </ng-container>
  and continued on my way.
</p>
这次就渲染对了。

现在用 <ng-container> 来根据条件排除选择框中的某个 <option>。
Path:"src/app/app.component.html (select-ngcontainer)"
<div>
  Pick your favorite hero
  (<label><input type="checkbox" checked (change)="showSad = !showSad">show sad</label>)
</div>
<select [(ngModel)]="hero">
  <ng-container *ngFor="let h of heroes">
    <ng-container *ngIf="showSad || h.emotion !== 'sad'">
      <option [ngValue]="h">{{h.name}} ({{h.emotion}})</option>
    </ng-container>
  </ng-container>
</select>
下拉框也工作正常。
注:
-ngModel指令是在 Angular 的FormsModule中定义的,你要在想使用它的模块的imports: [...]元数据中导入FormsModule。
<ng-container> 是一个由 Angular 解析器负责识别处理的语法元素。 它不是一个指令、组件、类或接口,更像是 JavaScript 中 if 块中的花括号。
if (someCondition) {
  statement1;
  statement2;
  statement3;
}
没有这些花括号,JavaScript 只会执行第一句,而你原本的意图是把其中的所有语句都视为一体来根据条件执行。 而 <ng-container> 满足了 Angular 模板中类似的需求。
写一个结构型指令
你需要写一个名叫 UnlessDirective 的结构型指令,它是 NgIf 的反义词。 NgIf 在条件为 true 的时候显示模板内容,而 UnlessDirective 则会在条件为 false 时显示模板内容。
Path:"src/app/app.component.html (appUnless-1)"
<p *appUnless="condition">Show this sentence unless the condition is true.</p>创建指令很像创建组件。
- 导入
Directive装饰器(而不再是Component)。
- 导入符号
Input、TemplateRef和ViewContainerRef,你在任何结构型指令中都会需要它们。
- 给指令类添加装饰器。
- 设置 CSS 属性选择器,以便在模板中标识出这个指令该应用于哪个元素。
这里是起点:
Path:"src/app/unless.directive.ts (skeleton)"
import { Directive, Input, TemplateRef, ViewContainerRef } from '@angular/core';


@Directive({ selector: '[appUnless]'})
export class UnlessDirective {
}
指令的选择器通常是把指令的属性名括在方括号中,如 [appUnless]。 这个方括号定义出了一个 CSS 属性选择器。
该指令的属性名应该拼写成小驼峰形式,并且带有一个前缀。 但是,这个前缀不能用 ng,因为它只属于 Angular 本身。 请选择一些简短的,适合你自己或公司的前缀。 在这个例子中,前缀是 app。
指令的类名用 Directive 结尾,参见风格指南。 但 Angular 自己的指令例外。
TemplateRef 和 ViewContainerRef
像这个例子一样的简单结构型指令会从 Angular 生成的 <ng-template> 元素中创建一个内嵌的视图,并把这个视图插入到一个视图容器中,紧挨着本指令原来的宿主元素 <p>(译注:注意不是子节点,而是兄弟节点)。
你可以使用TemplateRef取得 <ng-template> 的内容,并通过ViewContainerRef来访问这个视图容器。
你可以把它们都注入到指令的构造函数中,作为该类的私有属性。
Path:"src/app/unless.directive.ts (ctor)"
constructor(
  private templateRef: TemplateRef<any>,
  private viewContainer: ViewContainerRef) { }
appUnless 属性
该指令的使用者会把一个 true/false 条件绑定到 [appUnless] 属性上。 也就是说,该指令需要一个带有 @Input 的 appUnless 属性。
Path:"src/app/unless.directive.ts (set)"
@Input() set appUnless(condition: boolean) {
  if (!condition && !this.hasView) {
    this.viewContainer.createEmbeddedView(this.templateRef);
    this.hasView = true;
  } else if (condition && this.hasView) {
    this.viewContainer.clear();
    this.hasView = false;
  }
}
一旦该值的条件发生了变化,Angular 就会去设置 appUnless 属性。因为不能用 appUnless 属性,所以你要为它定义一个设置器(setter)。
如果条件为假,并且以前尚未创建过该视图,就告诉视图容器(ViewContainer)根据模板创建一个内嵌视图。
如果条件为真,并且视图已经显示出来了,就会清除该容器,并销毁该视图。
没有人会读取 appUnless 属性,因此它不需要定义 getter。
完整的指令代码如下:
Path:"src/app/unless.directive.ts (excerpt)"
import { Directive, Input, TemplateRef, ViewContainerRef } from '@angular/core';


/**
 * Add the template content to the DOM unless the condition is true.
 */
@Directive({ selector: '[appUnless]'})
export class UnlessDirective {
  private hasView = false;


  constructor(
    private templateRef: TemplateRef<any>,
    private viewContainer: ViewContainerRef) { }


  @Input() set appUnless(condition: boolean) {
    if (!condition && !this.hasView) {
      this.viewContainer.createEmbeddedView(this.templateRef);
      this.hasView = true;
    } else if (condition && this.hasView) {
      this.viewContainer.clear();
      this.hasView = false;
    }
  }
}
把这个指令添加到 AppModule 的 declarations 数组中。
然后创建一些 HTML 来试用一下。
Path:"src/app/app.component.html (appUnless)"
<p *appUnless="condition" class="unless a">
  (A) This paragraph is displayed because the condition is false.
</p>


<p *appUnless="!condition" class="unless b">
  (B) Although the condition is true,
  this paragraph is displayed because appUnless is set to false.
</p>
当 condition 为 false 时,顶部的段落就会显示出来,而底部的段落消失了。 当 condition 为 true 时,顶部的段落被移除了,而底部的段落显示了出来。

改进自定义指令的模板类型检查
你可以通过在指令定义中添加模板守护属性来改进自定义指令的模板类型检查。这些属性可以帮助 Angular 模板类型检查器在编译期间发现模板中的错误,避免这些失误导致运行期错误。
使用类型守护属性可以告诉模板类型检查器你所期望的类型,从而改进该模板的编译期类型检查。
- 属性
ngTemplateGuard_(someInputProperty)允许你为模板中的输入表达式指定一个更准确的类型。
ngTemplateContextGuard静态属性声明了模板上下文的类型。
本节提供了这两种类型守护属性的例子。
使用模板守护功能可以让模板内的类型需求更具体
模板中的结构型指令会根据输入表达式来控制是否要在运行时渲染该模板。为了帮助编译器捕获模板类型中的错误,你应该尽可能详细地指定模板内指令的输入表达式所期待的类型。
类型守护函数会把输入表达式所期待的类型窄化为在运行时可能传给指令的子类型。你可以提供这样一个函数来帮助类型检查器在编译期间推断出该表达式的正确类型。
例如,NgIf 的实现使用类型窄化来确保只有当 *ngIf 的输入表达式为真时,模板才会被实例化。为了提供具体的类型要求,NgIf 指令定义了一个静态属性 ngTemplateGuard_ngIf: 'binding'。binding 值是一种常见的类型窄化的例子,它会对输入表达式进行求值,以满足类型要求。
要为模板中的指令提供一个更具体的输入表达式类型,就要把 ngTemplateGuard_xx 属性添加到该指令中,其静态属性名的后缀(xx)是 @Input 字段名。该属性的值既可以是针对其返回类型的通用类型窄化函数,也可以是字符串 "binding" 就像 NgIf 一样。
例如,考虑以下结构型指令,它以模板表达式的结果作为输入。
Path:"src/app/IfLoadedDirective"
export type Loaded = { type: 'loaded', data: T };
export type Loading = { type: 'loading' };
export type LoadingState = Loaded | Loading;
export class IfLoadedDirective {
    @Input('ifLoaded') set state(state: LoadingState) {}
    static ngTemplateGuard_state(dir: IfLoadedDirective, expr: LoadingState): expr is Loaded { return true; };
export interface Person {
  name: string;
}


@Component({
  template: `
{{ state.data }}
`,
})
export class AppComponent {
  state: LoadingState;
}
在这个例子中,LoadingState<T> 类型允许两种状态之一,Loaded<T> 或 Loading。此表达式用作该指令的 state 输入是一个总括类型 LoadingState,因为此处的加载状态是未知的。
IfLoadedDirective 定义声明了静态字段 ngTemplateGuard_state,表示其窄化行为。在 AppComponent 模板中,*ifLoaded 结构型指令只有当实际的 state 是 Loaded<Person> 类型时,才会渲染该模板。类型守护允许类型检查器推断出模板中可接受的 state 类型是 Loaded<T>,并进一步推断出 T 必须是 Person 一个实例。
为指令上下文指定类型
如果你的结构型指令要为实例化的模板提供一个上下文,可以通过提供静态的 ngTemplateContextGuard 函数在模板中给它提供合适的类型。下面的代码片段展示了该函数的一个例子。
Path:"src/app/myDirective.ts"
@Directive({…})
export class ExampleDirective {
    // Make sure the template checker knows the type of the context with which the
    // template of this directive will be rendered
    static ngTemplateContextGuard(dir: ExampleDirective, ctx: unknown): ctx is ExampleContext { return true; };


    // …
}
源代码
- Path:"src/app/app.component.ts" 。
    import { Component } from '@angular/core';


    import { Hero, heroes } from './hero';


    @Component({
      selector: 'app-root',
      templateUrl: './app.component.html',
      styleUrls: [ './app.component.css' ]
    })
    export class AppComponent {
      heroes = heroes;
      hero = this.heroes[0];


      condition = false;
      logs: string[] = [];
      showSad = true;
      status = 'ready';


      trackById(index: number, hero: Hero): number { return hero.id; }
}- Path:"src/app/app.component.html" 。
    <h1>Structural Directives</h1>


    <p>Conditional display of hero</p>


    <blockquote>
    <div *ngIf="hero" class="name">{{hero.name}}</div>
    </blockquote>


    <p>List of heroes</p>


    <ul>
      <li *ngFor="let hero of heroes">{{hero.name}}</li>
    </ul>


    <hr>


    <h2 id="ngIf">NgIf</h2>


    <p *ngIf="true">
      Expression is true and ngIf is true.
      This paragraph is in the DOM.
    </p>
    <p *ngIf="false">
      Expression is false and ngIf is false.
      This paragraph is not in the DOM.
    </p>


    <p [style.display]="'block'">
      Expression sets display to "block".
      This paragraph is visible.
    </p>
    <p [style.display]="'none'">
      Expression sets display to "none".
      This paragraph is hidden but still in the DOM.
    </p>


    <h4>NgIf with template</h4>
    <p><ng-template> element</p>
    <ng-template [ngIf]="hero">
      <div class="name">{{hero.name}}</div>
    </ng-template>


    <hr>


    <h2 id="ng-container"><ng-container></h2>


    <h4>*ngIf with a <ng-container></h4>


    <button (click)="hero = hero ? null : heroes[0]">Toggle hero</button>


    <p>
      I turned the corner
      <ng-container *ngIf="hero">
        and saw {{hero.name}}. I waved
      </ng-container>
      and continued on my way.
    </p>
    <p>
      I turned the corner
      <span *ngIf="hero">
        and saw {{hero.name}}. I waved
      </span>
      and continued on my way.
    </p>


    <p><i><select> with <span></i></p>
    <div>
      Pick your favorite hero
      (<label><input type="checkbox" checked (change)="showSad = !showSad">show sad</label>)
    </div>
    <select [(ngModel)]="hero">
      <span *ngFor="let h of heroes">
        <span *ngIf="showSad || h.emotion !== 'sad'">
          <option [ngValue]="h">{{h.name}} ({{h.emotion}})</option>
        </span>
      </span>
    </select>


    <p><i><select> with <ng-container></i></p>
    <div>
      Pick your favorite hero
      (<label><input type="checkbox" checked (change)="showSad = !showSad">show sad</label>)
    </div>
    <select [(ngModel)]="hero">
      <ng-container *ngFor="let h of heroes">
        <ng-container *ngIf="showSad || h.emotion !== 'sad'">
          <option [ngValue]="h">{{h.name}} ({{h.emotion}})</option>
        </ng-container>
      </ng-container>
    </select>
    <br><br>


    <hr>


    <h2 id="ngFor">NgFor</h2>


    <div class="box">


    <p class="code"><div *ngFor="let hero of heroes; let i=index; let odd=odd; trackBy: trackById" [class.odd]="odd"></p>
    <div *ngFor="let hero of heroes; let i=index; let odd=odd; trackBy: trackById" [class.odd]="odd">
      ({{i}}) {{hero.name}}
    </div>


    <p class="code"><ng-template ngFor let-hero [ngForOf]="heroes" let-i="index" let-odd="odd" [ngForTrackBy]="trackById"/></p>
    <ng-template ngFor let-hero [ngForOf]="heroes" let-i="index" let-odd="odd" [ngForTrackBy]="trackById">
      <div [class.odd]="odd">({{i}}) {{hero.name}}</div>
    </ng-template>


    </div>
    <hr>


    <h2 id="ngSwitch">NgSwitch</h2>


    <div>Pick your favorite hero</div>
    <p>
      <label *ngFor="let h of heroes">
        <input type="radio" name="heroes" [(ngModel)]="hero" [value]="h">{{h.name}}
      </label>
      <label><input type="radio" name="heroes" (click)="hero = null">None of the above</label>
    </p>


    <h4>NgSwitch</h4>


    <div [ngSwitch]="hero?.emotion">
      <app-happy-hero    *ngSwitchCase="'happy'"    [hero]="hero"></app-happy-hero>
      <app-sad-hero      *ngSwitchCase="'sad'"      [hero]="hero"></app-sad-hero>
      <app-confused-hero *ngSwitchCase="'confused'" [hero]="hero"></app-confused-hero>
      <app-unknown-hero  *ngSwitchDefault           [hero]="hero"></app-unknown-hero>
    </div>


    <h4>NgSwitch with <ng-template></h4>
    <div [ngSwitch]="hero?.emotion">
      <ng-template [ngSwitchCase]="'happy'">
        <app-happy-hero [hero]="hero"></app-happy-hero>
      </ng-template>
      <ng-template [ngSwitchCase]="'sad'">
        <app-sad-hero [hero]="hero"></app-sad-hero>
      </ng-template>
      <ng-template [ngSwitchCase]="'confused'">
        <app-confused-hero [hero]="hero"></app-confused-hero>
      </ng-template >
      <ng-template ngSwitchDefault>
        <app-unknown-hero [hero]="hero"></app-unknown-hero>
      </ng-template>
    </div>


    <hr>


    <h2><ng-template></h2>
    <p>Hip!</p>
    <ng-template>
      <p>Hip!</p>
    </ng-template>
    <p>Hooray!</p>


    <hr>


    <h2 id="appUnless">UnlessDirective</h2>
    <p>
      The condition is currently
      <span [ngClass]="{ 'a': !condition, 'b': condition, 'unless': true }">{{condition}}</span>.
      <button
        (click)="condition = !condition"
        [ngClass] = "{ 'a': condition, 'b': !condition }" >
        Toggle condition to {{condition ? 'false' : 'true'}}
      </button>
    </p>
    <p *appUnless="condition" class="unless a">
      (A) This paragraph is displayed because the condition is false.
    </p>


    <p *appUnless="!condition" class="unless b">
      (B) Although the condition is true,
      this paragraph is displayed because appUnless is set to false.
    </p>


    <h4>UnlessDirective with template</h4>


    <p *appUnless="condition">Show this sentence unless the condition is true.</p>


    <p *appUnless="condition" class="code unless">
      (A) <p *appUnless="condition" class="code unless">
    </p>


    <ng-template [appUnless]="condition">
      <p class="code unless">
        (A) <ng-template [appUnless]="condition">
      </p>
</ng-template>- Path:"src/app/app.component.css" 。
    button {
      min-width: 100px;
      font-size: 100%;
    }


    .box {
      border: 1px solid gray;
      max-width: 600px;
      padding: 4px;
    }
    .choices {
      font-style: italic;
    }


    code, .code {
      background-color: #eee;
      color: black;
      font-family: Courier, sans-serif;
      font-size: 85%;
    }


    div.code {
      width: 400px;
    }


    .heroic {
      font-size: 150%;
      font-weight: bold;
    }


    hr {
      margin: 40px 0
    }


    .odd {
      background-color:  palegoldenrod;
    }


    td, th {
      text-align: left;
      vertical-align: top;
    }


    p span { color: red; font-size: 70%; }


    .unless {
      border: 2px solid;
      padding: 6px;
    }


    p.unless {
      width: 500px;
    }


    button.a, span.a, .unless.a {
      color: red;
      border-color: gold;
      background-color: yellow;
      font-size: 100%;
    }


    button.b, span.b, .unless.b {
      color: black;
      border-color: green;
      background-color: lightgreen;
      font-size: 100%;
}- Path:"src/app/app.module.ts" 。
    import { NgModule }      from '@angular/core';
    import { FormsModule }   from '@angular/forms';
    import { BrowserModule } from '@angular/platform-browser';


    import { AppComponent }         from './app.component';
    import { heroSwitchComponents } from './hero-switch.components';
    import { UnlessDirective }    from './unless.directive';


    @NgModule({
      imports: [ BrowserModule, FormsModule ],
      declarations: [
        AppComponent,
        heroSwitchComponents,
        UnlessDirective
      ],
      bootstrap: [ AppComponent ]
    })
export class AppModule { }- Path:"src/app/hero.ts" 。
    export interface Hero {
      id: number;
      name: string;
      emotion?: string;
    }


    export const heroes: Hero[] = [
      { id: 1, name: 'Dr Nice',  emotion: 'happy'},
      { id: 2, name: 'Narco',     emotion: 'sad' },
      { id: 3, name: 'Windstorm', emotion: 'confused' },
      { id: 4, name: 'Magneta'}
];- Path:"src/app/hero-switch.components.ts" 。
    import { Component, Input } from '@angular/core';
    import { Hero } from './hero';


    @Component({
      selector: 'app-happy-hero',
      template: `Wow. You like {{hero.name}}. What a happy hero ... just like you.`
    })
    export class HappyHeroComponent {
      @Input() hero: Hero;
    }


    @Component({
      selector: 'app-sad-hero',
      template: `You like {{hero.name}}? Such a sad hero. Are you sad too?`
    })
    export class SadHeroComponent {
      @Input() hero: Hero;
    }


    @Component({
      selector: 'app-confused-hero',
      template: `Are you as confused as {{hero.name}}?`
    })
    export class ConfusedHeroComponent {
      @Input() hero: Hero;
    }


    @Component({
      selector: 'app-unknown-hero',
      template: `{{message}}`
    })
    export class UnknownHeroComponent {
      @Input() hero: Hero;
      get message() {
        return this.hero && this.hero.name ?
          `${this.hero.name} is strange and mysterious.` :
          'Are you feeling indecisive?';
      }
    }


    export const heroSwitchComponents =
[ HappyHeroComponent, SadHeroComponent, ConfusedHeroComponent, UnknownHeroComponent ];- Path:"src/app/unless.directive.ts" 。
    import { Directive, Input, TemplateRef, ViewContainerRef } from '@angular/core';


    /**
     * Add the template content to the DOM unless the condition is true.
     *
     * If the expression assigned to `appUnless` evaluates to a truthy value
     * then the templated elements are removed removed from the DOM,
     * the templated elements are (re)inserted into the DOM.
     *
     * <div *appUnless="errorCount" class="success">
     *   Congrats! Everything is great!
     * </div>
     *
     * ### Syntax
     *
     * - `<div *appUnless="condition">...</div>`
     * - `<ng-template [appUnless]="condition"><div>...</div></ng-template>`
     *
     */
    @Directive({ selector: '[appUnless]'})
    export class UnlessDirective {
      private hasView = false;


      constructor(
        private templateRef: TemplateRef<any>,
        private viewContainer: ViewContainerRef) { }


      @Input() set appUnless(condition: boolean) {
        if (!condition && !this.hasView) {
          this.viewContainer.createEmbeddedView(this.templateRef);
          this.hasView = true;
        } else if (condition && this.hasView) {
          this.viewContainer.clear();
          this.hasView = false;
        }
      }
    }
小结
- 结构型指令可以操纵 HTML 的元素布局。
- 当没有合适的宿主元素时,可以使用
<ng-container>对元素进行分组。
- Angular 会把星号(
*)语法解开成<ng-template>。
- 内置指令
NgIf、NgFor和NgSwitch的工作原理。
- 微语法如何展开成
<ng-template>。
- 写了一个自定义结构型指令 ——
UnlessDirective。


更多建议: