
 免费 AI IDE

Route 起步
开始本应用的一个简版,它在两个空路由之间导航。
用 Angular CLI 生成一个范例应用。
ng new angular-router-sample定义路由
路由器必须用“路由定义”的列表进行配置。
每个定义都被翻译成了一个Route对象。该对象有一个 path 字段,表示该路由中的 URL 路径部分,和一个 component 字段,表示与该路由相关联的组件。
当浏览器的 URL 变化时或在代码中告诉路由器导航到一个路径时,路由器就会翻出它用来保存这些路由定义的注册表。
第一个路由执行以下操作:
- 当浏览器地址栏的
URL变化时,如果它匹配上了路径部分 "/crisis-center",路由器就会激活一个CrisisListComponent的实例,并显示它的视图。
- 当应用程序请求导航到路径 "/crisis-center" 时,路由器激活一个
CrisisListComponent的实例,显示它的视图,并将该路径更新到浏览器地址栏和历史。
第一个配置定义了由两个路由构成的数组,它们用最短路径指向了 CrisisListComponent 和 HeroListComponent。
生成 CrisisList 和 HeroList 组件,以便路由器能够渲染它们。
ng generate component crisis-listng generate component hero-list- Path:"src/app/crisis-list/crisis-list.component.html" 。
    <h2>CRISIS CENTER</h2>
<p>Get your crisis here</p>- Path:"src/app/hero-list/hero-list.component.html" 。
    <h2>HEROES</h2>
    <p>Get your heroes here</p>
注册 Router 和 Routes
为了使用 Router,你必须注册来自 @angular/router 包中的 RouterModule。定义一个路由数组 appRoutes,并把它传给 RouterModule.forRoot() 方法。RouterModule.forRoot() 方法会返回一个模块,其中包含配置好的 Router 服务提供者,以及路由库所需的其它提供者。一旦启动了应用,Router 就会根据当前的浏览器 URL 进行首次导航。
注:
RouterModule.forRoot()方法是用于注册全应用级提供者的编码模式。要详细了解全应用级提供者。
Path:"src/app/app.module.ts (first-config)" 。
import { NgModule }             from '@angular/core';
import { BrowserModule }        from '@angular/platform-browser';
import { FormsModule }          from '@angular/forms';
import { RouterModule, Routes } from '@angular/router';


import { AppComponent }          from './app.component';
import { CrisisListComponent }   from './crisis-list/crisis-list.component';
import { HeroListComponent }     from './hero-list/hero-list.component';


const appRoutes: Routes = [
  { path: 'crisis-center', component: CrisisListComponent },
  { path: 'heroes', component: HeroListComponent },
];


@NgModule({
  imports: [
    BrowserModule,
    FormsModule,
    RouterModule.forRoot(
      appRoutes,
      { enableTracing: true } // <-- debugging purposes only
    )
  ],
  declarations: [
    AppComponent,
    HeroListComponent,
    CrisisListComponent,
  ],
  bootstrap: [ AppComponent ]
})
export class AppModule { }
对于最小化的路由配置,把配置好的
RouterModule添加到AppModule中就足够了。但是,随着应用的成长,你将需要将路由配置重构到单独的文件中,并创建路由模块,路由模块是一种特殊的、专做路由的服务模块。
把 RouterModule.forRoot() 注册到 AppModule 的 imports 数组中,能让该 Router 服务在应用的任何地方都能使用。
添加路由出口
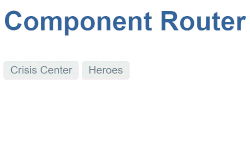
根组件 AppComponent 是本应用的壳。它在顶部有一个标题、一个带两个链接的导航条,在底部有一个路由器出口,路由器会在它所指定的位置上渲染各个组件。

路由出口扮演一个占位符的角色,表示路由组件将会渲染到哪里。
该组件所对应的模板是这样的:
Path:"src/app/app.component.html" 。
<h1>Angular Router</h1>
<nav>
  <a routerLink="/crisis-center" routerLinkActive="active">Crisis Center</a>
  <a routerLink="/heroes" routerLinkActive="active">Heroes</a>
</nav>
<router-outlet></router-outlet>
定义通配符路由
你以前在应用中创建过两个路由,一个是 "/crisis-center",另一个是 "/heroes"。 所有其它 URL 都会导致路由器抛出错误,并让应用崩溃。
可以添加一个通配符路由来拦截所有无效的 URL,并优雅的处理它们。 通配符路由的 path 是两个星号(**),它会匹配任何 URL。 而当路由器匹配不上以前定义的那些路由时,它就会选择这个通配符路由。 通配符路由可以导航到自定义的“404 Not Found”组件,也可以重定向到一个现有路由。
路由器会使用先到先得的策略来选择路由。 由于通配符路由是最不具体的那个,因此务必确保它是路由配置中的最后一个路由。
要测试本特性,请往 HeroListComponent 的模板中添加一个带 RouterLink 的按钮,并且把它的链接设置为一个不存在的路由 "/sidekicks"。
Path:"src/app/hero-list/hero-list.component.html (excerpt)" 。
<h2>HEROES</h2>
<p>Get your heroes here</p>


<button routerLink="/sidekicks">Go to sidekicks</button>
当用户点击该按钮时,应用就会失败,因为你尚未定义过 "/sidekicks" 路由。
不要添加 "/sidekicks" 路由,而是定义一个“通配符”路由,让它导航到 PageNotFoundComponent 组件。
Path:"src/app/app.module.ts (wildcard)" 。
{ path: '**', component: PageNotFoundComponent }
创建 PageNotFoundComponent,以便在用户访问无效网址时显示它。
ng generate component page-not-foundPath:"src/app/page-not-found.component.html (404 component)" 。
<h2>Page not found</h2>
现在,当用户访问 "/sidekicks" 或任何无效的 URL 时,浏览器就会显示 “Page not found” 。 浏览器的地址栏仍指向无效的 URL。
设置跳转
应用启动时,浏览器地址栏中的初始 URL 默认是这样的:
localhost:4200
它不能匹配上任何硬编码进来的路由,于是就会走到通配符路由中去,并且显示 PageNotFoundComponent。
这个应用需要一个有效的默认路由,在这里应该用英雄列表作为默认页。当用户点击 "Heroes" 链接或把 "localhost:4200/heroes" 粘贴到地址栏时,它应该导航到列表页。
添加一个 redirect 路由,把最初的相对 URL('')转换成所需的默认路径(/heroes)。
在通配符路由上方添加一个默认路由。 在下方的代码片段中,它出现在通配符路由的紧上方,展示了这个里程碑的完整 appRoutes。
Path:"src/app/app-routing.module.ts (appRoutes)" 。
const appRoutes: Routes = [
  { path: 'crisis-center', component: CrisisListComponent },
  { path: 'heroes',        component: HeroListComponent },
  { path: '',   redirectTo: '/heroes', pathMatch: 'full' },
  { path: '**', component: PageNotFoundComponent }
];
浏览器的地址栏会显示 ".../heroes",好像你直接在那里导航一样。
重定向路由需要一个 pathMatch 属性,来告诉路由器如何用 URL 去匹配路由的路径。 在本应用中,路由器应该只有在*完整的 URL_等于 '' 时才选择 HeroListComponent 组件,因此要把 pathMatch 设置为 'full'。
聚焦 PATHMATCH
从技术角度看,pathMatch = 'full' 会导致 URL 中剩下的、未匹配的部分必须等于 ''。 在这个例子中,跳转路由在一个顶层路由中,因此剩下的_URL和完整的_URL是一样的。
pathMatch 的另一个可能的值是 'prefix',它会告诉路由器:当*剩下的_URL以这个跳转路由中的 prefix 值开头时,就会匹配上这个跳转路由。 但这不适用于此示例应用,因为如果 pathMatch 值是 'prefix',那么每个 URL 都会匹配 ''。
尝试把它设置为 'prefix',并点击Go to sidekicks按钮。这是因为它是一个无效 URL,本应显示“Page not found” 页。 但是,你仍然在“英雄列表”页中。在地址栏中输入一个无效的 URL,你又被路由到了 /heroes。 每一个 URL,无论有效与否,都会匹配上这个路由定义。
默认路由应该只有在整个URL 等于 '' 时才重定向到 HeroListComponent,别忘了把重定向路由设置为 pathMatch = 'full'。
小结
当用户单击某个链接时,该示例应用可以在两个视图之间切换。
本节涵盖了以下几点的做法:
- 加载路由库。
- 往壳组件的模板中添加一个导航条,导航条中有一些 A 标签、
routerLink指令和routerLinkActive指令。
- 往壳组件的模板中添加一个
router-outlet指令,视图将会被显示在那里。
- 用
RouterModule.forRoot()配置路由器模块。
- 设置路由器,使其合成 HTML5 模式的浏览器
URL。
- 使用通配符路由来处理无效路由。
- 当应用在空路径下启动时,导航到默认路由。
初学者应用结构图:
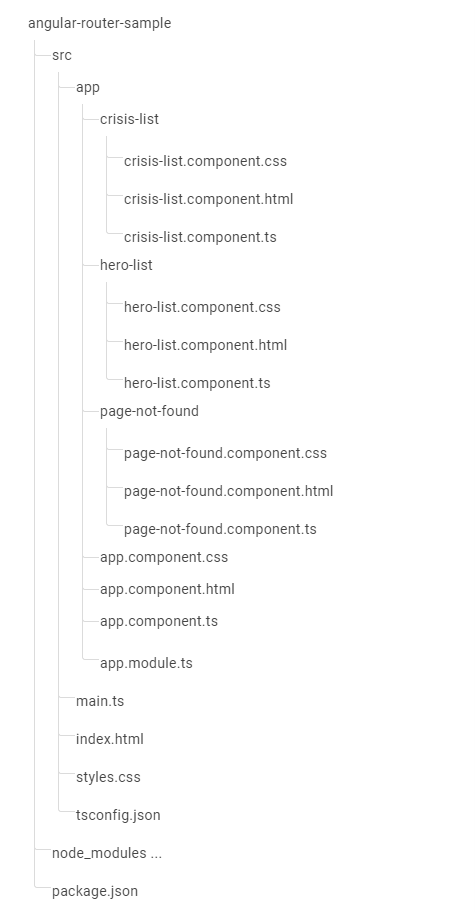
本节产生的文件列表:
- Path:"app.component.html" 。
    <h1>Angular Router</h1>
    <nav>
      <a routerLink="/crisis-center" routerLinkActive="active">Crisis Center</a>
      <a routerLink="/heroes" routerLinkActive="active">Heroes</a>
    </nav>
<router-outlet></router-outlet>- Path:"app.module.ts" 。
    import { NgModule }             from '@angular/core';
    import { BrowserModule }        from '@angular/platform-browser';
    import { FormsModule }          from '@angular/forms';
    import { RouterModule, Routes } from '@angular/router';


    import { AppComponent }          from './app.component';
    import { CrisisListComponent }   from './crisis-list/crisis-list.component';
    import { HeroListComponent }     from './hero-list/hero-list.component';
    import { PageNotFoundComponent } from './page-not-found/page-not-found.component';


    const appRoutes: Routes = [
      { path: 'crisis-center', component: CrisisListComponent },
      { path: 'heroes', component: HeroListComponent },


      { path: '',   redirectTo: '/heroes', pathMatch: 'full' },
      { path: '**', component: PageNotFoundComponent }
    ];


    @NgModule({
      imports: [
        BrowserModule,
        FormsModule,
        RouterModule.forRoot(
          appRoutes,
          { enableTracing: true } // <-- debugging purposes only
        )
      ],
      declarations: [
        AppComponent,
        HeroListComponent,
        CrisisListComponent,
        PageNotFoundComponent
      ],
      bootstrap: [ AppComponent ]
    })
export class AppModule { }- Path:"hero-list/hero-list.component.html" 。
    <h2>HEROES</h2>
    <p>Get your heroes here</p>


<button routerLink="/sidekicks">Go to sidekicks</button>- Path:"crisis-list/crisis-list.component.html" 。
    <h2>CRISIS CENTER</h2>
<p>Get your crisis here</p>- Path:"page-not-found/page-not-found.component.html" 。
<h2>Page not found</h2>- Path:"index.html" 。
    <html lang="en">
      <head>
        <!-- Set the base href -->
        <base href="/">
        <title>Angular Router</title>
        <meta charset="UTF-8">
        <meta name="viewport" content="width=device-width, initial-scale=1">
      </head>


      <body>
        <app-root></app-root>
      </body>


    </html>

更多建议: