
 免费 AI IDE

Angular 教程:为英雄之旅添加路由支持-里程碑 3:英雄特征区
里程碑 3: 英雄特征区
本里程碑涵盖了以下内容:
- 用模块把应用和路由组织为一些特性区。
- 命令式的从一个组件导航到另一个
- 通过路由传递必要信息和可选信息
这个示例应用在“英雄指南”教程的“服务”部分重新创建了英雄特性区,并复用了Tour of Heroes: Services example code / 下载范例中的大部分代码。
典型的应用具有多个特性区,每个特性区都专注于特定的业务用途并拥有自己的文件夹。
该部分将向你展示如何将应用重构为不同的特性模块、将它们导入到主模块中,并在它们之间导航。
添加英雄管理功能
遵循下列步骤:
- 为了管理这些英雄,在
heroes目录下创建一个带路由的 HeroesModule,并把它注册到根模块 AppModule中。
ng generate module heroes/heroes --module app --flat --routingapp 下占位用的 hero-list 目录移到 heroes 目录中。heroes/heroes.component.html 的内容复制到 hero-list.component.html 模板中。- 给
<h2> 加文字,改成 <h2>HEROES</h2>。 - 删除模板底部的
<app-hero-detail> 组件。
heroes/heroes.component.css 文件的内容复制到 hero-list.component.css 文件中。heroes/heroes.component.ts 文件的内容复制到 hero-list.component.ts 文件中。- 把组件类名改为
HeroListComponent。 - 把
selector改为 app-hero-list。
对于路由组件来说,这些选择器不是必须的,因为这些组件是在渲染页面时动态插入的,不过选择器对于在 HTML 元素树中标记和选中它们是很有用的。
hero-detail 目录中的 hero.ts、hero.service.ts 和 mock-heroes.ts 文件复制到 heroes 子目录下。message.service.ts 文件复制到 src/app 目录下。hero.service.ts 文件中修改导入 message.service 的相对路径。HeroesModule 的元数据。HeroDetailComponent 和 HeroListComponent,并添加到 HeroesModule 模块的 declarations 数组中。import { NgModule } from '@angular/core';
import { CommonModule } from '@angular/common';
import { FormsModule } from '@angular/forms';
import { HeroListComponent } from './hero-list/hero-list.component';
import { HeroDetailComponent } from './hero-detail/hero-detail.component';
import { HeroesRoutingModule } from './heroes-routing.module';
@NgModule({
imports: [
CommonModule,
FormsModule,
HeroesRoutingModule
],
declarations: [
HeroListComponent,
HeroDetailComponent
]
})
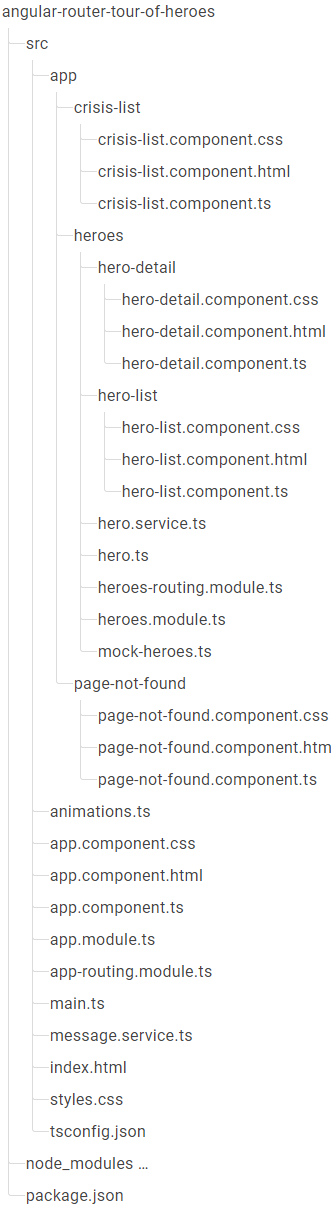
export class HeroesModule {}英雄管理部分的文件结构如下:

英雄特性区的路由需求
英雄特性区中有两个相互协作的组件:英雄列表和英雄详情。当你导航到列表视图时,它会获取英雄列表并显示出来。当你点击一个英雄时,详细视图就会显示那个特定的英雄。
通过把所选英雄的 id 编码进路由的 URL 中,就能告诉详情视图该显示哪个英雄。
从新位置 src/app/heroes/ 目录中导入英雄相关的组件,并定义两个“英雄管理”路由。
现在,你有了 Heroes 模块的路由,还得在 RouterModule 中把它们注册给路由器,和 AppRoutingModule 中的做法几乎完全一样,只有一项重要的差别。
在 AppRoutingModule 中,你使用了静态的 RouterModule.forRoot() 方法来注册路由和全应用级服务提供者。在特性模块中你要改用 forChild() 静态方法。
只在根模块
AppRoutingModule中调用 RouterModule.forRoot()(如果在 AppModule中注册应用的顶层路由,那就在 AppModule中调用)。在其它模块中,你就必须调用 RouterModule.forChild 方法来注册附属路由。
修改后的 HeroesRoutingModule 是这样的:
import { NgModule } from '@angular/core';
import { RouterModule, Routes } from '@angular/router';

import { HeroListComponent } from './hero-list/hero-list.component';
import { HeroDetailComponent } from './hero-detail/hero-detail.component';

const heroesRoutes: Routes = [
  { path: 'heroes',  component: HeroListComponent },
  { path: 'hero/:id', component: HeroDetailComponent }
];

@NgModule({
  imports: [
    RouterModule.forChild(heroesRoutes)
  ],
  exports: [
    RouterModule
  ]
})
export class HeroesRoutingModule { }
考虑为每个特性模块提供自己的路由配置文件。虽然特性路由目前还很少,但即使在小型应用中,路由也会变得越来越复杂。
移除重复的“英雄管理”路由
英雄类的路由目前定义在两个地方:HeroesRoutingModule 中(并最终给 HeroesModule)和 AppRoutingModule 中。
由特性模块提供的路由会被路由器再组合上它们所导入的模块的路由。这让你可以继续定义特性路由模块中的路由,而不用修改主路由配置。
移除 HeroListComponent 的导入和来自 app-routing.module.ts 中的 /heroes 路由。
保留默认路由和通配符路由,因为这些路由仍然要在应用的顶层使用。
import { NgModule } from '@angular/core';
import { RouterModule, Routes } from '@angular/router';

import { CrisisListComponent } from './crisis-list/crisis-list.component';
// import { HeroListComponent } from './hero-list/hero-list.component';  // <-- delete this line
import { PageNotFoundComponent } from './page-not-found/page-not-found.component';

const appRoutes: Routes = [
  { path: 'crisis-center', component: CrisisListComponent },
  // { path: 'heroes',     component: HeroListComponent }, // <-- delete this line
  { path: '',   redirectTo: '/heroes', pathMatch: 'full' },
  { path: '**', component: PageNotFoundComponent }
];

@NgModule({
  imports: [
    RouterModule.forRoot(
      appRoutes,
      { enableTracing: true } // <-- debugging purposes only
    )
  ],
  exports: [
    RouterModule
  ]
})
export class AppRoutingModule {}
移除英雄列表的声明
因为 HeroesModule 现在提供了 HeroListComponent,所以把它从 AppModule 的 declarations 数组中移除。现在你已经有了一个单独的 HeroesModule,你可以用更多的组件和不同的路由来演进英雄特性区。
经过这些步骤,AppModule 变成了这样:
import { NgModule } from '@angular/core';
import { BrowserModule } from '@angular/platform-browser';
import { FormsModule } from '@angular/forms';
import { AppComponent } from './app.component';
import { AppRoutingModule } from './app-routing.module';
import { HeroesModule } from './heroes/heroes.module';

import { CrisisListComponent } from './crisis-list/crisis-list.component';
import { PageNotFoundComponent } from './page-not-found/page-not-found.component';

@NgModule({
  imports: [
    BrowserModule,
    FormsModule,
    HeroesModule,
    AppRoutingModule
  ],
  declarations: [
    AppComponent,
    CrisisListComponent,
    PageNotFoundComponent
  ],
  bootstrap: [ AppComponent ]
})
export class AppModule { }
模块导入顺序
请注意该模块的 imports 数组,AppRoutingModule 是最后一个,并且位于 HeroesModule 之后。
imports: [
  BrowserModule,
  FormsModule,
  HeroesModule,
  AppRoutingModule
],
路由配置的顺序很重要,因为路由器会接受第一个匹配上导航所要求的路径的那个路由。
当所有路由都在同一个 AppRoutingModule 时,你要把默认路由和通配符路由放在最后(这里是在 /heroes 路由后面), 这样路由器才有机会匹配到 /heroes 路由,否则它就会先遇到并匹配上该通配符路由,并导航到“页面未找到”路由。
每个路由模块都会根据导入的顺序把自己的路由配置追加进去。如果你先列出了 AppRoutingModule,那么通配符路由就会被注册在“英雄管理”路由之前。通配符路由(它匹配任意URL)将会拦截住每一个到“英雄管理”路由的导航,因此事实上屏蔽了所有“英雄管理”路由。
反转路由模块的导入顺序,就会看到当点击英雄相关的链接时被导向了“页面未找到”路由。
路由参数
带参数的路由定义
回到 HeroesRoutingModule 并再次检查这些路由定义。HeroDetailComponent 路由的路径中带有 :id 令牌。
{ path: 'hero/:id', component: HeroDetailComponent }:id 令牌会为路由参数在路径中创建一个“空位”。在这里,这种配置会让路由器把英雄的 id 插入到那个“空位”中。
如果要告诉路由器导航到详情组件,并让它显示“Magneta”,你会期望这个英雄的 id 像这样显示在浏览器的 URL 中:
localhost:4200/hero/15如果用户把此 URL 输入到浏览器的地址栏中,路由器就会识别出这种模式,同样进入“Magneta”的详情视图。
路由参数:必须的还是可选的?
在这个场景下,把路由参数的令牌 :id 嵌入到路由定义的 path中是一个好主意,因为对于 HeroDetailComponent来说 id是必须的,而且路径中的值 15已经足够把到“Magneta”的路由和到其它英雄的路由明确区分开。
在列表视图中设置路由参数
然后导航到 HeroDetailComponent 组件。在那里,你期望看到所选英雄的详情,这需要两部分信息:导航目标和该英雄的 id。
因此,这个链接参数数组中有两个条目:路由的路径和一个用来指定所选英雄 id 的路由参数。
<a [routerLink]="['/hero', hero.id]">路由器从该数组中组合出了目标 URL:localhost:3000/hero/15。
路由器从 URL 中解析出路由参数(id:15),并通过 ActivatedRoute 服务来把它提供给 HeroDetailComponent 组件。
ActivatedRoute 实战
从路由器(router)包中导入 Router、ActivatedRoute 和 Params 类。
import { Router, ActivatedRoute, ParamMap } from '@angular/router';这里导入 switchMap 操作符是因为你稍后将会处理路由参数的可观察对象 Observable。
import { switchMap } from 'rxjs/operators';把这些服务作为私有变量添加到构造函数中,以便 Angular 注入它们(让它们对组件可见)。
constructor(
  private route: ActivatedRoute,
  private router: Router,
  private service: HeroService
) {}
在 ngOnInit() 方法中,使用 ActivatedRoute 服务来检索路由的参数,从参数中提取出英雄的 id,并检索要显示的英雄。
ngOnInit() {
  this.hero$ = this.route.paramMap.pipe(
    switchMap((params: ParamMap) =>
      this.service.getHero(params.get('id')!))
  );
}
当这个 map 发生变化时,paramMap 会从更改后的参数中获取 id 参数。
然后,让 HeroService 去获取具有该 id 的英雄,并返回 HeroService 请求的结果。
switchMap 操作符做了两件事。它把 HeroService 返回的 Observable<Hero> 拍平,并取消以前的未完成请求。当 HeroService 仍在检索旧的 id 时,如果用户使用新的 id 重新导航到这个路由,switchMap 会放弃那个旧请求,并返回新 id 的英雄。
AsyncPipe 处理这个可观察的订阅,而且该组件的 hero 属性也会用检索到的英雄(重新)进行设置。
ParamMap API
ParamMap API 的灵感来自 URLSearchParams接口。它提供了处理路由参数 ( paramMap ) 和查询参数 ( queryParamMap ) 的参数访问的方法。
|
成员 |
详情 |
|---|---|
has(name)
|
如果参数名位于参数列表中,就返回 |
get(name)
|
如果这个 map 中有参数名对应的参数值(字符串),就返回它,否则返回 |
getAll(name)
|
如果这个 map 中有参数名对应的值,就返回一个字符串数组,否则返回空数组。当一个参数名可能对应多个值的时候,请使用 |
keys
|
返回这个 map 中的所有参数名组成的字符串数组。 |
paramMap 可观察对象与路由复用
在这个例子中,你接收了路由参数的 Observable 对象。这种写法暗示着这些路由参数在该组件的生存期内可能会变化。
默认情况下,如果它没有访问过其它组件就导航到了同一个组件实例,那么路由器倾向于复用组件实例。如果复用,这些参数可以变化。
假设父组件的导航栏有“前进”和“后退”按钮,用来轮流显示英雄列表中中英雄的详情。每次点击都会强制导航到带前一个或后一个 id 的 HeroDetailComponent 组件。
你肯定不希望路由器先从 DOM 中移除当前的 HeroDetailComponent 实例,只是为了用下一个 id 重新创建它,因为它将重新渲染视图。为了更好的用户体验,路由器会复用同一个组件实例,而只是更新参数。
由于 ngOnInit() 在每个组件实例化时只会被调用一次,所以你可以使用 paramMap 可观察对象来检测路由参数在同一个实例中何时发生了变化。
当在组件中订阅一个可观察对象时,你通常总是要在组件销毁时取消这个订阅。
不过,ActivatedRoute中的可观察对象是一个例外,因为 ActivatedRoute及其可观察对象与 Router本身是隔离的。Router会在不再需要时销毁这个路由组件,这意味着此组件的所有成员也都会销毁,包括注入进来的 ActivatedRoute以及那些对它的所有 Observable属性的订阅。
Router不会 completeActivatedRoute的任何 Observable,所以其 finalize或 complete代码块都不会运行。如果你要在 finalize中做些什么处理,你仍然要在 ngOnDestroy中取消订阅。如果你的 Observable型管道有某些代码不希望在当前组件被销毁后运行,仍然要主动取消订阅。
snapshot:当不需要 Observable 时的替代品
本应用不需要复用 HeroDetailComponent。用户总是会先返回英雄列表,再选择另一位英雄。所以,不存在从一个英雄详情导航到另一个而不用经过英雄列表的情况。这意味着路由器每次都会创建一个全新的 HeroDetailComponent 实例。
假如你很确定这个 HeroDetailComponent 实例永远不会被复用,你可以使用 snapshot。
route.snapshot 提供了路由参数的初始值。你可以通过它来直接访问参数,而不用订阅或者添加 Observable 的操作符,代码如下:
ngOnInit() {
  const id = this.route.snapshot.paramMap.get('id')!;

  this.hero$ = this.service.getHero(id);
}用这种技术,
snapshot只会得到这些参数的初始值。如果路由器可能复用该组件,那么就该用 paramMap可观察对象的方式。本教程的示例应用中就用了 paramMap可观察对象。
导航回列表组件
HeroDetailComponent 的 “Back” 按钮使用了 gotoHeroes() 方法,该方法会强制导航回 HeroListComponent。
路由的 navigate() 方法同样接受一个单条目的链接参数数组,你也可以把它绑定到 [routerLink] 指令上。它保存着到 HeroListComponent 组件的路径:
gotoHeroes() {
  this.router.navigate(['/heroes']);
}
路由参数:必须还是可选?
如果想导航到 HeroDetailComponent 以对 id 为 15 的英雄进行查看并编辑,就要在路由的 URL 中使用路由参数来指定必要参数值。
localhost:4200/hero/15你也能在路由请求中添加可选信息。比如,当从 hero-detail.component.ts 返回到列表时,如果能自动选中刚刚查看过的英雄就好了。

当从 HeroDetailComponent 返回时,你可以会通过把正在查看的英雄的 id 作为可选参数包含在 URL 中来实现这个特性。
可选信息还可以包含其它形式,比如:
- 结构松散的搜索条件。比如
name='wind_'。 - 多个值。比如
after='12/31/2015' & before='1/1/2017' - 没有特定的顺序 - before='1/1/2017' & after='12/31/2015' - 具有各种格式 - during='currentYear'。
由于这些参数不适合用作 URL 路径,因此可以使用可选参数在导航过程中传递任意复杂的信息。可选参数不参与模式匹配,因此在表达上提供了巨大的灵活性。
和必要参数一样,路由器也支持通过可选参数导航。在你定义完必要参数之后,再通过一个独立的对象来定义可选参数。
通常,对于必传的值(比如用于区分两个路由路径的)使用必备参数;当这个值是可选的、复杂的或多值的时,使用可选参数。
英雄列表:选定一个英雄(也可不选)
当导航到 HeroDetailComponent 时,你可以在路由参数中指定一个所要编辑的英雄 id,只要把它作为链接参数数组中的第二个条目就可以了。
<a [routerLink]="['/hero', hero.id]">路由器在导航 URL 中内嵌了 id 的值,这是因为你把它用一个 :id 占位符当做路由参数定义在了路由的 path 中:
{ path: 'hero/:id', component: HeroDetailComponent }当用户点击后退按钮时,HeroDetailComponent 构造了另一个链接参数数组,可以用它导航回 HeroListComponent。
gotoHeroes() {
  this.router.navigate(['/heroes']);
}
该数组缺少一个路由参数,这是因为以前你不需要往 HeroListComponent 发送信息。
现在,使用导航请求发送当前英雄的 id,以便 HeroListComponent 在其列表中突出显示该英雄。
传送一个包含可选 id 参数的对象。为了演示,这里还在对象中定义了一个没用的额外参数(foo),HeroListComponent 应该忽略它。下面是修改过的导航语句:
gotoHeroes(hero: Hero) {
  const heroId = hero ? hero.id : null;
  // Pass along the hero id if available
  // so that the HeroList component can select that hero.
  // Include a junk 'foo' property for fun.
  this.router.navigate(['/heroes', { id: heroId, foo: 'foo' }]);
}
该应用仍然能工作。点击“back”按钮返回英雄列表视图。
注意浏览器的地址栏。
它应该是这样的,不过也取决于你在哪里运行它:
localhost:4200/heroes;id=15;foo=fooid 的值像这样出现在 URL 中(;id=15;foo=foo),但不在 URL 的路径部分。“Heroes”路由的路径部分并没有定义 :id。
可选的路由参数没有使用“?”和“&”符号分隔,因为它们将用在 URL 查询字符串中。它们是用“;”分隔的。这是矩阵 URL标记法。
Matrix URL 写法首次提出是在1996 提案中,提出者是 Web 的奠基人:Tim Berners-Lee。
虽然 Matrix 写法未曾进入过 HTML 标准,但它是合法的。而且在浏览器的路由系统中,它作为从父路由和子路由中单独隔离出参数的方式而广受欢迎。Angular 的路由器正是这样一个路由系统,并支持跨浏览器的 Matrix 写法。
ActivatedRoute 服务中的路由参数
开发到现在,英雄列表还没有变化。没有突出显示的英雄行。
HeroListComponent 需要添加使用这些参数的代码。
以前,当从 HeroListComponent 导航到 HeroDetailComponent 时,你通过 ActivatedRoute 服务订阅了路由参数这个 Observable,并让它能用在 HeroDetailComponent 中。你把该服务注入到了 HeroDetailComponent 的构造函数中。
这次,你要进行反向导航,从 HeroDetailComponent 到 HeroListComponent。
首先,扩展该路由的导入语句,以包含进 ActivatedRoute 服务的类;
import { ActivatedRoute } from '@angular/router';导入 switchMap 操作符,在路由参数的 Observable 对象上执行操作。
import { Observable } from 'rxjs';
import { switchMap } from 'rxjs/operators';
在 HeroListComponent 构造函数中注入 ActivatedRoute。
export class HeroListComponent implements OnInit {
  heroes$!: Observable<Hero[]>;
  selectedId = 0;

  constructor(
    private service: HeroService,
    private route: ActivatedRoute
  ) {}

  ngOnInit() {
    this.heroes$ = this.route.paramMap.pipe(
      switchMap(params => {
        this.selectedId = parseInt(params.get('id')!, 10);
        return this.service.getHeroes();
      })
    );
  }
}ActivatedRoute.paramMap 属性是一个路由参数的 Observable。当用户导航到这个组件时,paramMap 会发射一个新值,其中包含 id。在 ngOnInit() 中,你订阅了这些值,设置到 selectedId,并获取英雄数据。
用 CSS 类绑定更新模板,把它绑定到 isSelected 方法上。 如果该方法返回 true,此绑定就会添加 CSS 类 selected,否则就移除它。 在 <li> 标记中找到它,就像这样:
<h2>Heroes</h2>
<ul class="heroes">
  <li *ngFor="let hero of heroes$ | async" [class.selected]="hero.id === selectedId">
    <a [routerLink]="['/hero', hero.id]">
      <span class="badge">{{ hero.id }}</span>{{ hero.name }}
    </a>
  </li>
</ul>

<button type="button" routerLink="/sidekicks">Go to sidekicks</button>
当选中列表条目时,要添加一些样式。
.heroes .selected a {
background-color: #d6e6f7;
}
.heroes .selected a:hover {
background-color: #bdd7f5;
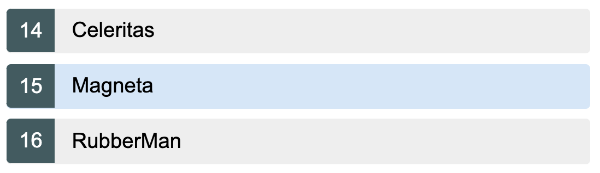
}当用户从英雄列表导航到英雄“Magneta”并返回时,“Magneta”看起来是选中的:
这个可选的 foo 路由参数人畜无害,路由器会继续忽略它。
添加路由动画
在这一节,你将为英雄详情组件添加一些动画。
首先导入 BrowserAnimationsModule,并添加到 imports 数组中:
import { BrowserAnimationsModule } from '@angular/platform-browser/animations';

@NgModule({
  imports: [
    BrowserAnimationsModule,
  ],
})
接下来,为指向 HeroListComponent 和 HeroDetailComponent 的路由定义添加一个 data 对象。 转场是基于 state 的,你将使用来自路由的 animation 数据为转场提供一个有名字的动画 state。
import { NgModule } from '@angular/core';
import { RouterModule, Routes } from '@angular/router';

import { HeroListComponent } from './hero-list/hero-list.component';
import { HeroDetailComponent } from './hero-detail/hero-detail.component';

const heroesRoutes: Routes = [
  { path: 'heroes',  component: HeroListComponent, data: { animation: 'heroes' } },
  { path: 'hero/:id', component: HeroDetailComponent, data: { animation: 'hero' } }
];

@NgModule({
  imports: [
    RouterModule.forChild(heroesRoutes)
  ],
  exports: [
    RouterModule
  ]
})
export class HeroesRoutingModule { }
在根目录 src/app/ 下创建一个 animations.ts。内容如下:
import {
  trigger, animateChild, group,
  transition, animate, style, query
} from '@angular/animations';


// Routable animations
export const slideInAnimation =
  trigger('routeAnimation', [
    transition('heroes <=> hero', [
      style({ position: 'relative' }),
      query(':enter, :leave', [
        style({
          position: 'absolute',
          top: 0,
          left: 0,
          width: '100%'
        })
      ]),
      query(':enter', [
        style({ left: '-100%'})
      ]),
      query(':leave', animateChild()),
      group([
        query(':leave', [
          animate('300ms ease-out', style({ left: '100%'}))
        ]),
        query(':enter', [
          animate('300ms ease-out', style({ left: '0%'}))
        ])
      ]),
      query(':enter', animateChild()),
    ])
  ]);
该文件做了如下工作:
- 导入动画符号以构建动画触发器、控制状态并管理状态之间的过渡。
- 导出了一个名叫
slideInAnimation的常量,并把它设置为一个名叫 routeAnimation的动画触发器。 - 定义一个转场动画,当在
heroes和 hero路由之间来回切换时,如果进入(:enter)应用视图则让组件从屏幕的左侧滑入,如果离开(:leave)应用视图则让组件从右侧划出。
回到 AppComponent,从 @angular/router 包导入 RouterOutlet,并从 './animations.ts 导入 slideInAnimation。
为包含 slideInAnimation 的 @Component 元数据添加一个 animations 数组。
import { ChildrenOutletContexts } from '@angular/router';
import { slideInAnimation } from './animations';

@Component({
  selector: 'app-root',
  templateUrl: 'app.component.html',
  styleUrls: ['app.component.css'],
  animations: [ slideInAnimation ]
})
要想使用路由动画,就要把 RouterOutlet 包装到一个元素中。再把 @routeAnimation 触发器绑定到该元素上。
为了把 @routeAnimation 转场转场到指定的状态,你需要从 ActivatedRoute 的 data 中提供它。RouterOutlet 导出成了一个模板变量 outlet,这样你就可以绑定一个到路由出口的引用了。这个例子中使用了一个 routerOutlet 变量。
<h1>Angular Router</h1>
<nav>
  <a routerLink="/crisis-center" routerLinkActive="active" ariaCurrentWhenActive="page">Crisis Center</a>
  <a routerLink="/heroes" routerLinkActive="active" ariaCurrentWhenActive="page">Heroes</a>
</nav>
<div [@routeAnimation]="getAnimationData()">
  <router-outlet></router-outlet>
</div>@routeAnimation 属性使用所提供的 routerOutlet 引用来绑定到 getAnimationData(),它会根据主路由所提供的 data 对象返回动画的属性。animation 属性会根据你在 animations.ts 中定义 slideInAnimation 时使用的 transition 名称进行匹配。
export class AppComponent {
  constructor(private contexts: ChildrenOutletContexts) {}

  getAnimationData() {
      return this.contexts.getContext('primary')?.route?.snapshot?.data?.['animation'];
  }
}如果在两个路由之间切换,导航进来时,HeroDetailComponent 和 HeroListComponent 会从左侧滑入;导航离开时将会从右侧划出。
里程碑 3 的小结
本节包括以下内容:
- 把应用组织成特性区
- 命令式的从一个组件导航到另一个
- 通过路由参数传递信息,并在组件中订阅它们
- 把这个特性分区模块导入根模块 AppModule
- 把动画应用到路由组件上
做完这些修改之后,目录结构如下:
这里是当前版本的范例程序相关文件。
- animations.ts
import {
  trigger, animateChild, group,
  transition, animate, style, query
} from '@angular/animations';


// Routable animations
export const slideInAnimation =
  trigger('routeAnimation', [
    transition('heroes <=> hero', [
      style({ position: 'relative' }),
      query(':enter, :leave', [
        style({
          position: 'absolute',
          top: 0,
          left: 0,
          width: '100%'
        })
      ]),
      query(':enter', [
        style({ left: '-100%'})
      ]),
      query(':leave', animateChild()),
      group([
        query(':leave', [
          animate('300ms ease-out', style({ left: '100%'}))
        ]),
        query(':enter', [
          animate('300ms ease-out', style({ left: '0%'}))
        ])
      ]),
      query(':enter', animateChild()),
    ])
]);<h1>Angular Router</h1>
<nav>
<a routerLink="/crisis-center" routerLinkActive="active" ariaCurrentWhenActive="page">Crisis Center</a>
<a routerLink="/heroes" routerLinkActive="active" ariaCurrentWhenActive="page">Heroes</a>
</nav>
<div [@routeAnimation]="getAnimationData()">
<router-outlet></router-outlet>
</div>import { Component } from '@angular/core';
import { ChildrenOutletContexts } from '@angular/router';
import { slideInAnimation } from './animations';
@Component({
selector: 'app-root',
templateUrl: 'app.component.html',
styleUrls: ['app.component.css'],
animations: [ slideInAnimation ]
})
export class AppComponent {
constructor(private contexts: ChildrenOutletContexts) {}
getAnimationData() {
return this.contexts.getContext('primary')?.route?.snapshot?.data?.['animation'];
}
}import { NgModule } from '@angular/core';
import { BrowserModule } from '@angular/platform-browser';
import { FormsModule } from '@angular/forms';
import { BrowserAnimationsModule } from '@angular/platform-browser/animations';
import { AppComponent } from './app.component';
import { AppRoutingModule } from './app-routing.module';
import { HeroesModule } from './heroes/heroes.module';
import { CrisisListComponent } from './crisis-list/crisis-list.component';
import { PageNotFoundComponent } from './page-not-found/page-not-found.component';
@NgModule({
imports: [
BrowserModule,
BrowserAnimationsModule,
FormsModule,
HeroesModule,
AppRoutingModule
],
declarations: [
AppComponent,
CrisisListComponent,
PageNotFoundComponent
],
bootstrap: [ AppComponent ]
})
export class AppModule { }import { NgModule } from '@angular/core';
import { RouterModule, Routes } from '@angular/router';
import { CrisisListComponent } from './crisis-list/crisis-list.component';
/* . . . */
import { PageNotFoundComponent } from './page-not-found/page-not-found.component';
const appRoutes: Routes = [
{ path: 'crisis-center', component: CrisisListComponent },
/* . . . */
{ path: '', redirectTo: '/heroes', pathMatch: 'full' },
{ path: '**', component: PageNotFoundComponent }
];
@NgModule({
imports: [
RouterModule.forRoot(
appRoutes,
{ enableTracing: true } // <-- debugging purposes only
)
],
exports: [
RouterModule
]
})
export class AppRoutingModule {}/* HeroListComponent's private CSS styles */
.heroes {
margin: 0 0 2em 0;
list-style-type: none;
padding: 0;
width: 100%;
}
.heroes li {
position: relative;
cursor: pointer;
}
.heroes li:hover {
left: .1em;
}
.heroes a {
color: black;
text-decoration: none;
display: block;
font-size: 1.2rem;
background-color: #eee;
margin: .5rem .5rem .5rem 0;
padding: .5rem 0;
border-radius: 4px;
}
.heroes a:hover {
color: #2c3a41;
background-color: #e6e6e6;
}
.heroes a:active {
background-color: #525252;
color: #fafafa;
}
.heroes .selected a {
background-color: #d6e6f7;
}
.heroes .selected a:hover {
background-color: #bdd7f5;
}
.heroes .badge {
padding: .5em .6em;
color: white;
background-color: #435b60;
min-width: 16px;
margin-right: .8em;
border-radius: 4px 0 0 4px;
}<h2>Heroes</h2>
<ul class="heroes">
<li *ngFor="let hero of heroes$ | async" [class.selected]="hero.id === selectedId">
<a [routerLink]="['/hero', hero.id]">
<span class="badge">{{ hero.id }}</span>{{ hero.name }}
</a>
</li>
</ul>
<button type="button" routerLink="/sidekicks">Go to sidekicks</button>// TODO: Feature Componetized like CrisisCenter
import { Observable } from 'rxjs';
import { switchMap } from 'rxjs/operators';
import { Component, OnInit } from '@angular/core';
import { ActivatedRoute } from '@angular/router';
import { HeroService } from '../hero.service';
import { Hero } from '../hero';
@Component({
selector: 'app-hero-list',
templateUrl: './hero-list.component.html',
styleUrls: ['./hero-list.component.css']
})
export class HeroListComponent implements OnInit {
heroes$!: Observable<Hero[]>;
selectedId = 0;
constructor(
private service: HeroService,
private route: ActivatedRoute
) {}
ngOnInit() {
this.heroes$ = this.route.paramMap.pipe(
switchMap(params => {
this.selectedId = parseInt(params.get('id')!, 10);
return this.service.getHeroes();
})
);
}
}<h2>Heroes</h2>
<div *ngIf="hero$ | async as hero">
<h3>{{ hero.name }}</h3>
<p>Id: {{ hero.id }}</p>
<label for="hero-name">Hero name: </label>
<input type="text" id="hero-name" [(ngModel)]="hero.name" placeholder="name"/>
<button type="button" (click)="gotoHeroes(hero)">Back</button>
</div>import { switchMap } from 'rxjs/operators';
import { Component, OnInit } from '@angular/core';
import { Router, ActivatedRoute, ParamMap } from '@angular/router';
import { Observable } from 'rxjs';
import { HeroService } from '../hero.service';
import { Hero } from '../hero';
@Component({
selector: 'app-hero-detail',
templateUrl: './hero-detail.component.html',
styleUrls: ['./hero-detail.component.css']
})
export class HeroDetailComponent implements OnInit {
hero$!: Observable<Hero>;
constructor(
private route: ActivatedRoute,
private router: Router,
private service: HeroService
) {}
ngOnInit() {
this.hero$ = this.route.paramMap.pipe(
switchMap((params: ParamMap) =>
this.service.getHero(params.get('id')!))
);
}
gotoHeroes(hero: Hero) {
const heroId = hero ? hero.id : null;
// Pass along the hero id if available
// so that the HeroList component can select that hero.
// Include a junk 'foo' property for fun.
this.router.navigate(['/heroes', { id: heroId, foo: 'foo' }]);
}
}import { Injectable } from '@angular/core';
import { Observable, of } from 'rxjs';
import { map } from 'rxjs/operators';
import { Hero } from './hero';
import { HEROES } from './mock-heroes';
import { MessageService } from '../message.service';
@Injectable({
providedIn: 'root',
})
export class HeroService {
constructor(private messageService: MessageService) { }
getHeroes(): Observable<Hero[]> {
// TODO: send the message _after_ fetching the heroes
this.messageService.add('HeroService: fetched heroes');
return of(HEROES);
}
getHero(id: number | string) {
return this.getHeroes().pipe(
// (+) before `id` turns the string into a number
map((heroes: Hero[]) => heroes.find(hero => hero.id === +id)!)
);
}
}import { NgModule } from '@angular/core';
import { CommonModule } from '@angular/common';
import { FormsModule } from '@angular/forms';
import { HeroListComponent } from './hero-list/hero-list.component';
import { HeroDetailComponent } from './hero-detail/hero-detail.component';
import { HeroesRoutingModule } from './heroes-routing.module';
@NgModule({
imports: [
CommonModule,
FormsModule,
HeroesRoutingModule
],
declarations: [
HeroListComponent,
HeroDetailComponent
]
})
export class HeroesModule {}import { NgModule } from '@angular/core';
import { RouterModule, Routes } from '@angular/router';
import { HeroListComponent } from './hero-list/hero-list.component';
import { HeroDetailComponent } from './hero-detail/hero-detail.component';
const heroesRoutes: Routes = [
{ path: 'heroes', component: HeroListComponent, data: { animation: 'heroes' } },
{ path: 'hero/:id', component: HeroDetailComponent, data: { animation: 'hero' } }
];
@NgModule({
imports: [
RouterModule.forChild(heroesRoutes)
],
exports: [
RouterModule
]
})
export class HeroesRoutingModule { }import { Injectable } from '@angular/core';
@Injectable({
providedIn: 'root',
})
export class MessageService {
messages: string[] = [];
add(message: string) {
this.messages.push(message);
}
clear() {
this.messages = [];
}
}


更多建议: