
 免费 AI IDE
Spring DATA Neo4j - 示例
在本章中,我们将讨论如何开发一个 Spring 框架项目来使用 Neo4j 数据库。
Spring DATA Neo4j 模块注释
我们将使用以下 Spring Framework 注释来开发此应用程序。
| S.No. | Spring DATA Neo4j注解 | 用法 |
|---|---|---|
| 1 | @GraphEntity | 定义域类Neo4j Entity |
| 2 | @GraphID | 定义节点或关系id |
| 3 | @GraphProperty | 定义节点或关系属性 |
在开发应用程序之前,请参考“Neo4j Spring DATA环境设置”一章来设置 Maven Eclipse IDE 项目。
实现 Spring DATA Neo4j 应用程序的简要步骤 -
-
开发图表实体或域或
POJO 类 -
开发
DAO 或存储库 -
开发服务层(如果需要)
-
Spring DATA Neo4j XML 配置
我们现在演示如何在 Eclipse IDE 中开发基于 Maven 的 Spring DATA 应用程序来执行 Neo4j DB 操作。
开发图表实体或域或 POJO 类
我们要实现equals()和hashCode()方法。
它不需要为“id”属性提供 setter 方法,因为 Neo4j 将负责分配此属性
package com.tp.springdata.neo4j.domain;

import org.springframework.data.neo4j.annotation.GraphId;
import org.springframework.data.neo4j.annotation.NodeEntity;

@NodeEntity
public class GoogleProfile {

   @GraphId Long id;
   private String name;
   private String address;
   private String sex;
   private String dob;

   public Long getId() {
      return id;
   }

   public String getName() {
      return name;
   }

   public void setName(String name) {
      this.name = name;
   }

   public String getAddress() {
      return address;
   }

   public void setAddress(String address) {
      this.address = address;
   }

   public String getSex() {
      return sex;
   }

   public void setSex(String sex) {
      this.sex = sex;
   }

   public String getDob() {
      return dob;
   }

   public void setDob(String dob) {
      this.dob = dob;
   }

   public boolean equals(Object other) {

      if (this == other)
         return true;

      if (id == null)
         return false;

      if (! (other instanceof GoogleProfile))
         return false;

      return id.equals(((GoogleProfile) other).id);
   }

   public int hashCode() {
      return id == null ? System.identityHashCode(this) : id.hashCode();
   }

   public String toString(){
      return "Profile[id:"+ id +",name:"+ name +",sex:" + sex+ ",address:" + address + ",dob:" + dob +"]";
   }
}
@GraphProperty 是可选的,所以我们可以省略这个。 上面的实体同下。
package com.tp.springdata.neo4j.domain;

import org.springframework.data.neo4j.annotation.GraphId;
import org.springframework.data.neo4j.annotation.NodeEntity;

@NodeEntity
public class GoogleProfile {

   @GraphId
   private Long id;

   private String name;
   private String address;
   private String sex;
   private String dob;

   // Getter for id
   // Setters and Getters for rest of properties
   // implement equals() and hashCode() methods
}
开发 Spring DATA Neo4j 存储库。
正如我们前面讨论的,我们需要通过扩展 Spring DATA Neo4j API 接口“GraphRepository”而不需要它的实现来开发接口。
Spring DATA Neo4j 将在内部为此接口提供实现。
为我们的 Domain 类定义一个存储库或 DAO 接口:GoogleProfile
package com.tp.springdata.neo4j.dao;

import org.springframework.data.neo4j.repository.GraphRepository;

public interface GoogleProfileRepository extends GraphRepository<GoogleProfile>{
}
实现 Spring DAT Neo4j 存储库非常容易和简单。 我们只需要通过指定我们的域类作为参数来扩展 GraphRepository 来定义一个接口。
发展服务层工件:接口和实现。
最好在我们的应用程序中在 DAO 层之上提供一个 Service 层。
Service 构件
Service 组件接口:
package com.tp.springdata.neo4j.service;

import org.springframework.data.neo4j.conversion.Result;
import com.tp.springdata.neo4j.domain.GoogleProfile;

public interface GoogleProfileService {

   GoogleProfile create(GoogleProfile profile);
   void delete(GoogleProfile profile);
   GoogleProfile findById(long id);
   Result<GoogleProfile> findAll();
}
Service 组件的实现:
package com.tp.springdata.neo4j.service;

import org.springframework.beans.factory.annotation.Autowired;
import org.springframework.data.neo4j.conversion.Result;
import org.springframework.stereotype.Service;

import com.tp.springdata.neo4j.dao.GoogleProfileRepository;
import com.tp.springdata.neo4j.domain.GoogleProfile;

@Service("googleProfileService")
public class GoogleProfileServiceImpl implements GoogleProfileService {

   @Autowired
   private GoogleProfileRepository googleProfileRepository;

   public GoogleProfile create(GoogleProfile profile) {
      return googleProfileRepository.save(profile);
   }

   public void delete(GoogleProfile profile) {
      googleProfileRepository.delete(profile);
   }

   public GoogleProfile findById(long id) {
      return googleProfileRepository.findOne(id);
   }

   public Result<GoogleProfile> findAll() {
      return googleProfileRepository.findAll();
   }
}
Spring DATA Neo4j XML 配置
要运行基于 Spring 的应用程序,我们需要提供一些 XML 配置。
我们需要在 Spring XML 配置文件中提供以下详细信息
提供 Spring Data Neo4j 命名空间
xmlns:neo4j=http://www.springframework.org/schema/data/neo4j
提供 Spring 数据 Neo4j 模式定义(XSD 文件)
xsi:schemaLocation="http://www.springframework.org/schema/data/neo4j http://www.springframework.org/schema/data/neo4j/spring-neo4j.xsd"
spring-neo4j.xsd 文件包含所有 Spring Data Neo4j 相关的 XML 标签
提供我们的 Neo4j 数据库位置和我们的图实体(域或 POJO 类)基础包
<neo4j:config storeDirectory="C:TPNeo4jDB" base-package="com.tp.springdata.neo4j.domain"/?>
这里 storeDirectory =“C:\ TPNeo4jDB”指定我们的 Neo4j 数据库文件存储在我们的文件系统中的 C:\ TPNeo4jDB 位置。
base-package =“com.tp.springdata.neo4j.domain”
我们的所有图实体都有 com.tp.springdata.neo4j.domain 作为我们的应用程序类路径中的基础包
提供我们的 Spring Data Neo4j 存储库(DAO Interfaces)基础包。
<neo4j:repositories base-package="com.tp.springdata.neo4j.dao"/?>
我们的所有 Spring Data Neo4j 存储库都可以在我们的应用程序类路径 com.tp.springdata.neo4j.dao 包
提供 Spring 配置以注册带有 Spring IOC 容器的注释组件。
<context:component-scan base-package="com.tp.springdata.neo4j.service" /?>
我们的所有组件或服务都可以在我们的应用程序类路径中的“com.tp.springdata.neo4j.service”包
完成“googleprofile.xml”
<?xml version="1.0" encoding="UTF-8" standalone="no"?>
<beans xmlns="http://www.springframework.org/schema/beans"
   xmlns:context="http://www.springframework.org/schema/context"
   xmlns:xsi="http://www.w3.org/2001/XMLSchema-instance"
   xmlns:neo4j="http://www.springframework.org/schema/data/neo4j"
   xmlns:tx="http://www.springframework.org/schema/tx"
   xsi:schemaLocation="
      http://www.springframework.org/schema/beans
      http://www.springframework.org/schema/beans/spring-beans.xsd
      http://www.springframework.org/schema/context
      http://www.springframework.org/schema/context/spring-context.xsd
      http://www.springframework.org/schema/data/neo4j
      http://www.springframework.org/schema/data/neo4j/spring-neo4j.xsd
      http://www.springframework.org/schema/tx
      http://www.springframework.org/schema/tx/spring-tx.xsd">

   <context:component-scan base-package="com.tp.springdata.neo4j.service" />

   <neo4j:config storeDirectory="C:TPNeo4jDB"
      base-package="com.tp.springdata.neo4j.domain"/>

   <neo4j:repositories base-package="com.tp.springdata.neo4j.dao"/>

   <tx:annotation-driven />
</beans>
开发测试程序并测试所有操作
import java.util.Iterator;

import org.springframework.context.ApplicationContext;
import org.springframework.context.support.ClassPathXmlApplicationContext;
import org.springframework.data.neo4j.conversion.Result;

import com.tp.springdata.neo4j.service.GoogleProfileService;
import com.tp.springdata.neo4j.domain.GoogleProfile;

public class GoogleProfileTest {
   public static void main(String[] args) {
      ApplicationContext context = new ClassPathXmlApplicationContext("googleprofile.xml");
      GoogleProfileService service = (GoogleProfileService) context.getBean("googleProfileService");

      // Please uncomment one of the operation section
      // and comment remaining section to test only one operation at a time
      // Here I've uncommented CREATE operation and
      // commented other operations: FIND ONE, FIND ALL, DELETE
      // CREATE Operation
      GoogleProfile profile = createPofile();
      createProfile(service,profile);
      System.out.println("GoogleProfile created successfully.");

      // FIND ONE
      /*
      GoogleProfile profile = getOneProfileById(service,67515L);
      System.out.println(profile);
      */

      // FIND ALL
      /*
      getAllProfiles(service);
      */

      // DELETE
      /*
      GoogleProfile profile = createPofile();
      deleteProfile(service,profile);
      System.out.println("GoogleProfile deleted successfully.");
      */
   }

   private static GoogleProfile createProfile(GoogleProfileService service, GoogleProfile profile){
      return service.create(profile);
   }

   private static void deleteProfile(GoogleProfileService service,GoogleProfile profile){
      service.delete(profile);
   }

   private static GoogleProfile getOneProfileById(GoogleProfileService service,Long id){
      return service.findById(id);
   }

   private static void getAllProfiles(GoogleProfileService service){
      Result<GoogleProfile> result = service.findAll();
      Iterator<GoogleProfile> iterator = result.iterator();

      while(iterator.hasNext()){
         System.out.println(iterator.next());
      }
   }

   private static GoogleProfile createPofile(){
      GoogleProfile profile = new GoogleProfile();
      profile.setName("Profile-2");
      profile.setAddress("Hyderabad");
      profile.setSex("Male");
      profile.setDob("02/02/1980");
      return profile;
   }
}
我已取消注释只有为 CREATE 操作和注释剩下的3个操作。
如果你想测试其他操作,jut 注释不需要的部分和取消注释想要的部分,并测试此应用程序
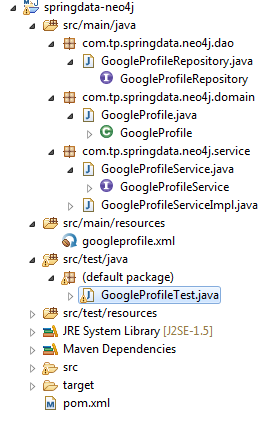
最终 Eclipse Maven 项目结构
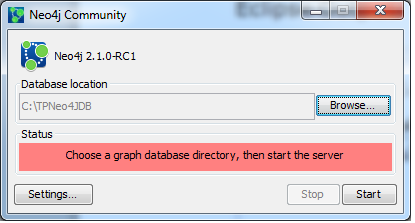
当我们运行这个程序,请确保我们的 Neo4j 数据库服务器应该在 SHUTDOWM 状态。
在执行此 Java 程序之前,检查您的 Neo4j 是否处于关闭模式。 如果没有,请点击“停止”按钮展开它。
运行 GoogleProfileTest.java 应用程序并查看结果
当我们在 Eclipse IDE 中运行这个 CREATE 操作时,我们可以在控制台中观察到以下消息。

执行一些操作后,然后通过单击“开始”按钮启动 Neo4j 数据库服务器
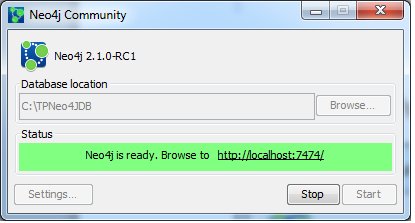
使用 http:// localhost:7474 / url 打开 Neo4j 数据浏览器
在数据浏览器上键入以下命令
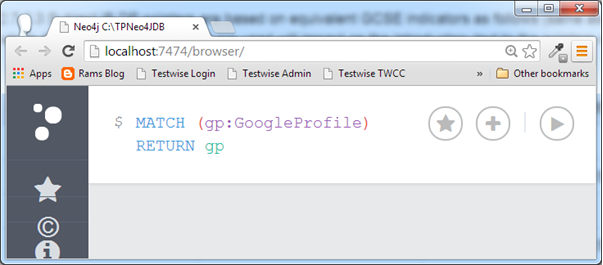
点击“执行”按钮并观察结果
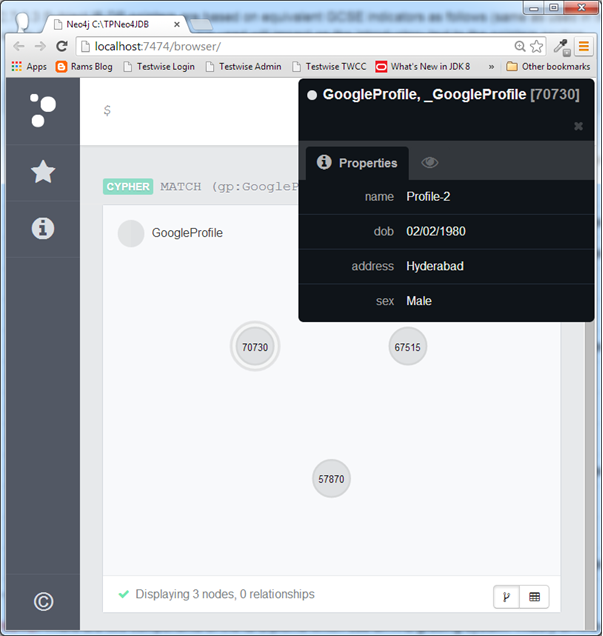
到目前为止,我们已经创建了3个 GoogleProfile 节点。


更多建议: