
 免费 AI IDE

与现有的应用程序集成
由于 React 并没有做出关于你其他的技术堆栈的假设——通常在 MVC 中简单的用 V 来表示——这很容易嵌入到现有 non-React Native 应用程序中。事实上,它与另外的最佳实践社区工具集成了,如 CocoaPods。
需求
用 CocoaPods 安装 React Native
CocoaPods 是 iOS/Mac 开发的管理工具包。我们需要用它来下载 React Native。如果你还没有安装 CocoaPods,请查看本教程。
当你准备使用 CocoaPods 工作时,添加以下行到 Podfile 中。如果你没有,那么在你的项目的根目录下创建它。
    pod 'React'
    pod 'React/RCTText'
    # Add any subspecs you want to use in your project
记得安装所有你需要的 subspecs。没有 pod 'React/RCTText',<Text> 元素不能使用。
然后安装你的 pods:
$ pod install
创建你的 React Native 应用程序
有两块你需要设置:
根 JavaScript 文件,该文件将包含实际的 React Native 应用程序和其他组件
包装 Objective - C 代码,将加载脚本并创建一个
RCTRootView来显示和管理你的 React Native 组件
首先,为你的应用程序的 React 代码创建一个目录,并创建一个简单的 index.ios.js 文件:
$ mkdir ReactComponent
$ touch index.ios.js
为 index.ios.js 复制 & 粘贴以下 starter 代码——它是一个 barebones React Native 应用程序:
'use strict';var React = require('react-native');var {
  Text,
  View
} = React;var styles = React.StyleSheet.create({
  container: {
    flex: 1,
    backgroundColor: 'red'
  }
});class SimpleApp extends React.Component {
  render() {    return (      <View style={styles.container}>
        <Text>This is a simple application.</Text>
      </View>
    )
  }
}
React.AppRegistry.registerComponent('SimpleApp', () => SimpleApp);
SimpleApp 将是你的模块名称,这将在后面使用。
将容器视图添加到你的应用程序中
现在,你应该为 React Native 组件添加一个容器视图。在你的应用程序中它可以是任何的 UIView。
但是,为了使代码简洁,让我们把 UIView 归入子类。让我们把它命名为 ReactView。打开你的Yourproject.xcworkspace,并创建一个新类 ReactView(你可以把它命名为任何你喜欢的名字:))。
    // ReactView.h
    #import <UIKit/UIKit.h>
    @interface ReactView : UIView
    @end
在一个视图控制器中,想要管理这一视图,继续添加一个出口并将其连接:
    // ViewController.m
    @interface ViewController ()
    @property (weak, nonatomic) IBOutlet ReactView *reactView;    @end
在这里我简单的禁用了 AutoLayout。在实际产品中,你应该自己打开 AutoLayout,并且设置约束。
为容器视图添加 RCTRootView
准备好学习最有趣的这部分了吗?现在我们将在你的 React Native 应用程序存在的位置创建 RCTRootView。
在 ReactView.m 中,我们首先需要用 index.ios.bundle 的 URI 启动 RCTRootView。index.ios.bundle 将被 packager 创建,并由 React Native 服务器服务,这将在稍后讨论。
NSURL *jsCodeLocation = [NSURL URLWithString:@"http://localhost:8081/index.ios.bundle"];// For production use, this `NSURL` could instead point to a pre-bundled file on disk:////   NSURL *jsCodeLocation = [[NSBundle mainBundle] URLForResource:@"main" withExtension:@"jsbundle"];//// To generate that file, run the curl command and add the output to your main Xcode build target:////   curl http://localhost:8081/index.ios.bundle -o main.jsbundleRCTRootView *rootView = [[RCTRootView alloc] initWithBundleURL:jsCodeLocation
                                                    moduleName: @"SimpleApp"
                                                 launchOptions:nil];
然后把它作为 ReactView 的子视图添加。
[self addSubview:rootView];
rootView.frame = self.bounds;
启动开发服务器
在根目录,我们需要启动 React Native 开发服务器。
(JS_DIR=`pwd`/ReactComponent; cd Pods/React; npm run start -- --root $JS_DIR)
这个命令将在我们的 CocoaPods 依赖中启动一个 React Native 开发服务器,来创建捆绑脚本。——root 选项表明 React Native 应用程序的根——这将是我们包含单一 index.ios.js 文件的 ReactComponents目录。该运行的服务器将通过 http:/ / localhost:8081 / index.ios.bundle 把 index.ios.bundle 打包成可访问的文件。
编译和运行
现在编译并运行你的应用程序。你将看到你的 React Native 应用程序在 ReactView 内部运行。
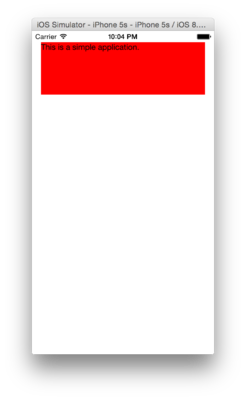
Live 也从模拟器重新加载工作!你已经得到了一个简单的完全封装在 Objective–C UIView 子类中的 React 组件。
总结
所以,当 RCTRootView 初始化时,它会尝试从 React Native 开发服务器中下载,解析并运行包文件。这意味着你所需要做的就是为 RCTRootView 实现你自己的容器视图或视图控制器——RCTRootView 摄取了捆绑的 JS 并呈现出你的 React 组件。万岁!
你可以在这里查看一个示例应用程序的完整源代码。


更多建议: