免费 AI IDE
今天小编为大家分享有关于“react native生命周期详解!”这方面的相关内容,希望小编的分享对大家的学习和了解有所帮助!
我们先来看看下面这个有关于 react native 生命周期的流程图,如下所示:

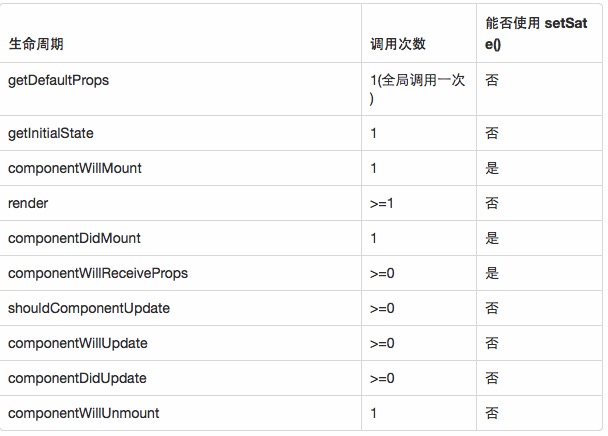
在上面这个流程图中我们可以了解到,在 react native 生命周期中分为三个阶段。
阶段一:实例化阶段函数功能分析
1、 getDefaultProps:在这个组件中我们可以通过使用 this.props 获取初始化它的属性,而且在组件初始化后,再次使用这个组件是不会调用getDefaultProps函数,所以组件自己不可以修改props,只可由其他组件调用它时再外部进行修改。
2、getInitialState:这个函数用于对组件部分状态进行初始化,而且该函数不同于 getDefaultProps ,在之后的过程中我们会再次调用,所以可以将控制控件状态的一些变量放在这里初始化(比如控件上显示的文字,可以通过this.state来获取值,通过this.setState来修改state值。)
注意:而且一旦调用了this.setState方法,组件一定会调用 render 方法,对组件进行再次渲染,不过,React 框架会根据 DOM的状态自动判断是否需要真正渲染。
下面我们来看看下面相关的代码:
constructor(props) {
    super(props);
    this.state = {
      clickText: "开始点击按钮",
      count: 1,
      detailContent: true
    }
  }
    ...
clickButton(){
    const { count } = this.state;
    this.setState({
      clickText: "我点击了按钮",
      count: count + 1,
      detailContent: false
    })
  }

render() {
    console.log("render1111");
    return (
      <View style={styles.container}>
        <Text>欢迎来到首页</Text>
        <TouchableOpacity
          onPress={() => Actions.notice()}
        >
          <Text>跳转到公告页</Text>
        </TouchableOpacity>
        <Text style={{color: 'blue', fontSize: 40}}>{this.state.count}</Text>
        <TouchableOpacity
          style={styles.button}
          onPress={() => this.clickButton()}
        >
          <Text>{this.state.clickText}</Text>
        </TouchableOpacity>
        <HomeDetails detailContent={this.state.detailContent}/>
      </View>
    )
  }
3、componentWillMount: 组件将要被加载到视图之前调用
4、componentDidMount: 在这个方法中调用了render方法,组件加载成功并被成功渲染出来之后,所要执行的后续操作,一般都会在这个函数中进行。
阶段二:存在阶段函数功能分析
shouldComponentUpdate:一般用于优化,可以返回false或true来控制是否进行渲染(true 的话进行下2步操作,false不会进行下去)
componentWillUpdate: 组件刷新前调用
componentDidUpdate:更新后
shouldComponentUpdate(nextProps, nextState){
    console.log(this.state.detailContent,'detailContent');
    if (this.state.count !== nextState.count) {
      console.log("shouldComponentUpdate1111---组件需要更新");
      return true;
    }
    return false;
  }

  componentWillUpdate(){
    console.log("componentWillUpdate1111---组件将要更新");
  }

  componentDidUpdate(){
    console.log("componentDidUpdate1111---组件更新完毕");
  }
componentWillReceiveProps:指父元素对组件的props或state进行了修改
// 在子组件中对父元素props或state的改变进行监听进行相应的操作
componentWillReceiveProps(nextProps){
    console.log(this.props.detailContent,'this--->>componentWillReceiveProps');
    console.log(nextProps.detailContent,'next--->>componentWillReceiveProps')
  }
// componentWillReceiveProps -> 改变后执行父组件中 shouldComponentUpdate -> componentWillUpdate -> componentDidUpdate
阶段三:销毁阶段函数功能分析
componentWillUnmount
用于清理一些无用的内容,比如:定时器清除
下面为大家介绍一些我们日常常用的知识点:
this.state:开发中,组件肯定要与用户进行交互,React 的一大创新就是将组件看成了一个状态机,一开始有一个初始状态,然后用户交互,导致状态变化,从而触发重新渲染UI。
1、当用户点击组件,导致状态变化,this.setSate方法就修改状态值,每次修改以后,会自动调用this.render方法,再次渲染组件
2、可以把组件看成一个状态机,根据不同的status有不同的UI展示,只要使用setState改变状态值,根据diff算法算出有差值后,就会执行ReactDom的render方法,重新渲染界面
3、由于this.props和this.state都用于描述组件的特性,可能会产生混淆,一个简单的区分方法就是---this.props表示那些一旦定义,就不再更改的特性,而this.state是会随着用户交互而产生改变的特性
获取真实的Dom节点:
1、在React Native中,组件并不是真实的DOM节点,而是存在于内存中的一种数据结构,叫虚拟DOM
2、只有当它插入文档后,才会变成真实的DOM
3、根据React的设计,所有DOM变动,都现在虚拟DOM上发生,然后再将实际发生变动的部分,反映在真实DOM上,这种算法叫做DOM diff,它可以极大提高网页的性能表现。
4、有时需要从组建获取真实DOM节点,这时就需要到ref属性
以上就是有关于:“react native生命周期详解!”这方面的相关内容分享,更多有关于 react native 这方面的相关内容我们都可以在W3Cschool中进行学习和了解!