
 免费 AI IDE
OpenAI API 图像生成
介绍
图片 API 提供了三种与图片交互的方法:
根据文本提示从头开始创建图像
根据新文本提示创建现有图像的编辑
创建现有图像的变体
本指南涵盖了使用这三个 API 端点的基础知识以及有用的代码示例。
图片 API 处于测试阶段。在此期间,API 和模型将根据您的反馈进行改进。为确保所有用户都能轻松制作原型,默认速率限制为每分钟 50 张图像。如果您想提高速率限制,请查看这篇帮助中心文章。随着我们对使用和容量要求的更多了解,我们将提高默认速率限制。
使用方法
生成
图像生成端点允许您在给定文本提示的情况下创建原始图像。生成的图像的大小可以为 256x256、512x512 或 1024x1024 像素。较小的尺寸生成速度更快。您可以使用 n 参数一次请求 1-10 张图像。
| python | node.js | curl |
|
|
|
描述越详细,您就越有可能获得您或您的最终用户想要的结果。您可以探索 DALL·E 预览应用程序中的示例以获得更多提示灵感。这是一个简单的例子:
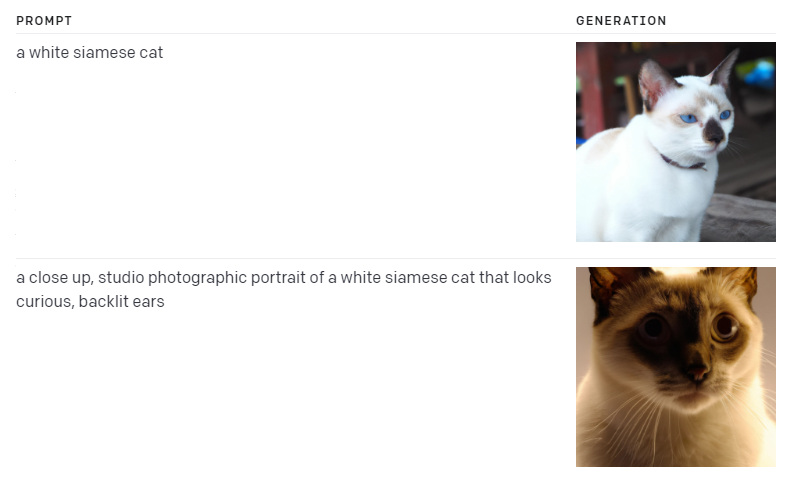
使用 response_format 参数,每个图像都可以作为 URL 或 Base64 数据返回。 URL 将在一小时后过期。
编辑
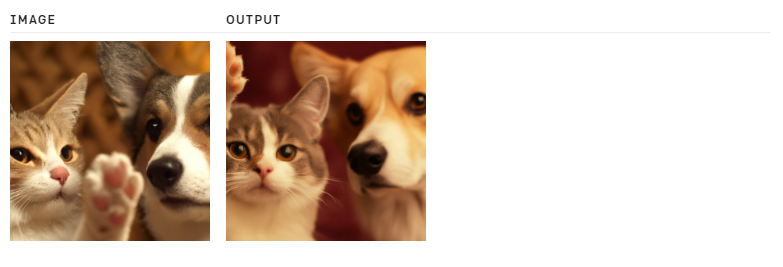
图像编辑端点允许您通过上传蒙版来编辑和扩展图像。遮罩的透明区域指示应编辑图像的位置,提示应描述完整的新图像,而不仅仅是擦除区域。此端点可以启用类似我们 DALL·E 预览应用程序中的编辑器的体验。
| python | node.js | curl |
|
|
|

上传的图片和遮罩必须是小于 4MB 的正方形 PNG 图片,并且必须具有相同的尺寸。生成输出时不使用遮罩的非透明区域,因此它们不一定需要像上面的示例那样与原始图像匹配。
变化
图像变体端点允许您生成给定图像的变体。
| python | node.js | curl |
|
|
|
与编辑端点类似,输入图像必须是大小小于 4MB 的方形 PNG 图像。
内容审核
提示和图像根据我们的内容政策进行过滤,当提示或图像被标记时返回错误。
特定语言提示
- NODE.JS
使用内存图像数据
上面指南中的 Node.js 示例使用 fs 模块从磁盘读取图像数据。在某些情况下,您可能会将图像数据保存在内存中。下面是一个使用存储在 Node.js Buffer 对象中的图像数据的 API 调用示例:
// This is the Buffer object that contains your image data
const buffer = [your image data];
// Set a `name` that ends with .png so that the API knows it's a PNG image
buffer.name = "image.png";
const response = await openai.createImageVariation(
  buffer,
  1,
  "1024x1024"
);
使用 TypeScript
如果您使用的是 TypeScript,您可能会遇到一些图像文件参数的问题。下面是通过显式转换参数来解决类型不匹配的示例:
// Cast the ReadStream to `any` to appease the TypeScript compiler
const response = await openai.createImageVariation(
  fs.createReadStream("image.png") as any,
  1,
  "1024x1024"
);
这是内存中图像数据的类似示例:
// This is the Buffer object that contains your image data
const buffer: Buffer = [your image data];
// Cast the buffer to `any` so that we can set the `name` property
const file: any = buffer;
// Set a `name` that ends with .png so that the API knows it's a PNG image
file.name = "image.png";
const response = await openai.createImageVariation(
  file,
  1,
  "1024x1024"
);
错误处理
API 请求可能会由于无效输入、速率限制或其他问题而返回错误。这些错误可以用 try...catch 语句处理,错误详细信息可以在 error.response 或 error.message 中找到:
try {
  const response = await openai.createImageVariation(
    fs.createReadStream("image.png"),
    1,
    "1024x1024"
  );
  console.log(response.data.data[0].url);
} catch (error) {
  if (error.response) {
    console.log(error.response.status);
    console.log(error.response.data);
  } else {
    console.log(error.message);
  }
}使用内存图像数据
上面指南中的 Python 示例使用 open 函数从磁盘读取图像数据。在某些情况下,您可能会将图像数据保存在内存中。下面是一个使用存储在 BytesIO 对象中的图像数据的 API 调用示例:
from io import BytesIO

# This is the BytesIO object that contains your image data
byte_stream: BytesIO = [your image data]
byte_array = byte_stream.getvalue()
response = openai.Image.create_variation(
  image=byte_array,
  n=1,
  size="1024x1024"
)
图像数据操作
在将图像传递给 API 之前对图像执行操作可能很有用。这是一个使用 PIL 调整图像大小的示例:
from io import BytesIO
from PIL import Image

# Read the image file from disk and resize it
image = Image.open("image.png")
width, height = 256, 256
image = image.resize((width, height))

# Convert the image to a BytesIO object
byte_stream = BytesIO()
image.save(byte_stream, format='PNG')
byte_array = byte_stream.getvalue()

response = openai.Image.create_variation(
  image=byte_array,
  n=1,
  size="1024x1024"
)
错误处理
API 请求可能会由于无效输入、速率限制或其他问题而返回错误。这些错误可以通过 try...except 语句来处理,错误的详细信息可以在 e.error 中找到:
try:
  openai.Image.create_variation(
    open("image.png", "rb"),
    n=1,
    size="1024x1024"
  )
  print(response['data'][0]['url'])
except openai.error.OpenAIError as e:
  print(e.http_status)
  print(e.error)


更多建议: