
 免费 AI IDE

iBatis开发详解(5)---分页(Struts、freeMark)
2018-10-13 11:45 更新
之前介绍过基于Hibernate分页的原理和设计,这里我们所用的分页都是物理分页技术,不是JS实现的页面分页技术,是在SQL语句上执行的分页,可以获取结果集数量固定的列表,执行效率很高。下面来看看iBatis中如何设计分页,本文基于Struts2,Spring3来整合,因为暂时Spring不支持MyBatis3(可以选用MyBatis官方的MyBatis-Spring插件来实现,配有中文文档,很好理解),我们这里仍然以iBatis2作为载体来介绍。
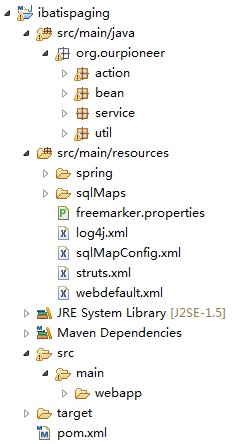
首先就是搭建开发环境,这里可以说也是对Struts2,Spring3和iBatis2进行了简单的整合,大家也可以来参考。项目的结构如下,使用Maven创建的web项目:
添加必要的依赖,因为整合了Struts2和Spring,依赖就比较多了,如下:

首先来配置一下Struts2,这个就比较简单了,相信大家都不陌生。在web.xml中:
<!-- Struts2的过滤器 -->
<filter>
    <filter-name>struts2</filter-name>
<filter-class>org.apache.struts2.dispatcher.ng.filter.StrutsPrepareAndExecuteFilter</filter-class>
</filter>
<filter-mapping>
    <filter-name>struts2</filter-name>
    <url-pattern>*.action</url-pattern>
</filter-mapping>
<?xml version="1.0" encoding="UTF-8" ?>
<!DOCTYPE struts PUBLIC
    "-//Apache Software Foundation//DTD Struts Configuration 2.1.7//EN"
    "http://struts.apache.org/dtds/struts-2.1.7.dtd">
<struts>
    <package name="ibatis-paging" extends="struts-default"
        namespace="/">
        <result-types>
            <result-type name="freemarker"
        class="org.apache.struts2.views.freemarker.FreemarkerResult"
                default="true" />
        </result-types>
        <action name="user_*" class="userAction" method="{1}">
            <result name="list">user_list.ftl</result>
        </action>
    </package>
</struts>
template_update_delay=5
default_encoding=UTF-8
url_escaping_charset=UTF-8
number_format=0.#
date_format=yyyy-MM-dd
time_format=HH:mm:ss
datetime_format=yyyy-MM-dd HH:mm:ss
boolean_format=true,false
whitespace_stripping=true
tag_syntax=auto_detect
auto_import=/Freemarker/page_macro.ftl as p
<context-param>
    <param-name>contextConfigLocation</param-name>
    <param-value>classpath:spring/*.xml</param-value>
</context-param>
<!-- Spring加载配置文件来初始化IoC容器 -->
<listener>        <listener-class>org.springframework.web.context.ContextLoaderListener</listener-class>
</listener>
<bean id="dataSource" class="org.apache.commons.dbcp.BasicDataSource"
        destroy-method="close">
        <property name="driverClassName" value="com.mysql.jdbc.Driver" />
        <property name="url" value="jdbc:mysql://localhost:3306/test" />
        <property name="username" value="root" />
        <property name="password" value="123" />
        <property name="maxActive" value="100" />
        <property name="maxIdle" value="50" />
        <property name="maxWait" value="100" />
        <property name="defaultAutoCommit" value="true" />
    </bean>
    <!-- 创建JdbcTemplate -->
    <bean id="jdbcTemplate" class="org.springframework.jdbc.core.JdbcTemplate">
        <property name="dataSource" ref="dataSource" />
    </bean>
    <!-- 创建sqlMapClient -->
    <bean id="sqlMapClient" class="org.springframework.orm.ibatis.SqlMapClientFactoryBean">
        <property name="configLocation" value="classpath:sqlMapConfig.xml" />
        <property name="dataSource" ref="dataSource" />
    </bean>
    <!-- 创建sqlMapClientTemplate -->
    <bean id="sqlMapClientTemplate" class="org.springframework.orm.ibatis.SqlMapClientTemplate">
        <constructor-arg>
            <ref bean="sqlMapClient" />
        </constructor-arg>
    </bean>
    <!-- 事务管理器 -->
    <bean id="transactionManager"
        class="org.springframework.jdbc.datasource.DataSourceTransactionManager">
        <property name="dataSource" ref="dataSource" />
    </bean>
    <!-- 配置事务处理通知 -->
    <tx:advice id="txAdvice" transaction-manager="transactionManager">
        <tx:attributes>
            <tx:method name="get*" read-only="true" />
            <tx:method name="add*" rollback-for="Exception" />
            <tx:method name="addOrUpdate*" rollback-for="Exception" />
            <tx:method name="del*" rollback-for="Exception" />
            <tx:method name="update*" rollback-for="Exception" />
        </tx:attributes>
    </tx:advice>
    <aop:config proxy-target-class="true">
        <aop:pointcut id="serviceMethod"
            expression="execution(* org.ourpioneer.service.*Service.*(..))" />
        <aop:advisor advice-ref="txAdvice" pointcut-ref="serviceMethod" />
    </aop:config>
<bean id="baseService" class="org.ourpioneer.service.BaseService">
    <property name="jdbcTemplate" ref="jdbcTemplate"></property>
</bean>

<bean id="userService" class="org.ourpioneer.service.UserService"
    parent="baseService">
    <property name="sqlMapClientTemplate" ref="sqlMapClientTemplate" />
</bean>
<bean id="userAction" class="org.ourpioneer.action.UserAction">
    <property name="userService" ref="userService" />
</bean>
<?xml version="1.0" encoding="UTF-8" ?>
<!DOCTYPE sqlMapConfig
    PUBLIC "-//iBATIS.com//DTD SQL Map Config 2.0//EN"
    "http://www.ibatis.com/dtd/sql-map-config-2.dtd">
<sqlMapConfig>
    <settings cacheModelsEnabled="true" enhancementEnabled="true"
        lazyLoadingEnabled="true" errorTracingEnabled="true" maxRequests="32"
        maxSessions="10" maxTransactions="5" />
    <sqlMap resource="sqlMaps/user.xml" />
</sqlMapConfig>
<?xml version="1.0" encoding="UTF-8" ?>
<!DOCTYPE sqlMap PUBLIC "-//ibatis.apache.org//DTD SQL Map 2.0//EN" "http://ibatis.apache.org/dtd/sql-map-2.dtd">
<sqlMap>
    <typeAlias alias="parameterMap" type="org.pioneer.bean.ParameterMap" />
    <select id="selectAllUsers" resultClass="java.util.HashMap">
        select * from user
    </select>
</sqlMap>
package org.ourpioneer.bean;
import java.util.HashMap;
public class ParameterMap extends HashMap {
    public ParameterMap(Object... parameters) {
        for (int i = 0; i < parameters.length - 1; i += 2) {
            super.put(parameters[i], parameters[i + 1]);
        }
    }
}
package org.ourpioneer.bean;

import java.util.HashMap;
import java.util.List;

import org.springframework.jdbc.core.JdbcTemplate;
import org.springframework.orm.ibatis.SqlMapClientTemplate;

import com.ibatis.sqlmap.engine.impl.SqlMapClientImpl;
import com.ibatis.sqlmap.engine.mapping.sql.Sql;
import com.ibatis.sqlmap.engine.mapping.statement.MappedStatement;
import com.ibatis.sqlmap.engine.scope.SessionScope;
import com.ibatis.sqlmap.engine.scope.StatementScope;

/**
 * iBatis分页类
 *
 * @author Nanlei
 *
 */
public class PagingList {
    private int rowCount = 0; // 记录总数
    private int pageCount = 1; // 分页总数
    private int pageSize = 10; // 每页记录数
    private int pageNum = 1; // 当前页数
    private int startIndex = 1; // 起始记录数
    private int endIndex = 1; // 结束记录数
    private List list;// 记录列表

    /**
     * 构造方法,进行分页
     *
     * @param statementName
     *            iBatis中语句的ID
     * @param parameterObject
     *            SQL语句参数
     * @param pageNum
     *            起始页数
     * @param pageSize
     *            每页大小
     * @param sqlMapClientTemplate
     *            iBatis的sqlMapClientTemplate对象
     */
    public PagingList(String statementName, Object parameterObject,
            int pageNum, int pageSize,
            SqlMapClientTemplate sqlMapClientTemplate, JdbcTemplate jdbcTemplate) {
        preProcessParams(pageNum, pageSize);
        execute(statementName, parameterObject, pageNum, pageSize,
                sqlMapClientTemplate, jdbcTemplate);
    }

    /**
     * 构造方法,进行分页
     *
     * @param statementName
     *            iBatis中语句的ID
     * @param pageNum
     *            起始页数
     * @param pageSize
     *            每页大小
     * @param sqlMapClientTemplate
     *            iBatis的sqlMapClientTemplate对象
     */
    public PagingList(String statementName, int pageNum, int pageSize,
            SqlMapClientTemplate sqlMapClientTemplate, JdbcTemplate jdbcTemplate) {
        preProcessParams(pageNum, pageSize);
        execute(statementName, pageNum, pageSize, sqlMapClientTemplate,
                jdbcTemplate);
    }

    /**
     * 执行方法
     *
     * @param statementName
     * @param parameterObject
     * @param pageNum
     * @param pageSize
     * @param sqlMapClientTemplate
     */
    public void execute(String statementName, Object parameterObject,
            int pageNum, int pageSize,
            SqlMapClientTemplate sqlMapClientTemplate, JdbcTemplate jdbcTemplate) {
        // 计算记录总数
        this.rowCount = jdbcTemplate.queryForInt(
                getCountSql(getSrcSql(statementName, parameterObject,
                        sqlMapClientTemplate)), ((HashMap) parameterObject)
                        .values().toArray());
        System.out.println(rowCount);
        // 计算分页数及起止记录
        countPage();
        // 获取分页列表
        this.list = sqlMapClientTemplate.queryForList(statementName,
                parameterObject, (pageNum - 1) * pageSize, pageSize);
    }

    /**
     * 执行方法
     *
     * @param statementName
     * @param pageNum
     * @param pageSize
     * @param sqlMapClientTemplate
     */
    public void execute(String statementName, int pageNum, int pageSize,
            SqlMapClientTemplate sqlMapClientTemplate, JdbcTemplate jdbcTemplate) {
        // 计算记录总数
        this.rowCount = jdbcTemplate.queryForInt(getCountSql(getSrcSql(
                statementName, null, sqlMapClientTemplate)));
        System.out.println(rowCount);
        // 计算分页数及起止记录
        countPage();
        // 获取分页列表
        this.list = sqlMapClientTemplate.queryForList(statementName,
                (pageNum - 1) * pageSize, pageSize);
    }

    /**
     * 预处理SQL语句和页面参数
     */
    private void preProcessParams(int pageNum, int pageSize) {
        if (pageNum > 0) {
            this.pageNum = pageNum;
        }
        if (pageSize > 0) {
            this.pageSize = pageSize;
        }
        if (pageSize > 1000) {
            this.pageSize = 1000;
        }
    }

    /**
     * 计算分页数及起止记录
     */
    private void countPage() {
        // 计算分页总数
        if ((rowCount % pageSize) == 0) {
            pageCount = rowCount / pageSize;
        } else {
            pageCount = rowCount / pageSize + 1;
        }
        if (pageCount == 0) {
            pageCount = 1;
        }
        // 判断pageNum是否过界
        if (pageNum > pageCount && rowCount != 0) {
            pageNum = pageCount;
        }
        // 计算起止记录
        startIndex = (pageNum - 1) * pageSize + 1;
        endIndex = (pageNum) * pageSize;
    }

    /**
     * 获得对象列表
     */
    public List getList() {
        return list;
    }

    /* 获得起始记录数 */
    public int getStartIndex() {
        return startIndex;
    }

    public Integer getStartIndexInteger() {
        return new Integer(startIndex);
    }

    /* 获得结束记录数 */
    public int getEndIndex() {
        return endIndex;
    }

    public Integer getEndIndexInteger() {
        return new Integer(endIndex);
    }

    /* 获得分页其它信息 */
    public int getPageCount() {
        return pageCount;
    }

    public int getPageNum() {
        return pageNum;
    }

    public int getPageSize() {
        return pageSize;
    }

    public int getRowCount() {
        return rowCount;
    }

    private String getSrcSql(String statementName, Object parameterObject,
            SqlMapClientTemplate sqlMapClientTemplate) {
        SqlMapClientImpl sqlMapClientImpl = (SqlMapClientImpl) sqlMapClientTemplate
                .getSqlMapClient();
        MappedStatement mappedStatement = sqlMapClientImpl
                .getMappedStatement(statementName);
        Sql sql = mappedStatement.getSql();
        StatementScope statementScope = new StatementScope(new SessionScope());
        String srcSql = sql.getSql(statementScope, parameterObject);
        return srcSql;
    }

    private String getCountSql(String srcSql) {
        return "SELECT COUNT(*) FROM ( " + srcSql + " ) CTBL_";
    }

}
package org.ourpioneer.service;
import org.ourpioneer.bean.PagingList;
import org.springframework.orm.ibatis.SqlMapClientTemplate;
import com.opensymphony.xwork2.ActionContext;
import com.opensymphony.xwork2.util.ValueStack;
public class BaseService {
    private JdbcTemplate jdbcTemplate;

    public void setJdbcTemplate(JdbcTemplate jdbcTemplate) {
        this.jdbcTemplate = jdbcTemplate;
    }

    /**
     * 获取ValueStack
     *
     * @return ValueStack对象
     */
    public ValueStack getValueStack() {
        return ActionContext.getContext().getValueStack();
    }

    /**
     * 获取分页的List
     *
     * @param statementName
     * @param sqlMapClientTemplate
     * @return
     */
    public PagingList getPagingList(String statementName,
            SqlMapClientTemplate sqlMapClientTemplate) {
        int pageNum = ((Integer) getValueStack().findValue("pageNum"))
                .intValue();
        int pageSize = ((Integer) getValueStack().findValue("pageSize"))
                .intValue();
        return new PagingList(statementName, pageNum, pageSize,
                sqlMapClientTemplate, jdbcTemplate);
    }

    /**
     * 获取分页的List
     *
     * @param statementName
     * @param parameterObject
     * @param sqlMapClientTemplate
     * @return
     */
    public PagingList getPagingList(String statementName,
            Object parameterObject, SqlMapClientTemplate sqlMapClientTemplate) {
        int pageNum = ((Integer) getValueStack().findValue("pageNum"))
                .intValue();
        int pageSize = ((Integer) getValueStack().findValue("pageSize"))
                .intValue();
        return new PagingList(statementName, parameterObject, pageNum,
                pageSize, sqlMapClientTemplate, jdbcTemplate);
    }
}
package org.ourpioneer.action;
import java.util.Map;
import javax.servlet.http.HttpServletRequest;
import org.apache.struts2.ServletActionContext;
import org.ourpioneer.util.QueryUtil;
import com.opensymphony.xwork2.ActionContext;
import com.opensymphony.xwork2.ActionSupport;
public class BaseAction extends ActionSupport {
    @Override
    public String execute() throws Exception {
        return SUCCESS;
    }
    public Map<String, Object> getParameters() {
        return ActionContext.getContext().getParameters();
    }
    public HttpServletRequest getRequest() {
        return ServletActionContext.getRequest();
    }
    /* 分页信息 */
    protected int pageNum = 1;
    protected int pageSize = 10;
    public int getPageNum() {
        return pageNum;
    }
    public void setPageNum(int pageNum) {
        this.pageNum = pageNum;
    }
    public int getPageSize() {
        return pageSize;
    }
    public void setPageSize(int pageSize) {
        this.pageSize = pageSize;
    }
    public int getMaxPageSize() {
        return 1000;
    }
    public int getDefaultPageSize() {
        return 10;
    }
    // 页面解析分页信息使用的方法
    public String getQueryStringWithoutPageNum() {
        Map<String, Object> m = getParameters();
        m.remove("pageNum");
        return QueryUtil.getQueryString(m);
    }
    public String getFullUrlWithoutPageNum() {
        return getRequest().getServletPath() + "?"
                + getQueryStringWithoutPageNum();
    }
    public String getQueryStringWithoutPageInfo() {
        Map<String, Object> m = getParameters();
        m.remove("pageNum");
        m.remove("pageSize");
        return QueryUtil.getQueryString(m);
    }
    public String getFullUrlWithoutPageInfo() {
        return getRequest().getServletPath() + "?"
                + getQueryStringWithoutPageInfo();
    }
}
package org.ourpioneer.action;
import org.ourpioneer.bean.PagingList;
import org.ourpioneer.service.UserService;
public class UserAction extends BaseAction {
    private UserService userService;
    public PagingList userList;
    public void setUserService(UserService userService) {
        this.userService = userService;
    }
    public PagingList getUserList() {
        return userList;
    }
    public String list() {
        userList = userService.getAllUsers();
        return "list";
    }
}
<#-- 处理分页参数 -->
<#function getPageUrl pageNum>
<#local pageUrl=base+fullUrlWithoutPageInfo>
<#if pageUrl?ends_with("?")>
<#return pageUrl + "pageSize=" + pageSize + "&pageNum=" + pageNum>
<#else>
<#return pageUrl + "&pageSize=" + pageSize + "&pageNum=" + pageNum>
</#if>
</#function>
<#-- 全部或分页显示 -->
<#function getPageUrlResize size>
<#local pageUrl=base+fullUrlWithoutPageInfo>
<#if pageUrl?ends_with("?")>
<#return pageUrl + "pageNum=1&pageSize=" + size>
<#else>
<#return pageUrl + "&pageNum=1&pageSize=" + size>
</#if>
</#function>
<#-- 分页信息 -->
<#macro paging pagingList>
<#local pageCount=pagingList.pageCount>
<#local rowCount=pagingList.rowCount>
<#local pageNum=pagingList.pageNum>
<#local pageSize=pagingList.pageSize>
<#if rowCount == 0>
<#if useFlag?exists>
<div style="border:1px solid #666;padding:2 5 2 5;background:#efefef;color:#333">没有相关记录</div>
<#else>
<#assign useFlag = 1>
</#if>
<#else>
<table>
<tr>
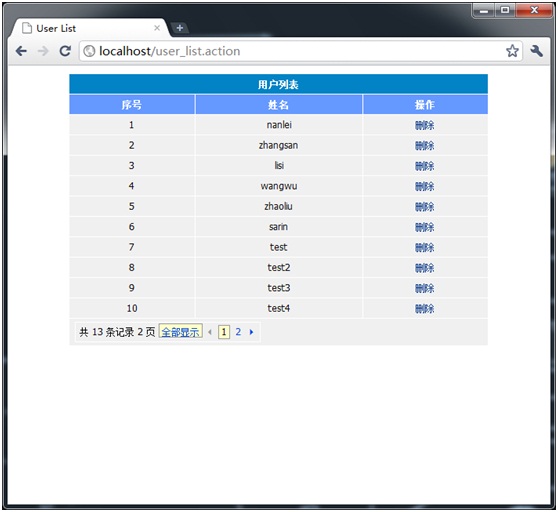
<td style="line-height:150%">共 ${rowCount} 条记录 ${pageCount} 页
<#if pageCount gt 1 && pageSize!=maxPageSize>
<span class="selectedPage" style="padding:2px 3px 0 3px"><a class="page" href="${getPageUrlResize(maxPageSize)}">全部显示</a></span>
<#elseif pageSize==maxPageSize>
<span class="selectedPage" style="padding:2px 3px 0 3px"><a class="page" href="${getPageUrlResize(defaultPageSize)}">分页显示</a></span>
</#if>
<#if (pageCount <= 11)>
<#local startPage = 1>
<#local endPage = pageCount>
<#elseif (pageNum + 5 > pageCount)>
<#local startPage = pageCount - 10>
<#local endPage = pageCount>
<#elseif (pageNum - 5 < 1)>
<#local startPage = 1>
<#local endPage = 11>
<#else>
<#local startPage = pageNum - 5>
<#local endPage = pageNum + 5>
</#if>
<#if (pageCount > 1)>
<#if (pageNum != 1)>
<#if (pageCount > 11)>
<a class="page" href="${getPageUrl(1)}" style="font-family:Webdings" title="首页">9</a>
</#if>
<a class="page" href="${getPageUrl(pageNum-1)}" style="font-family:Webdings" title="上页">3</a>
<#else>
<#if (pageCount > 11)>
<span style="font-family:Webdings;color:#999">9</span>
</#if>
<span style="font-family:Webdings;color:#999">3</span>
</#if>
<#list startPage..endPage as x>
<#if x=pageNum>
<span class="selectedPage">${x}</span>
<#else>
<span class="noSelectedPage"><a class="page" href="${getPageUrl(x)}">${x}</a></span>
</#if>
</#list>
<#if (pageCount != pageNum)>
<a class="page" href="${getPageUrl(pageNum+1)}" style="font-family:Webdings" title="下页">4</a>
<#if (pageCount > 11)>
<a class="page" href="${getPageUrl(pageCount)}" style="font-family:Webdings" title="尾页">:</a>
</#if>
<#else>
<span style="font-family:Webdings;color:#999">4</span>
<#if (pageCount > 11)>
<span style="font-family:Webdings;color:#999">:</span>
</#if>
</#if>
</#if>
</td>
</tr>
</table>
</#if>
</#macro>
本文系作者本人的实践探索,方案可能不是最佳实践,希望和大家交流沟通。
以上内容是否对您有帮助:


更多建议: