
 免费 AI IDE

FastAPI教程 使用密码和 Bearer 的简单 OAuth2
现在让我们接着上一章继续开发,并添加缺少的部分以实现一个完整的安全性流程。
获取 username 和 password
我们将使用 FastAPI 的安全性实用工具来获取 username 和 password。
OAuth2 规定在使用(我们打算用的)「password 流程」时,客户端/用户必须将 username 和 password 字段作为表单数据发送。
而且规范明确了字段必须这样命名。因此 user-name 或 email 是行不通的。
不过不用担心,你可以在前端按照你的想法将它展示给最终用户。
而且你的数据库模型也可以使用你想用的任何其他名称。
但是对于登录路径操作,我们需要使用这些名称来与规范兼容(以具备例如使用集成的 API 文档系统的能力)。
规范还写明了 username 和 password 必须作为表单数据发送(因此,此处不能使用 JSON)。
scope
规范还提到客户端可以发送另一个表单字段「scope」。
这个表单字段的名称为 scope(单数形式),但实际上它是一个由空格分隔的「作用域」组成的长字符串。
每个「作用域」只是一个字符串(中间没有空格)。
它们通常用于声明特定的安全权限,例如:
- users:read 或者 users:write 是常见的例子。
- Facebook / Instagram 使用 instagram_basic。
- Google 使用了 https://www.googleapis.com/auth/drive 。
Info
在 OAuth2 中「作用域」只是一个声明所需特定权限的字符串。
它有没有 : 这样的其他字符或者是不是 URL 都没有关系。
这些细节是具体的实现。
对 OAuth2 来说它们就只是字符串而已。
获取 username 和 password 的代码
现在,让我们使用 FastAPI 提供的实用工具来处理此问题。
OAuth2PasswordRequestForm
首先,导入 OAuth2PasswordRequestForm,然后在 token 的路径操作中通过 Depends 将其作为依赖项使用。
from typing import Optional

from fastapi import Depends, FastAPI, HTTPException, status
from fastapi.security import OAuth2PasswordBearer, OAuth2PasswordRequestForm
from pydantic import BaseModel

fake_users_db = {
    "johndoe": {
        "username": "johndoe",
        "full_name": "John Doe",
        "email": "johndoe@example.com",
        "hashed_password": "fakehashedsecret",
        "disabled": False,
    },
    "alice": {
        "username": "alice",
        "full_name": "Alice Wonderson",
        "email": "alice@example.com",
        "hashed_password": "fakehashedsecret2",
        "disabled": True,
    },
}

app = FastAPI()


def fake_hash_password(password: str):
    return "fakehashed" + password


oauth2_scheme = OAuth2PasswordBearer(tokenUrl="token")


class User(BaseModel):
    username: str
    email: Optional[str] = None
    full_name: Optional[str] = None
    disabled: Optional[bool] = None


class UserInDB(User):
    hashed_password: str


def get_user(db, username: str):
    if username in db:
        user_dict = db[username]
        return UserInDB(**user_dict)


def fake_decode_token(token):
    # This doesn't provide any security at all
    # Check the next version
    user = get_user(fake_users_db, token)
    return user


async def get_current_user(token: str = Depends(oauth2_scheme)):
    user = fake_decode_token(token)
    if not user:
        raise HTTPException(
            status_code=status.HTTP_401_UNAUTHORIZED,
            detail="Invalid authentication credentials",
            headers={"WWW-Authenticate": "Bearer"},
        )
    return user


async def get_current_active_user(current_user: User = Depends(get_current_user)):
    if current_user.disabled:
        raise HTTPException(status_code=400, detail="Inactive user")
    return current_user


@app.post("/token")
async def login(form_data: OAuth2PasswordRequestForm = Depends()):
    user_dict = fake_users_db.get(form_data.username)
    if not user_dict:
        raise HTTPException(status_code=400, detail="Incorrect username or password")
    user = UserInDB(**user_dict)
    hashed_password = fake_hash_password(form_data.password)
    if not hashed_password == user.hashed_password:
        raise HTTPException(status_code=400, detail="Incorrect username or password")

    return {"access_token": user.username, "token_type": "bearer"}


@app.get("/users/me")
async def read_users_me(current_user: User = Depends(get_current_active_user)):
    return current_user
OAuth2PasswordRequestForm 是一个类依赖项,声明了如下的请求表单:
- username。
- password。
- 一个可选的 scope 字段,是一个由空格分隔的字符串组成的大字符串。
- 一个可选的 grant_type.
Tip
OAuth2 规范实际上要求 grant_type 字段使用一个固定的值 password,但是 OAuth2PasswordRequestForm 没有作强制约束。
如果你需要强制要求这一点,请使用 OAuth2PasswordRequestFormStrict 而不是 OAuth2PasswordRequestForm。
- 一个可选的 client_id(我们的示例不需要它)。
- 一个可选的 client_secret(我们的示例不需要它)。
Info
OAuth2PasswordRequestForm 并不像 OAuth2PasswordBearer 一样是 FastAPI 的一个特殊的类。
OAuth2PasswordBearer 使得 FastAPI 明白它是一个安全方案。所以它得以通过这种方式添加到 OpenAPI 中。
但 OAuth2PasswordRequestForm 只是一个你可以自己编写的类依赖项,或者你也可以直接声明 Form 参数。
但是由于这是一种常见的使用场景,因此 FastAPI 出于简便直接提供了它。
使用表单数据
Tip
类依赖项 OAuth2PasswordRequestForm 的实例不会有用空格分隔的长字符串属性 scope,而是具有一个 scopes 属性,该属性将包含实际被发送的每个作用域字符串组成的列表。
在此示例中我们没有使用 scopes,但如果你需要的话可以使用该功能。
现在,使用表单字段中的 username 从(伪)数据库中获取用户数据。
如果没有这个用户,我们将返回一个错误消息,提示「用户名或密码错误」。
对于这个错误,我们使用 HTTPException 异常:
from typing import Optional

from fastapi import Depends, FastAPI, HTTPException, status
from fastapi.security import OAuth2PasswordBearer, OAuth2PasswordRequestForm
from pydantic import BaseModel

fake_users_db = {
    "johndoe": {
        "username": "johndoe",
        "full_name": "John Doe",
        "email": "johndoe@example.com",
        "hashed_password": "fakehashedsecret",
        "disabled": False,
    },
    "alice": {
        "username": "alice",
        "full_name": "Alice Wonderson",
        "email": "alice@example.com",
        "hashed_password": "fakehashedsecret2",
        "disabled": True,
    },
}

app = FastAPI()


def fake_hash_password(password: str):
    return "fakehashed" + password


oauth2_scheme = OAuth2PasswordBearer(tokenUrl="token")


class User(BaseModel):
    username: str
    email: Optional[str] = None
    full_name: Optional[str] = None
    disabled: Optional[bool] = None


class UserInDB(User):
    hashed_password: str


def get_user(db, username: str):
    if username in db:
        user_dict = db[username]
        return UserInDB(**user_dict)


def fake_decode_token(token):
    # This doesn't provide any security at all
    # Check the next version
    user = get_user(fake_users_db, token)
    return user


async def get_current_user(token: str = Depends(oauth2_scheme)):
    user = fake_decode_token(token)
    if not user:
        raise HTTPException(
            status_code=status.HTTP_401_UNAUTHORIZED,
            detail="Invalid authentication credentials",
            headers={"WWW-Authenticate": "Bearer"},
        )
    return user


async def get_current_active_user(current_user: User = Depends(get_current_user)):
    if current_user.disabled:
        raise HTTPException(status_code=400, detail="Inactive user")
    return current_user


@app.post("/token")
async def login(form_data: OAuth2PasswordRequestForm = Depends()):
    user_dict = fake_users_db.get(form_data.username)
    if not user_dict:
        raise HTTPException(status_code=400, detail="Incorrect username or password")
    user = UserInDB(**user_dict)
    hashed_password = fake_hash_password(form_data.password)
    if not hashed_password == user.hashed_password:
        raise HTTPException(status_code=400, detail="Incorrect username or password")

    return {"access_token": user.username, "token_type": "bearer"}


@app.get("/users/me")
async def read_users_me(current_user: User = Depends(get_current_active_user)):
    return current_user
校验密码
目前我们已经从数据库中获取了用户数据,但尚未校验密码。
让我们首先将这些数据放入 Pydantic UserInDB 模型中。
永远不要保存明文密码,因此,我们将使用(伪)哈希密码系统。
如果密码不匹配,我们将返回同一个错误。
哈希密码
「哈希」的意思是:将某些内容(在本例中为密码)转换为看起来像乱码的字节序列(只是一个字符串)。
每次你传入完全相同的内容(完全相同的密码)时,你都会得到完全相同的乱码。
但是你不能从乱码转换回密码。
为什么使用哈希密码
如果你的数据库被盗,小偷将无法获得用户的明文密码,只有哈希值。
因此,小偷将无法尝试在另一个系统中使用这些相同的密码(由于许多用户在任何地方都使用相同的密码,因此这很危险)。
from typing import Optional

from fastapi import Depends, FastAPI, HTTPException, status
from fastapi.security import OAuth2PasswordBearer, OAuth2PasswordRequestForm
from pydantic import BaseModel

fake_users_db = {
    "johndoe": {
        "username": "johndoe",
        "full_name": "John Doe",
        "email": "johndoe@example.com",
        "hashed_password": "fakehashedsecret",
        "disabled": False,
    },
    "alice": {
        "username": "alice",
        "full_name": "Alice Wonderson",
        "email": "alice@example.com",
        "hashed_password": "fakehashedsecret2",
        "disabled": True,
    },
}

app = FastAPI()


def fake_hash_password(password: str):
    return "fakehashed" + password


oauth2_scheme = OAuth2PasswordBearer(tokenUrl="token")


class User(BaseModel):
    username: str
    email: Optional[str] = None
    full_name: Optional[str] = None
    disabled: Optional[bool] = None


class UserInDB(User):
    hashed_password: str


def get_user(db, username: str):
    if username in db:
        user_dict = db[username]
        return UserInDB(**user_dict)


def fake_decode_token(token):
    # This doesn't provide any security at all
    # Check the next version
    user = get_user(fake_users_db, token)
    return user


async def get_current_user(token: str = Depends(oauth2_scheme)):
    user = fake_decode_token(token)
    if not user:
        raise HTTPException(
            status_code=status.HTTP_401_UNAUTHORIZED,
            detail="Invalid authentication credentials",
            headers={"WWW-Authenticate": "Bearer"},
        )
    return user


async def get_current_active_user(current_user: User = Depends(get_current_user)):
    if current_user.disabled:
        raise HTTPException(status_code=400, detail="Inactive user")
    return current_user


@app.post("/token")
async def login(form_data: OAuth2PasswordRequestForm = Depends()):
    user_dict = fake_users_db.get(form_data.username)
    if not user_dict:
        raise HTTPException(status_code=400, detail="Incorrect username or password")
    user = UserInDB(**user_dict)
    hashed_password = fake_hash_password(form_data.password)
    if not hashed_password == user.hashed_password:
        raise HTTPException(status_code=400, detail="Incorrect username or password")

    return {"access_token": user.username, "token_type": "bearer"}


@app.get("/users/me")
async def read_users_me(current_user: User = Depends(get_current_active_user)):
    return current_user
关于 **user_dict
UserInDB(**user_dict) 表示:
直接将 user_dict 的键和值作为关键字参数传递,等同于:
UserInDB(
    username = user_dict["username"],
    email = user_dict["email"],
    full_name = user_dict["full_name"],
    disabled = user_dict["disabled"],
    hashed_password = user_dict["hashed_password"],
)
Info
有关 user_dict 的更完整说明,请参阅额外的模型文档。
返回令牌
token 端点的响应必须是一个 JSON 对象。
它应该有一个 token_type。在我们的例子中,由于我们使用的是「Bearer」令牌,因此令牌类型应为「bearer」。
并且还应该有一个 access_token 字段,它是一个包含我们的访问令牌的字符串。
对于这个简单的示例,我们将极其不安全地返回相同的 username 作为令牌。
Tip
在下一章中,你将看到一个真实的安全实现,使用了哈希密码和 JWT 令牌。
但现在,让我们仅关注我们需要的特定细节。
from typing import Optional

from fastapi import Depends, FastAPI, HTTPException, status
from fastapi.security import OAuth2PasswordBearer, OAuth2PasswordRequestForm
from pydantic import BaseModel

fake_users_db = {
    "johndoe": {
        "username": "johndoe",
        "full_name": "John Doe",
        "email": "johndoe@example.com",
        "hashed_password": "fakehashedsecret",
        "disabled": False,
    },
    "alice": {
        "username": "alice",
        "full_name": "Alice Wonderson",
        "email": "alice@example.com",
        "hashed_password": "fakehashedsecret2",
        "disabled": True,
    },
}

app = FastAPI()


def fake_hash_password(password: str):
    return "fakehashed" + password


oauth2_scheme = OAuth2PasswordBearer(tokenUrl="token")


class User(BaseModel):
    username: str
    email: Optional[str] = None
    full_name: Optional[str] = None
    disabled: Optional[bool] = None


class UserInDB(User):
    hashed_password: str


def get_user(db, username: str):
    if username in db:
        user_dict = db[username]
        return UserInDB(**user_dict)


def fake_decode_token(token):
    # This doesn't provide any security at all
    # Check the next version
    user = get_user(fake_users_db, token)
    return user


async def get_current_user(token: str = Depends(oauth2_scheme)):
    user = fake_decode_token(token)
    if not user:
        raise HTTPException(
            status_code=status.HTTP_401_UNAUTHORIZED,
            detail="Invalid authentication credentials",
            headers={"WWW-Authenticate": "Bearer"},
        )
    return user


async def get_current_active_user(current_user: User = Depends(get_current_user)):
    if current_user.disabled:
        raise HTTPException(status_code=400, detail="Inactive user")
    return current_user


@app.post("/token")
async def login(form_data: OAuth2PasswordRequestForm = Depends()):
    user_dict = fake_users_db.get(form_data.username)
    if not user_dict:
        raise HTTPException(status_code=400, detail="Incorrect username or password")
    user = UserInDB(**user_dict)
    hashed_password = fake_hash_password(form_data.password)
    if not hashed_password == user.hashed_password:
        raise HTTPException(status_code=400, detail="Incorrect username or password")

    return {"access_token": user.username, "token_type": "bearer"}


@app.get("/users/me")
async def read_users_me(current_user: User = Depends(get_current_active_user)):
    return current_user
Tip
根据规范,你应该像本示例一样,返回一个带有 access_token 和 token_type 的 JSON。
这是你必须在代码中自行完成的工作,并且要确保使用了这些 JSON 字段。
这几乎是唯一的你需要自己记住并正确地执行以符合规范的事情。
其余的,FastAPI 都会为你处理。
更新依赖项
现在我们将更新我们的依赖项。
我们想要仅当此用户处于启用状态时才能获取 current_user。
因此,我们创建了一个额外的依赖项 get_current_active_user,而该依赖项又以 get_current_user 作为依赖项。
如果用户不存在或处于未启用状态,则这两个依赖项都将仅返回 HTTP 错误。
因此,在我们的端点中,只有当用户存在,身份认证通过且处于启用状态时,我们才能获得该用户:
from typing import Optional

from fastapi import Depends, FastAPI, HTTPException, status
from fastapi.security import OAuth2PasswordBearer, OAuth2PasswordRequestForm
from pydantic import BaseModel

fake_users_db = {
    "johndoe": {
        "username": "johndoe",
        "full_name": "John Doe",
        "email": "johndoe@example.com",
        "hashed_password": "fakehashedsecret",
        "disabled": False,
    },
    "alice": {
        "username": "alice",
        "full_name": "Alice Wonderson",
        "email": "alice@example.com",
        "hashed_password": "fakehashedsecret2",
        "disabled": True,
    },
}

app = FastAPI()


def fake_hash_password(password: str):
    return "fakehashed" + password


oauth2_scheme = OAuth2PasswordBearer(tokenUrl="token")


class User(BaseModel):
    username: str
    email: Optional[str] = None
    full_name: Optional[str] = None
    disabled: Optional[bool] = None


class UserInDB(User):
    hashed_password: str


def get_user(db, username: str):
    if username in db:
        user_dict = db[username]
        return UserInDB(**user_dict)


def fake_decode_token(token):
    # This doesn't provide any security at all
    # Check the next version
    user = get_user(fake_users_db, token)
    return user


async def get_current_user(token: str = Depends(oauth2_scheme)):
    user = fake_decode_token(token)
    if not user:
        raise HTTPException(
            status_code=status.HTTP_401_UNAUTHORIZED,
            detail="Invalid authentication credentials",
            headers={"WWW-Authenticate": "Bearer"},
        )
    return user


async def get_current_active_user(current_user: User = Depends(get_current_user)):
    if current_user.disabled:
        raise HTTPException(status_code=400, detail="Inactive user")
    return current_user


@app.post("/token")
async def login(form_data: OAuth2PasswordRequestForm = Depends()):
    user_dict = fake_users_db.get(form_data.username)
    if not user_dict:
        raise HTTPException(status_code=400, detail="Incorrect username or password")
    user = UserInDB(**user_dict)
    hashed_password = fake_hash_password(form_data.password)
    if not hashed_password == user.hashed_password:
        raise HTTPException(status_code=400, detail="Incorrect username or password")

    return {"access_token": user.username, "token_type": "bearer"}


@app.get("/users/me")
async def read_users_me(current_user: User = Depends(get_current_active_user)):
    return current_user
Info
我们在此处返回的值为 Bearer 的额外响应头 WWW-Authenticate 也是规范的一部分。
任何的 401「未认证」HTTP(错误)状态码都应该返回 WWW-Authenticate 响应头。
对于 bearer 令牌(我们的例子),该响应头的值应为 Bearer。
实际上你可以忽略这个额外的响应头,不会有什么问题。
但此处提供了它以符合规范。
而且,(现在或将来)可能会有工具期望得到并使用它,然后对你或你的用户有用处。
这就是遵循标准的好处...
实际效果
打开交互式文档:http://127.0.0.1:8000/docs。
身份认证
点击「Authorize」按钮。
使用以下凭证:
用户名:johndoe
密码:secret
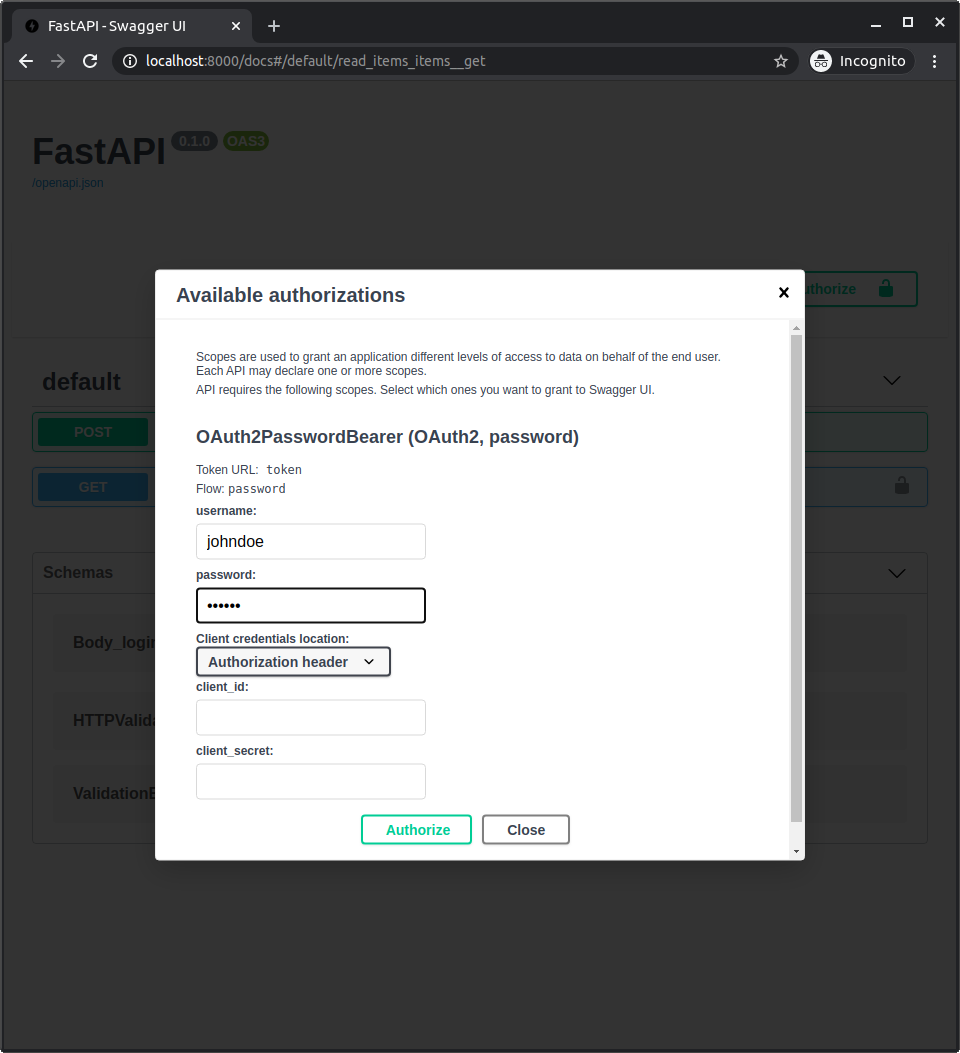
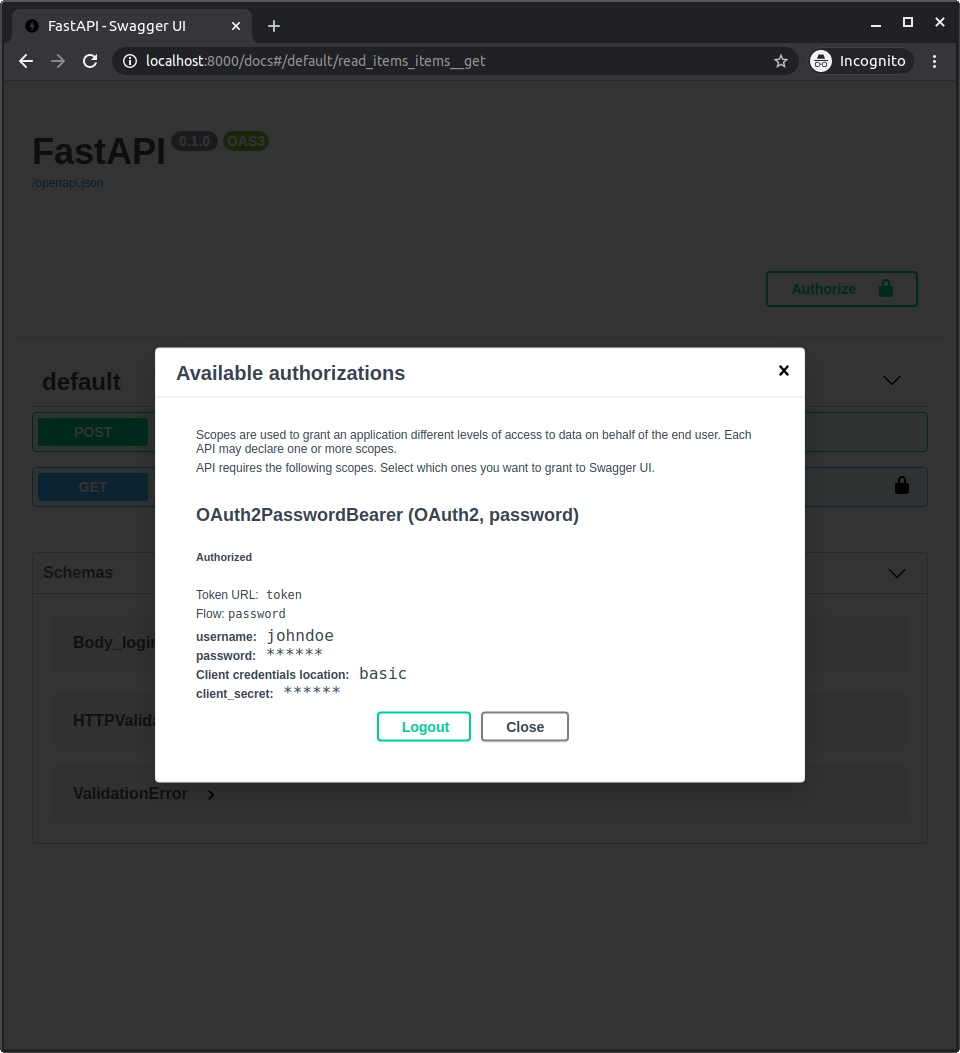
在系统中进行身份认证后,你将看到:
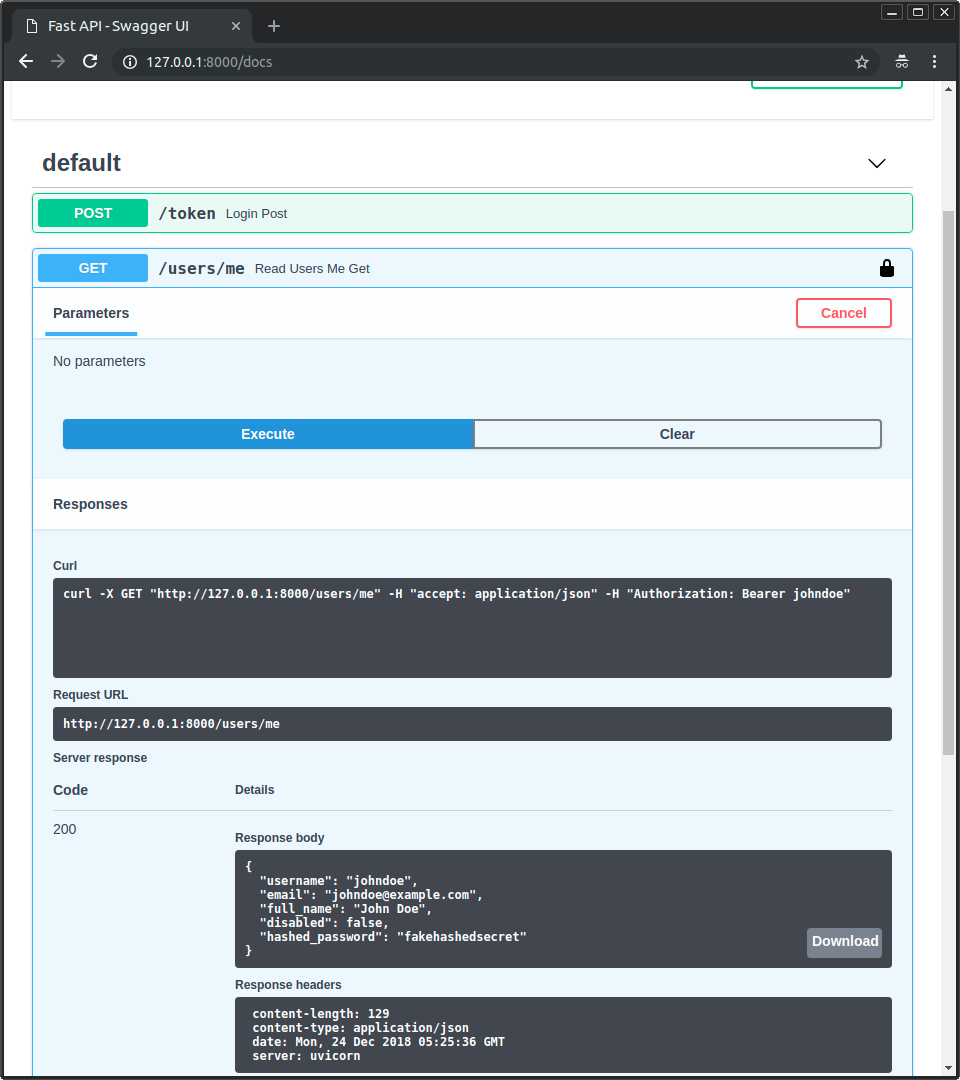
获取本人的用户数据
现在执行 /users/me 路径的 GET 操作。
你将获得你的用户数据,如:
{
  "username": "johndoe",
  "email": "johndoe@example.com",
  "full_name": "John Doe",
  "disabled": false,
  "hashed_password": "fakehashedsecret"
}
如果你点击锁定图标并注销,然后再次尝试同一操作,则会得到 HTTP 401 错误:
{
  "detail": "Not authenticated"
}
未启用的用户
现在尝试使用未启用的用户,并通过以下方式进行身份认证:
用户名:alice
密码:secret2
然后尝试执行 /users/me 路径的 GET 操作。
你将得到一个「未启用的用户」错误,如:
{
  "detail": "Inactive user"
}
总结
现在你掌握了为你的 API 实现一个基于 username 和 password 的完整安全系统的工具。
使用这些工具,你可以使安全系统与任何数据库以及任何用户或数据模型兼容。
唯一缺少的细节是它实际上还并不「安全」。
在下一章中,你将看到如何使用一个安全的哈希密码库和 JWT 令牌。


更多建议: