
 免费 AI IDE

Ansible 用 Docker Compose 练习 Ansible
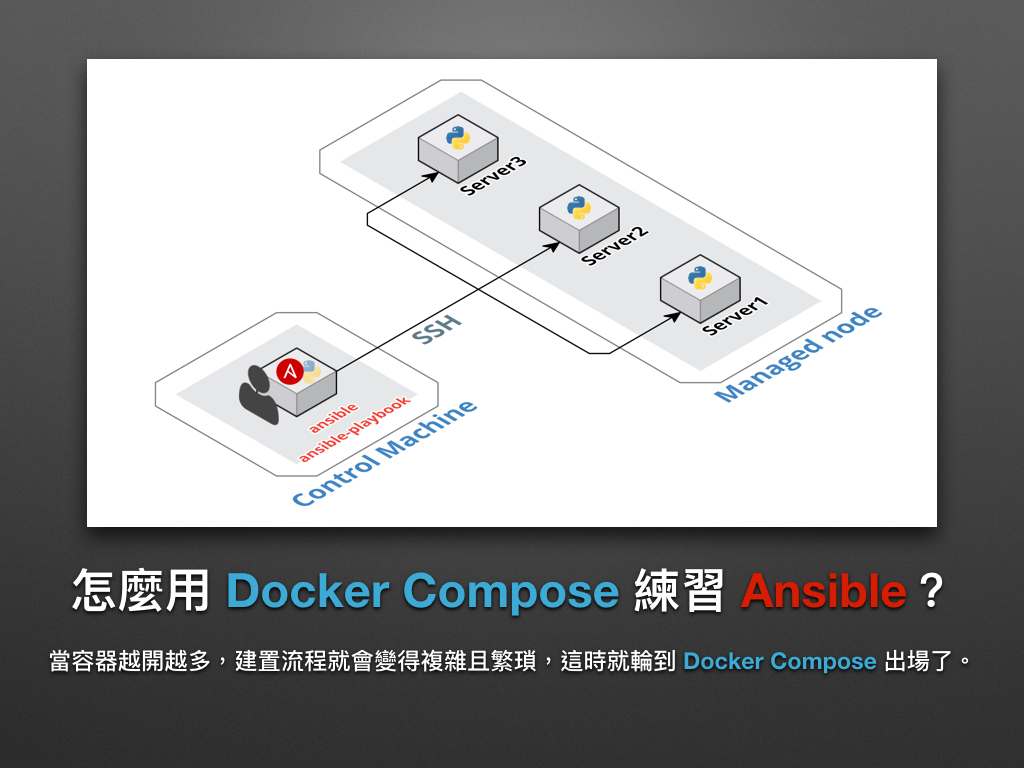
在前一章「Ansible 用 Jupyter 操控 Ansible (Managed node)」我们借由 Docker 实作用 Control Machine 和 Managed node 的环境。虽看似完美,可当容器一多就会让建置环境的流程变得复杂且繁琐,这次冻仁将改用 Docker Compose 来简化练习 Ansible 的步骤。
Docker Compose 是什么?
Docker Compose 是个用来定义和执行复杂 Docker 应用程序的工具,它就好比 Shell Script 和 Ansible Playbooks,通过事先撰写好的 docker-compose.yml 来批次管理 Docker 容器。
官网简介如下:
Docker Compose allows you to define your multi-container application with all of its dependencies in a single file, then spin your application up in a single command.
若想深入了解 Docker Compose,可参考以下文章:
怎么用 Docker Compose 管理容器?
底下只列出本次主题所会用到的相关指令,练习时只需执行步骤 1, 2 即可。
建立并执行容器。
$ docker-compose up观看容器状态和绑定的埠口 (Port)。
$ docker-compose ps停止容器。
$ docker-compose stop启用容器。
$ docker-compose start移除容器:再移除之前得先停用容器后才可移除。
$ docker-compose rm -f

# -f, --force: Don't ask to confirm removal
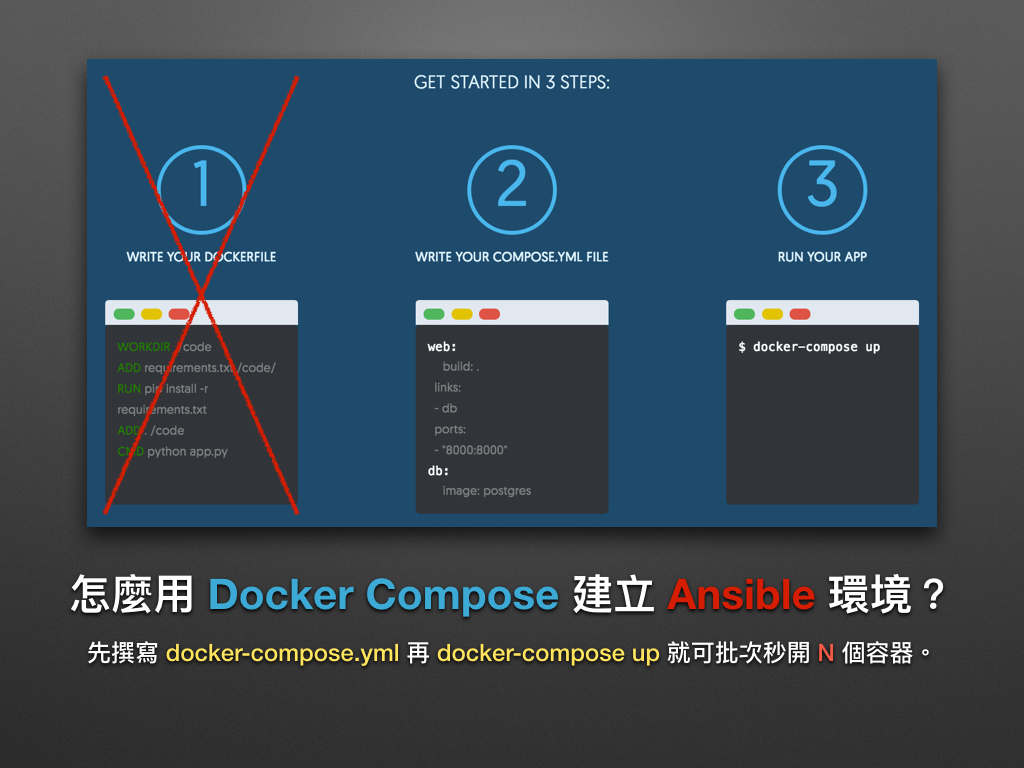
怎么用 Docker Compose 建立 Ansible 环境?
上一章我们开了 3 个 Docker 容器来实作 Control Machine (Jupyter, Ansible) + Managed node (CentOS 7, Ubuntu 14.04) 的环境,这次就再加一个 Debian 8 的 Managed node,并命名为 server3。
图片来源: https://www.docker.com/products/docker-compose
建立 docker-compose.yml
这次冻仁挑了 chusiang/ansible-jupyter:alpine-3.4 的 Docker image 作為 Control Machine,而新加入的 Managed node 则是 chusiang/ansible-managed-node:debian-8。
$ vi docker-compose.yml
version: '2'
services:

  control_machine:
    ports:
      - 8888:8888/tcp
    image: chusiang/ansible-jupyter:alpine-3.4

  server1:
    ports:
      - 2221:22/tcp
    image: chusiang/ansible-managed-node:ubuntu-14.04

  server2:
    ports:
      - 2223:22/tcp
    image: chusiang/ansible-managed-node:centos-7

  server3:
    ports:
      - 2222:22/tcp
    image: chusiang/ansible-managed-node:debian-8
启动容器
使用 docker-compose up 来批次秒开所有容器!
$ docker-compose up
Starting ch09_server2_1
Starting ch09_server1_1
Starting ch09_server3_1
Creating ch09_control_machine_1
Attaching to ch09_server3_1, ch09_server1_1, ch09_server2_1, ch09_control_machine_1
control_machine_1  | [I 22:29:59.156 NotebookApp] Writing notebook server cookie secret to /root/.local/share/jupyter/runtime/notebook_cookie_secret
control_machine_1  | [I 22:29:59.208 NotebookApp] Serving notebooks from local directory: /home
control_machine_1  | [I 22:29:59.209 NotebookApp] 0 active kernels
control_machine_1  | [I 22:29:59.209 NotebookApp] The Jupyter Notebook is running at: http://0.0.0.0:8888/
control_machine_1  | [I 22:29:59.210 NotebookApp] Use Control-C to stop this server and shut down allkernels (twice to skip confirmation).
...
设定 Ansible 环境
这部份大多与前一章的 Ansible 用 Jupyter 操控 Ansible (Managed node) 重复,请特别留意 inventory档案的设置。
取得本机的 IP:冻仁取得的 IP 为
192.168.1.104,请自行修改。# GNU/Linux $ ifconfig eth0 # macOS $ ifconfig en7取得 Managed node 容器所綁定的 OpenSSH port,请特別留意
0.0.0.0:222?->22/tcp的部份。$ docker-compose ps Name Command State Ports ------------------------------------------------------------------------------------- ch09_control_machine_1 docker-entrypoint.sh jupyt ... Up 0.0.0.0:8888->8888/tcp ch09_server1_1 /usr/sbin/sshd -D Up 0.0.0.0:2221->22/tcp ch09_server2_1 /usr/sbin/sshd -D Up 0.0.0.0:2223->22/tcp ch09_server3_1 /usr/sbin/sshd -D Up 0.0.0.0:2222->22/tcp进入 Jupyter notebook 网站 (http://localhost:8888/)。
若不想通过 Jupyter 操作 Ansible,可直接进入容器里操作,但要记得切换到
/home目录底下。# 从 Host OS 进入容器。 $ docker exec -it ch09_control_machine_1 sh / # # 切换目录。 / # cd /home # 列出 /home 底下的档案。 /home # ls -1 ansible.cfg ansible_on_jupyter.ipynb inventory setup_jupyter.yml修改
inventory档案,并填入步骤 1 取得的 IP 和步骤 2 取得的 OpenSSH port。这次容器的 Port mapping 将会依照 docker-compose.yml 所定义的内容建立,不像原先得一个个的手动设定。server1 ansible_ssh_host=192.168.1.104 ansible_ssh_port=2221 server2 ansible_ssh_host=192.168.1.104 ansible_ssh_port=2222 server3 ansible_ssh_host=192.168.1.104 ansible_ssh_port=2223请勿在这个 Lab 使用 localhost 和 127.0.0.1 的位址,这会让 Control Machine 一直对自己找 Managed node。在这里我们是把 Managed node 的 OpenSSH port 绑在 Host OS 1 上,而不是 Control Machine 的容器里。
环境建置完成!现在可以到 Control Managed (Jupyter + Ansible) 上对各个 Managed node (Ubuntu 14.04, CentOS 7, Debian 8) 进行操作了。
Play Ansible
现在我们可以通过 Ansible 操控 3 个 Managed node 了,记得把 inventory 的部份从 localhost 改成 all喔!
后话
改用 Docker Compose 管理容器后,我们可以一次对所有容器进行操作,并大幅简化建置复杂 Ansible 练习环境的操作流程!
以上,希望大家会喜欢简化过的 Docker Compose 流程。:D


更多建议: