情人节的由来可以追溯到古罗马时期。
当时会举行一个叫做“Lupercalia”的节日,这个节日是为了纪念罗马神话中的牧羊神Lupercus。
在这个节日里,男性会赤膊跑到街上,用皮鞭抽打女性,以此来祈求丰收和健康。
后来,罗马天主教会将这个节日改称为“圣瓦伦丁节”,以纪念瓦伦丁大主教,他曾经禁止这种抽打女性的习俗。
现在的情人节,则是从这个节日演变而来,它是一个纪念爱情的节日。在情人节,男女方会在这一天互赠礼物(玫瑰,巧克力或者贺卡)以表达爱意或者友好。
今天我们就来看看那些浪漫的程序员们是如何表达自己的爱意的吧!
在坐标轴上画爱心
笛卡尔与心形函数的故事始于17世纪,当时笛卡尔正在研究函数的性质,他发现了一个特殊的函数,它的图像是一个心形,他称之为“心形函数”。笛卡尔把这个函数命名为“爱情函数”,以此来表达他对爱情的热爱。后来,这个函数被用来表示爱情,成为情人节的象征,也成为现代数学中的一个重要概念。
现在,我们可以在python中使用matplotlib来把这个函数画出来:
import matplotlib.pyplot as plt
import numpy as np
#生成从-1到1的以为数组作为x轴的数据
x_data1 = np.linspace(-1,1,1000)
#根据心形公式,得到y的表达式,由于有正负之分,故分开表示
y_data1 = np.sqrt(1 - x_data1**2) + pow(np.abs(x_data1),float(2)/float(3))
y_data2 = -np.sqrt(1 - x_data1**2)+ pow(np.abs(x_data1),float(2)/float(3))
#设置空图表,并把两组数据已散点图的形式画在空图表上
fig = plt.figure()
plt.scatter(x_data1, y_data1,color = 'red')
plt.scatter(x_data1, y_data2,color = 'red')
#设置坐标轴的显示范围
plt.xlim(-1.25,1.25)
plt.ylim(-1.2,1.7)
#得到坐标轴信息
ax = plt.gca()
#设置坐标轴颜色,把右边和顶部的坐标设置为没有颜色
ax.spines['right'].set_color('none')
ax.spines['top'].set_color('none')
ax.spines['bottom'].set_color('white')
ax.spines['left'].set_color('white')
#设置坐标轴的位置
ax.spines['left'].set_position(('data',0))
ax.spines['bottom'].set_position(('data',0))
#设置刻度的位置
ax.xaxis.set_ticks_position('bottom')
ax.yaxis.set_ticks_position('left')
#设置刻度的相关参数,依次包括:坐标轴名称,字体大小,字体倾斜角度,字体颜色
ax.tick_params(axis="x", labelsize=18, labelrotation=0, labelcolor="white")
ax.tick_params(axis="y", labelsize=18, labelrotation=0, labelcolor="white")
#设置坐标轴线的宽度
ax.spines['bottom'].set_linewidth(3)
ax.spines['left'].set_linewidth(3)
#设置图片的背景
ax.set_facecolor('xkcd:black')
#设置图表的长宽
fig.set_figheight(15)
fig.set_figwidth(15)
#设置
ax.grid(True, linestyle='-.')
plt.show()
#保存绘制的图形到默认的目录
#fig.savefig('heart.png', dpi=500)
代码的运行结果如下所示:

另外,关于心形函数还有3D版本,代码如下所示:
import bbox as bbox
import matplotlib.pyplot as plt
import numpy as np


def heart_3d(x, y, z):
    return (x ** 2 + (9 / 4) * y ** 2 + z ** 2 - 1) ** 3 - x ** 2 * z ** 3 - (9 / 80) * y ** 2 * z ** 3


def heart_3d_2(x, y, z):
    return (2 * x ** 2 + 2 * y ** 2 + z ** 2 - 1) ** 3 - 0.1 * x ** 2 * z ** 3 - y ** 2 * z ** 3


def plot_implicit(fn, bbox=(-1.5, 1.5)):
    xmin, xmax, ymin, ymax, zmin, zmax = bbox * 3
    fig = plt.figure()
    ax = fig.add_subplot(111, projection='3d')
    A = np.linspace(xmin, xmax, 100)
    B = np.linspace(xmin, xmax, 40)
    A1, A2 = np.meshgrid(A, A)
    for z in B:
        X, Y = A1, A2
        Z = fn(X, Y, z)
        cset = ax.contour(X, Y, Z + z, [z], zdir='z', colors=('r',))
    for y in B:
        X, Z = A1, A2
        Y = fn(X, y, Z)
        cset = ax.contour(X, Y + y, Z, [y], zdir='y', colors=('red',))
    for x in B:
        Y, Z = A1, A2
        X = fn(x, Y, Z)
        cset = ax.contour(X + x, Y, Z, [x], zdir='x', colors=('red',))
    ax.set_zlim3d(zmin, zmax)
    ax.set_xlim3d(xmin, xmax)
    ax.set_ylim3d(ymin, ymax)
    #改变视角
    ax.view_init(elev=5., azim=-76)
    # 取消坐标轴显示
    plt.axis('off')
    plt.show()


if __name__ == '__main__':
     plot_implicit(heart_3d)
运行结果如下所示:

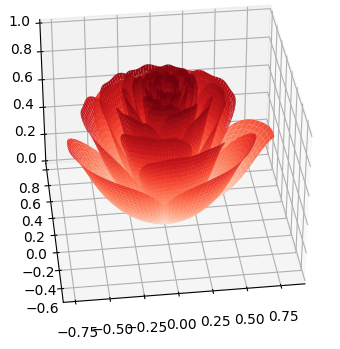
使用matplotlib绘制漂亮的花花
matplotlib不止可以用来画爱心,如果对3D建模感兴趣的,可以学一些python绘制3D花的原理,以下是使用python在matplotlib中绘制玫瑰花的代码案例:
import numpy as np
import matplotlib.pyplot as plt
from mpl_toolkits.mplot3d import Axes3D
fig = plt.figure()
ax = fig.add_subplot(projection='3d')
# 将相位向后移动了6*pi
[x, t] = np.meshgrid(np.array(range(25)) / 24.0, np.arange(0, 575.5, 0.5) / 575 * 20 * np.pi + 4*np.pi)
p = (np.pi / 2) * np.exp(-t / (8 * np.pi))
# 添加边缘扰动
change = np.sin(15*t)/150
# 将t的参数减少,使花瓣的角度变大
u = 1 - (1 - np.mod(3.3 * t, 2 * np.pi) / np.pi) ** 4 / 2 + change
y = 2 * (x ** 2 - x) ** 2 * np.sin(p)
r = u * (x * np.sin(p) + y * np.cos(p))
h = u * (x * np.cos(p) - y * np.sin(p))
c= plt.get_cmap('Reds')
surf = ax.plot_surface(r * np.cos(t), r * np.sin(t), h, rstride=1, cstride=1,
                       cmap= c, linewidth=0, antialiased=True)
plt.show()
运行结果如下所示:
使用turtle绘制图案
turtle是一个python绘图库,我们可以通过代码来控制turtle来绘制一些图形,比如一个简单的爱心或者一朵美丽的玫瑰花,爱心的绘制比较简单:
import turtle #导入turtle库
turtle.pensize(4)#设置画笔像素为4像素
turtle.pencolor("red")#设置画笔颜色为红色
turtle.fillcolor("pink")#设置填充颜色为粉红色
turtle.begin_fill()#开始填充
#开始绘制爱心
turtle.left(135)
turtle.forward(100)
turtle.circle(-50,180)#第一个半圆
turtle.left(90)
turtle.circle(-50,180)#第二个半圆
turtle.forward(100)
turtle.end_fill()#结束填充
turtle.done()
运行结果如下所示:
玫瑰花的绘制比较复杂:
from turtle import *
import time

#初始化玫瑰
#画布大小
setup(600,800,0,0)
speed(0)
penup() # 提起画笔
seth(90) #朝向90度
fd(340)  #向前移动指定的距离
seth(0)
pendown()  #放下画笔

#开始画
speed(5)      #画笔移动速度为5秒
begin_fill()  #开始填充
fillcolor('red') #为红色
circle(50,30)    #画一个半径为50,弧度为30的圆

for i in range(10):
    fd(1)
    left(10)    #逆时针转动画笔10度
circle(40,40)

for i in range(6):
    fd(1)
    left(3)
circle(80,40)

for i in range(20):
    fd(0.5)
    left(5)
circle(80,45)

for i in range(10):
    fd(2)
    left(1)
circle(80,25)

for i in range(20):
    fd(1)
    left(4)
circle(50,50)

time.sleep(0.1)

circle(120,55)

speed(3)

seth(-90)
fd(70)

right(150)   #顺时针转动画笔150度
fd(20)

left(140)
circle(140,90)

left(30)
circle(160,100)

left(130)
fd(25)

penup()
right(150)
circle(40,80)
pendown()

left(115)
fd(60)

penup()
left(180)
fd(60)
pendown()

end_fill()

right(120)
circle(-50,50)
circle(-20,90)

speed(1)
fd(75)

speed(1)
circle(90,110)

penup()
left(162)
fd(185)
left(170)
pendown()
circle(200,10)
circle(100,40)
circle(-52,115)
left(20)
circle(100,20)
circle(300,20)
speed(1)
fd(250)

penup()
speed(2)
left(180)
fd(250)
circle(-300,7)
right(80)
circle(200,5)
pendown()

left(60)
begin_fill()
fillcolor('green')
circle(-80,100)
right(90)
fd(10)
left(20)
circle(-63,127)
end_fill()

penup()
left(50)
fd(20)
left(180)

pendown()
circle(200,25)

penup()
right(150)

fd(180)

right(40)
pendown()
begin_fill()
fillcolor('green')
circle(-100,80)
right(150)
fd(10)
left(60)
circle(-80,98)
end_fill()

penup()
left(60)
fd(13)
left(180)

pendown()
speed(1)
circle(-200,23)

exitonclick() #当点击时退出
运行结果如下:

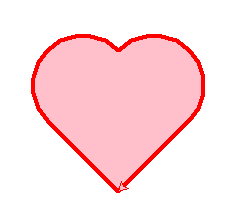
使用canvas绘制爱心
在如何使用canvas绘制李峋同款爱心?一文中,我们介绍了如何使用HTML的canvas结合JavaScript来绘制一个跳动的爱心,现在我们来重温一下这段代码:
<html lang="">
  <head>
    <meta charset="utf-8" />
    <title>爱心代码</title>
    <style>
      html, body {
        height: 100%;
        padding: 0;
        margin: 0;
        background: #000;
      }
      canvas {
        position: absolute;
        width: 100%;
        height: 100%;
      }
    </style>
  </head>
  <body>
    <canvas id="pinkboard" width="1873" height="218"></canvas>
    <script>
      var settings = {
        particles: {
          length: 500,
          duration: 2,
          velocity: 100,
          effect: -0.75,
          size: 32,
        },
      };
      (function () {
        var b = 0;
        var c = ["ms", "moz", "webkit", "o"];
        for (var a = 0; a < c.length && !window.requestAnimationFrame; ++a) {
          window.requestAnimationFrame = window[c[a] + "RequestAnimationFrame"];
          window.cancelAnimationFrame =
            window[c[a] + "CancelAnimationFrame"] ||
            window[c[a] + "CancelRequestAnimationFrame"];
        }
        if (!window.requestAnimationFrame) {
          window.requestAnimationFrame = function (h, e) {
            var d = new Date().getTime();
            var f = Math.max(0, 16 - (d - b));
            var g = window.setTimeout(function () {
              h(d + f);
            }, f);
            b = d + f;
            return g;
          };
        }
        if (!window.cancelAnimationFrame) {
          window.cancelAnimationFrame = function (d) {
            clearTimeout(d);
          };
        }
      })();

      var Point = (function () {
        function Point(x, y) {
          this.x = typeof x !== "undefined" ? x : 0;
          this.y = typeof y !== "undefined" ? y : 0;
        }
        Point.prototype.clone = function () {
          return new Point(this.x, this.y);
        };
        Point.prototype.length = function (length) {
          if (typeof length == "undefined")
            return Math.sqrt(this.x * this.x + this.y * this.y);
          this.normalize();
          this.x *= length;
          this.y *= length;
          return this;
        };
        Point.prototype.normalize = function () {
          var length = this.length();
          this.x /= length;
          this.y /= length;
          return this;
        };
        return Point;
      })();
      var Particle = (function () {
        function Particle() {
          this.position = new Point();
          this.velocity = new Point();
          this.acceleration = new Point();
          this.age = 0;
        }
        Particle.prototype.initialize = function (x, y, dx, dy) {
          this.position.x = x;
          this.position.y = y;
          this.velocity.x = dx;
          this.velocity.y = dy;
          this.acceleration.x = dx * settings.particles.effect;
          this.acceleration.y = dy * settings.particles.effect;
          this.age = 0;
        };
        Particle.prototype.update = function (deltaTime) {
          this.position.x += this.velocity.x * deltaTime;
          this.position.y += this.velocity.y * deltaTime;
          this.velocity.x += this.acceleration.x * deltaTime;
          this.velocity.y += this.acceleration.y * deltaTime;
          this.age += deltaTime;
        };
        Particle.prototype.draw = function (context, image) {
          function ease(t) {
            return --t * t * t + 1;
          }
          var size = image.width * ease(this.age / settings.particles.duration);
          context.globalAlpha = 1 - this.age / settings.particles.duration;
          context.drawImage(
            image,
            this.position.x - size / 2,
            this.position.y - size / 2,
            size,
            size
          );
        };
        return Particle;
      })();
      var ParticlePool = (function () {
        var particles,
          firstActive = 0,
          firstFree = 0,
          duration = settings.particles.duration;
        function ParticlePool(length) {
          // create and populate particle pool
          particles = new Array(length);
          for (var i = 0; i < particles.length; i++)
            particles[i] = new Particle();
        }
        ParticlePool.prototype.add = function (x, y, dx, dy) {
          particles[firstFree].initialize(x, y, dx, dy);
          // handle circular queue
          firstFree++;
          if (firstFree == particles.length) firstFree = 0;
          if (firstActive == firstFree) firstActive++;
          if (firstActive == particles.length) firstActive = 0;
        };
        ParticlePool.prototype.update = function (deltaTime) {
          var i;
          // update active particles
          if (firstActive < firstFree) {
            for (i = firstActive; i < firstFree; i++)
              particles[i].update(deltaTime);
          }
          if (firstFree < firstActive) {
            for (i = firstActive; i < particles.length; i++)
              particles[i].update(deltaTime);
            for (i = 0; i < firstFree; i++) particles[i].update(deltaTime);
          }
          // 移除非活性粒子
          while (
            particles[firstActive].age >= duration &&
            firstActive != firstFree
          ) {
            firstActive++;
            if (firstActive == particles.length) firstActive = 0;
          }
        };
        ParticlePool.prototype.draw = function (context, image) {
          // 绘制活性粒子
          if (firstActive < firstFree) {
            for (i = firstActive; i < firstFree; i++)
              particles[i].draw(context, image);
          }
          if (firstFree < firstActive) {
            for (i = firstActive; i < particles.length; i++)
              particles[i].draw(context, image);
            for (i = 0; i < firstFree; i++) particles[i].draw(context, image);
          }
        };
        return ParticlePool;
      })();
      (function (canvas) {
        var context = canvas.getContext("2d"),
          particles = new ParticlePool(settings.particles.length),
          particleRate =
            settings.particles.length / settings.particles.duration, // particles/sec
          time;
        // 用-PI<=t<=PI获得心脏点
        function pointOnHeart(t) {
          return new Point(
            160 * Math.pow(Math.sin(t), 3),
            130 * Math.cos(t) -
              50 * Math.cos(2 * t) -
              20 * Math.cos(3 * t) -
              10 * Math.cos(4 * t) +
              25
          );
        }
        // 使用虚拟画布创建粒子图像
        var image = (function () {
          var canvas = document.createElement("canvas"),
            context = canvas.getContext("2d");
          canvas.width = settings.particles.size;
          canvas.height = settings.particles.size;
          // helper函数创建路径
          function to(t) {
            var point = pointOnHeart(t);
            point.x =
              settings.particles.size / 2 +
              (point.x * settings.particles.size) / 350;
            point.y =
              settings.particles.size / 2 -
              (point.y * settings.particles.size) / 350;
            return point;
          }
          // 创建路径
          context.beginPath();
          var t = -Math.PI;
          var point = to(t);
          context.moveTo(point.x, point.y);
          while (t < Math.PI) {
            t += 0.01;
            point = to(t);
            context.lineTo(point.x, point.y);
          }
          context.closePath();
          // 创建填充
          context.fillStyle = "#ea80b0";
          context.fill();
          // 创建图像
          var image = new Image();
          image.src = canvas.toDataURL();
          return image;
        })();
        // 渲染
        function render() {
          // 下一动画帧
          requestAnimationFrame(render);
          var newTime = new Date().getTime() / 1000,
            deltaTime = newTime - (time || newTime);
          time = newTime;
          // 清除画布
          context.clearRect(0, 0, canvas.width, canvas.height);
          // 创建新粒子
          var amount = particleRate * deltaTime;
          for (var i = 0; i < amount; i++) {
            var pos = pointOnHeart(Math.PI - 2 * Math.PI * Math.random());
            var dir = pos.clone().length(settings.particles.velocity);
            particles.add(
              canvas.width / 2 + pos.x,
              canvas.height / 2 - pos.y,
              dir.x,
              -dir.y
            );
          }
          // 更新和绘制粒子
          particles.update(deltaTime);
          particles.draw(context, image);
        }
        // 处理(重新)画布的大小
        function onResize() {
          canvas.width = canvas.clientWidth;
          canvas.height = canvas.clientHeight;
        }
        window.onresize = onResize;
        //延迟渲染
        setTimeout(function () {
          onResize();
          render();
        }, 10);
      })(document.getElementById("pinkboard"));
    </script>
  </body>
</html>
他的运行结果也是比较好看的:

小结
编程的世界虽然美好,但也不要忘了在佳节陪伴佳人哦。